
The Optonet Vision Unit includes a Home Vision Therapy service that allows the professional prescribing individualized training programs for each patient, to be performed at home.
The professional can remotely control and modify the training program at any time, as well as see the patient’s progress in real time. We review its operation in this document.
Patient Selection #
First, we need to select the patient from our database (for a new patient, we need to create their record previously): from the main menu go to Patients and then click on Search Patient, which takes us to the list of patients. There choose the patient’s name and fill in the Examiner’s name, as required.
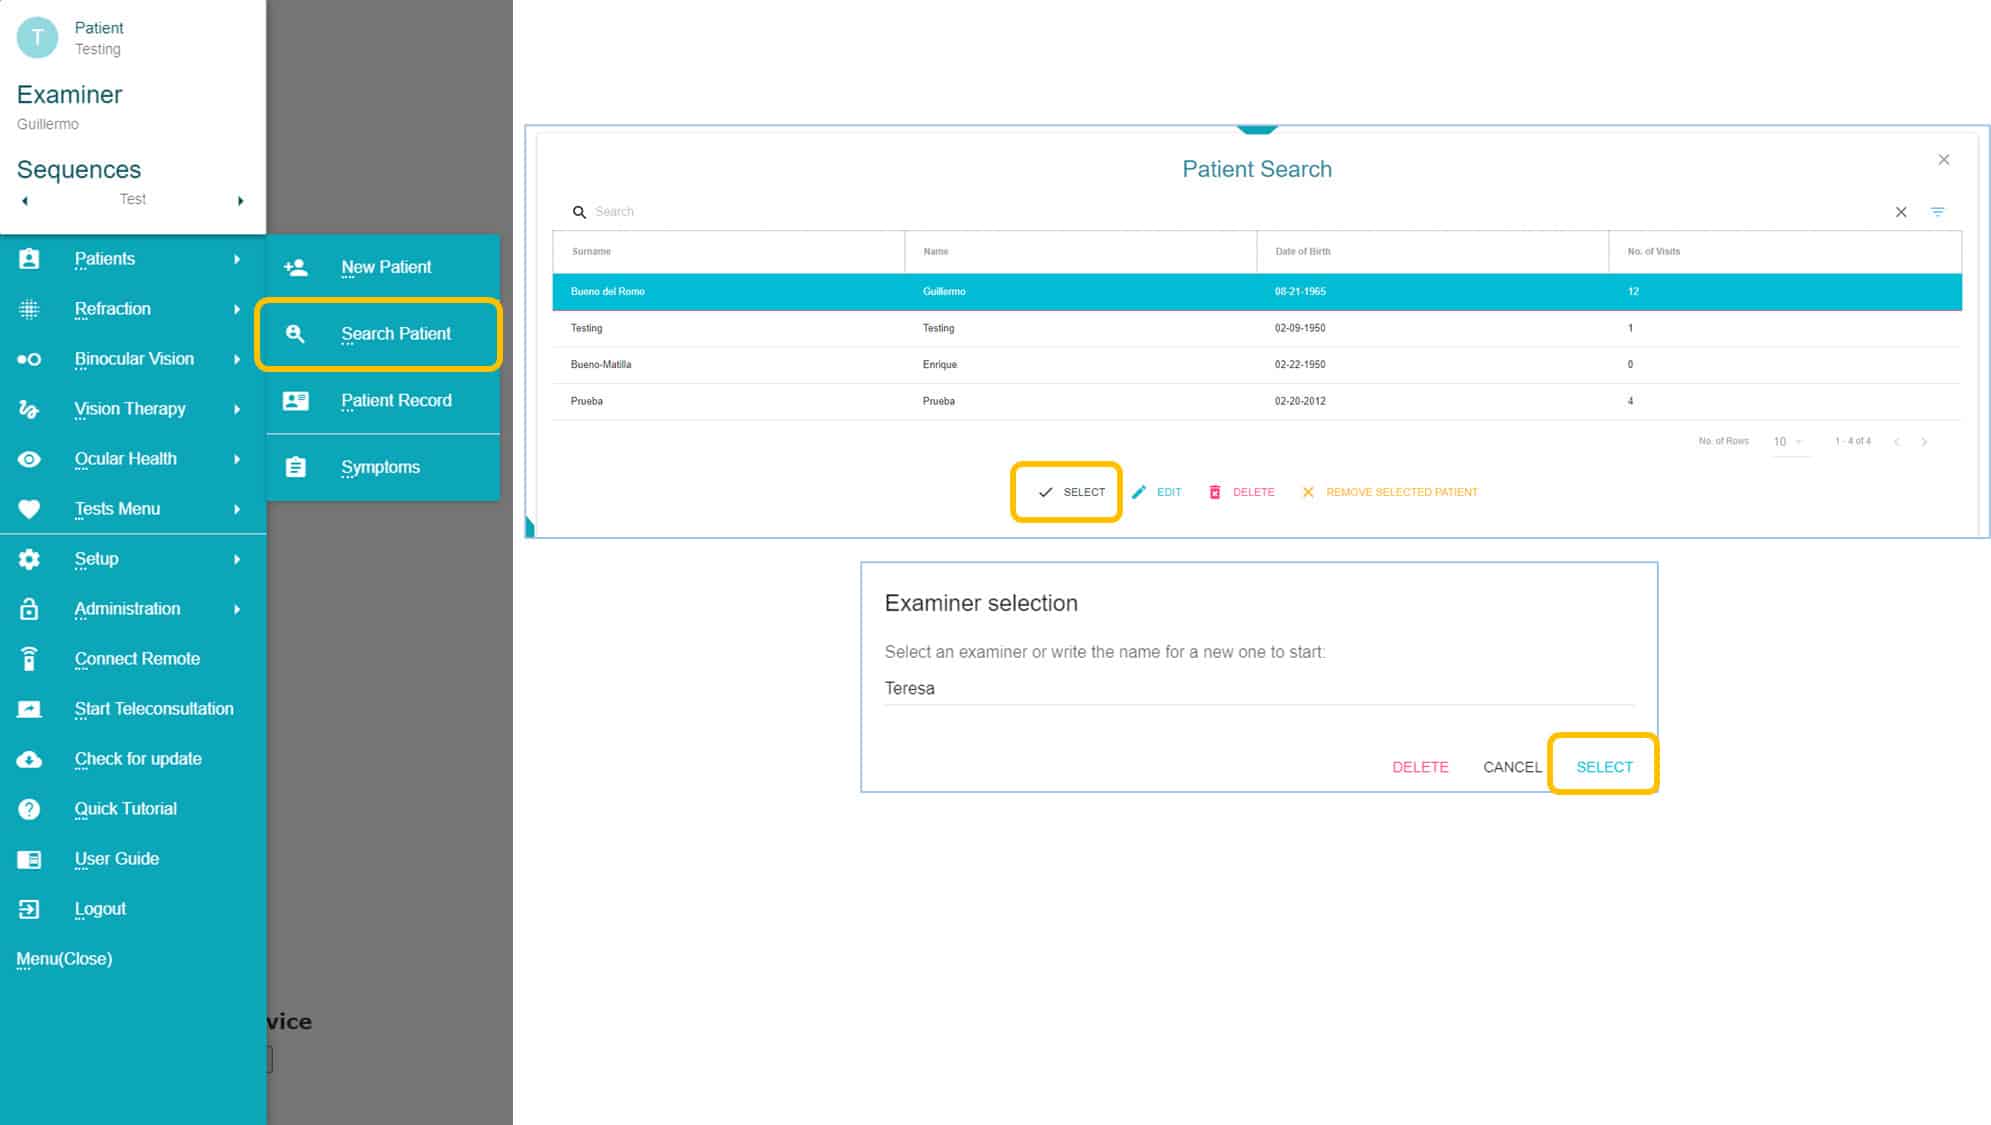
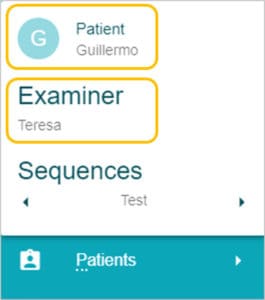
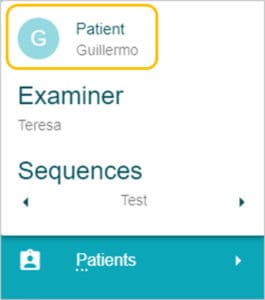
Once both the Patient and Examiner have been selected, we can see both names appearing at the top of the main menu:
Next, we can go to the Home Therapy section, which can be accessed either from the main menu on the left, or from the top menu that displays the most commonly used tests in the unit.
Calendar #
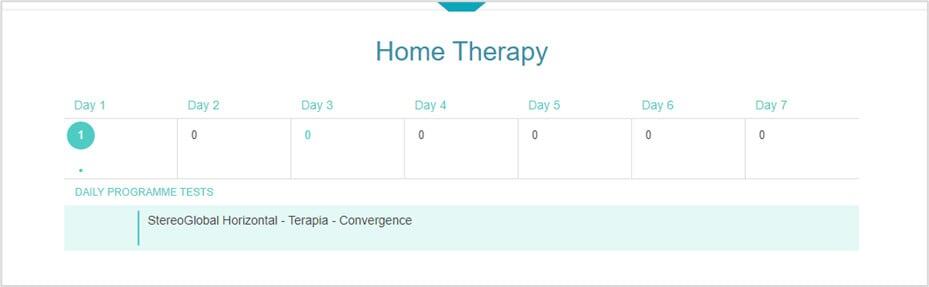
Once within the Home Therapy section, we find a 7-day Calendar, numbered from 1 to 7; but without specific dates or names of the days of the week, to allow starting the Therapy program any day of any week.

In the calendar the program will indicate the number of exercises scheduled to be carried out each day at home, during the next 7 days (usually between two visits to the clinic).
Daily Exercise Program #
We will see now how to program the list of exercises for the patient to perform each day.
First, we have to select the day on the calendar by clicking on it, which will highlight the number of exercises already programmed for that day.
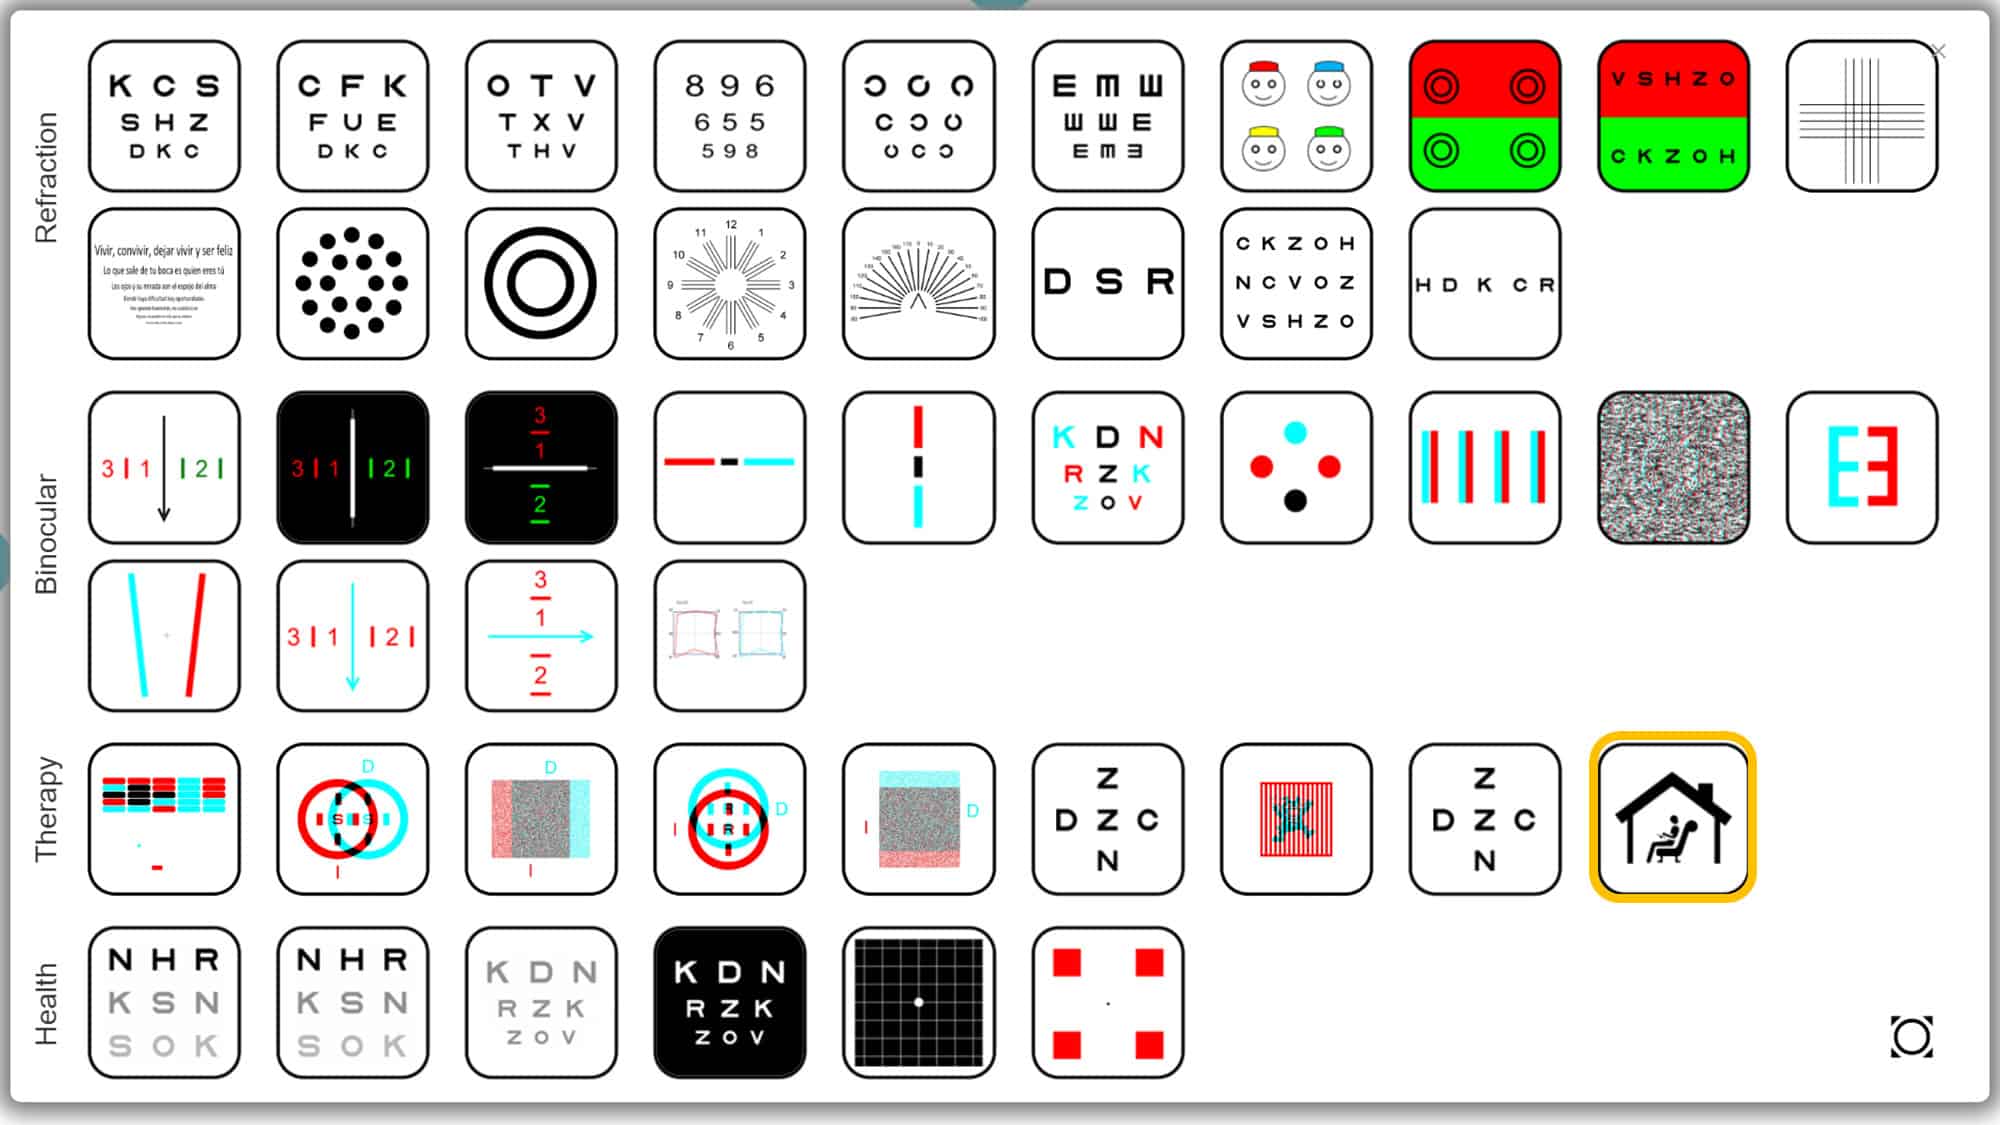
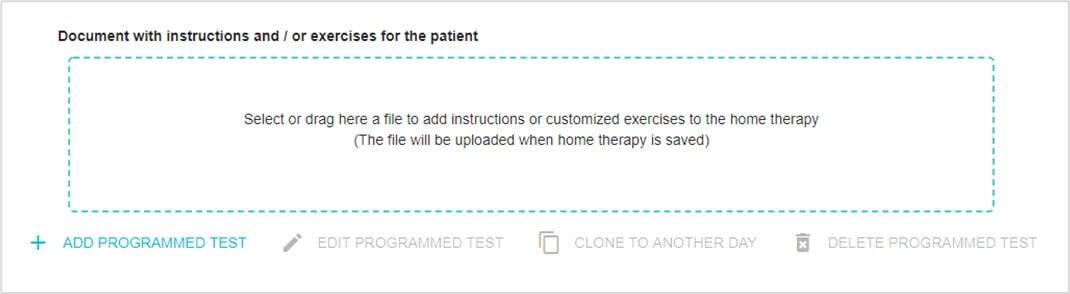
Next, go to the bottom of the page and click on the Add Programmed Test button.

A window will then open with a menu displaying the tests and exercises that can be chosen for home therapy with the Optonet Vision Unit:
When selecting any of the four Vergence options, we can then specify if we want the patient to do Therapy exercises or take automated measurements of their Fusional Vergence Amplitude.
Remember that StereoGlobal corresponds to images over a background of random dots, whereas StereoLocal indicates simple images on a plain background.
Parameters #
Once the test has been selected, we need to introduce all the parameters for that exercise, just as we do to define exercises for the consulting room.
Let us go through the process in this example:
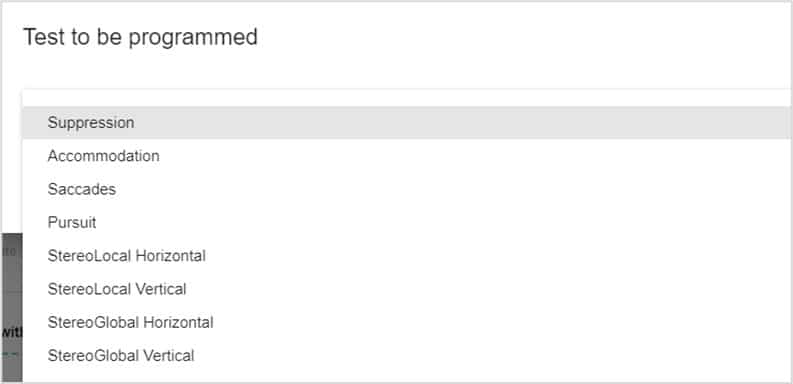
We select Day 1, click on Add Programmed Test, then on the Horizontal Stereo-Global Vergences test. A menu will then open, where we can establish the following parameters:
– Mode: Therapy or Amplitude
– Type of Vergence: Convergence, Divergence or Flexibility.
– Duration of the exercise
– Steps: the number of prismatic dioptres that are increased in each step.
– Type of image observed by the patient in stereopsis, when achieving binocular fusion (overcoming vergence demand).
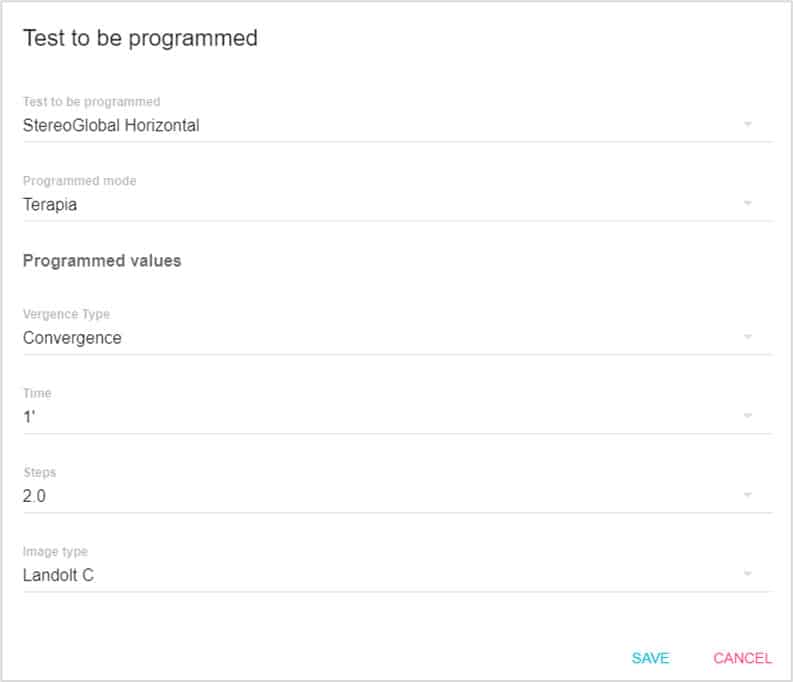
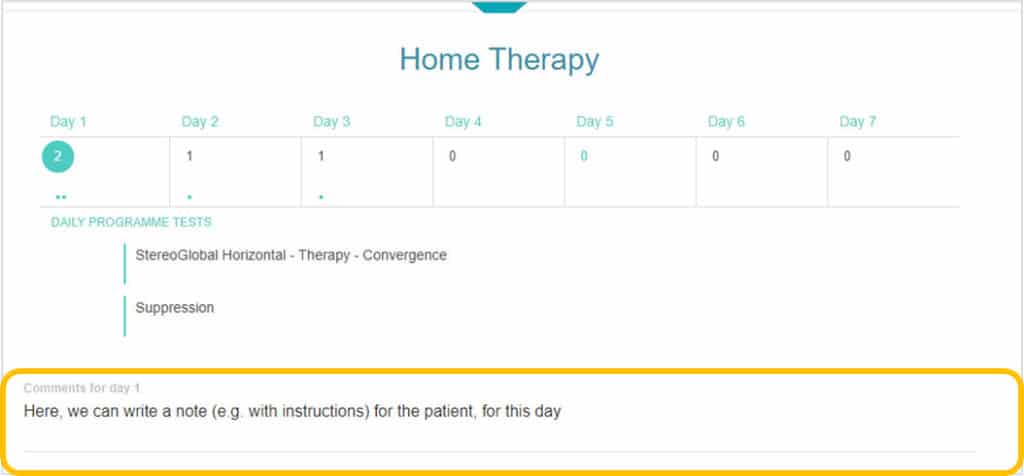
Once the parameters for the exercise have been set up, do not forget to click on Save. Now there is one task in the program for Day 1; and below we can see it consists on an exercise for Horizontal Stereo-Global Convergence.

If we now click on the exercise (Stereo-Global Horizontal), it gets highlighted in green:
and at the bottom of the screen, a menu is activated with several options:

– Edit Programmed Test, in case we want to modify the test and / or its parameters
– Clone to Another Day, that is very useful to copy this exercise to any other day of the week. We can indicate the day (from 1 to 7) to which we want to copy the exercise
– Delete Programmed Test, in case we want to erase it from the program
Weekly Cycle #
The calendar for scheduling VT at Home only shows a week of 7 days for the following reasons:
The ideal is to review the patient every week, to adjust the exercises as they progress. This is what is proposed in the validated protocols of TV (Visual Therapy).
Furthermore, as most of the exercises are repeated throughout the treatment (only varying the degree of difficulty), they are already scheduled for the following week and we only have to edit them by increasing or decreasing their difficulty, or leaving them the same, according to the patient’s progress.
Therefore, the 7 days that appear on the calendar correspond to the therapy cycle, which will be repeated during the other weeks until the end of the therapy. This makes it easier for the professional to simply change the parameters each week than to have to rewrite all the exercises.
Comments #
Just below, the program offers a text box, where we can write any comment or instruction for the patient, for that specific day.

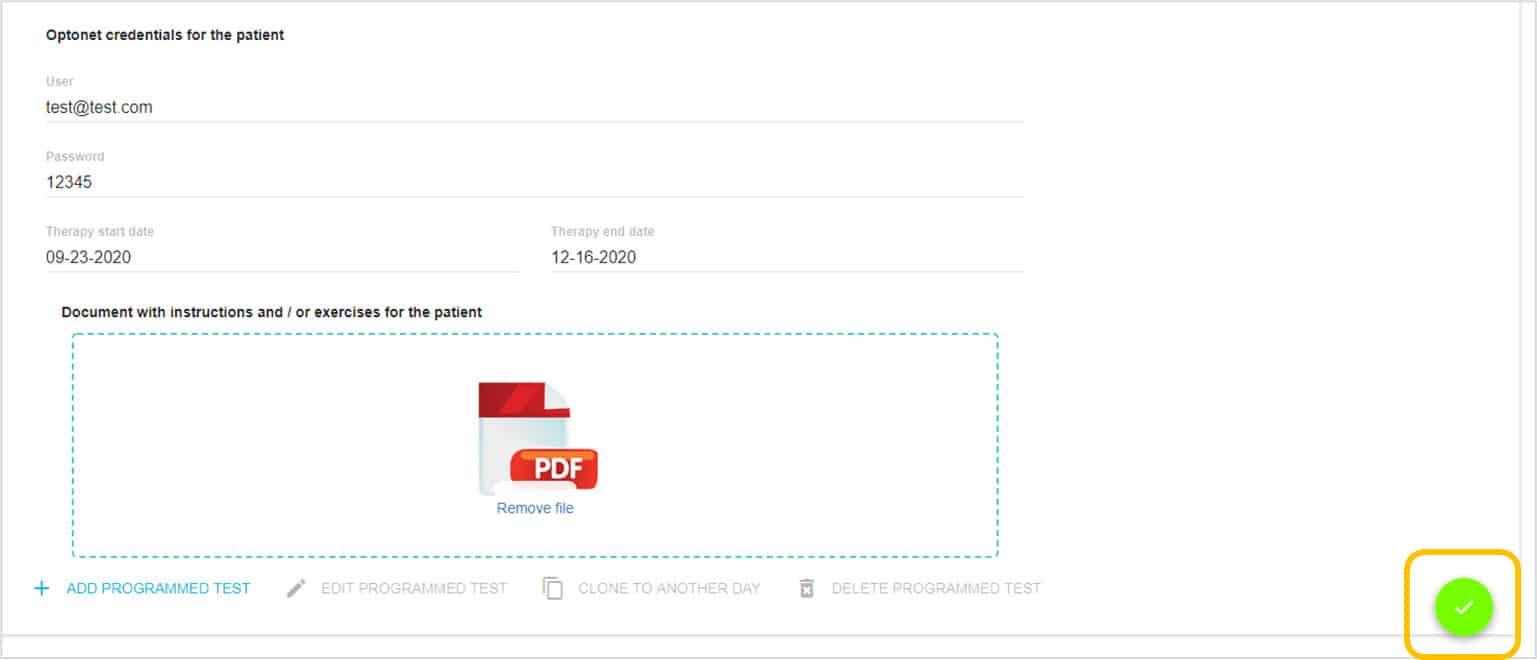
Login Credentials for the patient #
Once the exercises have been assigned, we can generate a username and password for the patient to access the program of home therapy. These keys must be unique, so we recommend introducing the patient’s email as their username, as shown in this example:
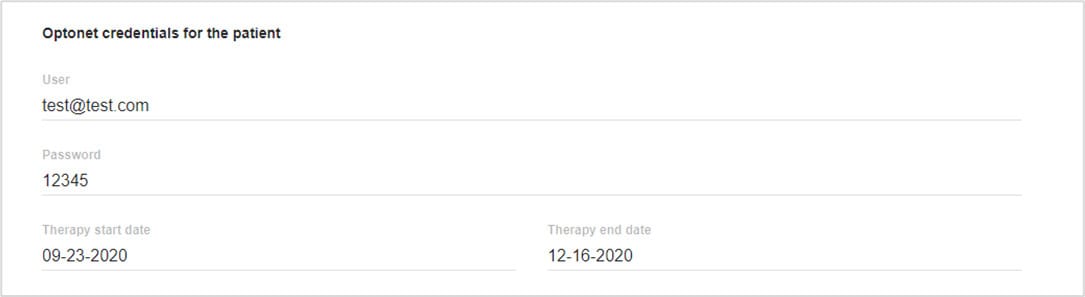
Next, the program asks for the Start and End Dates of the home Therapy program, to indicate the period in which the Home Therapy will be available for the patient (afterwards the patient will no longer have access to the exercises).
The only Vision Therapy Protocol validated through randomized clinical trials for Convergence Insufficiency (carried out by the multidisciplinary CITT research group)1 requires at least 12 weeks of therapy, with one or more sessions of Office-based Therapy per week, along with Home-based Therapy during a minimum of 5 days per week.
Therefore, when entering the start date, the program automatically calculates the end date for 12 weeks later; but we can manually change the number of weeks, if required.
Attaching documents #
Finally, the program allows attaching documents for the patient, for example, with instructions for the different vision therapy exercises.
We can also attach written instructions for other Therapy Exercises that do not require the Vision Unit; such as exercises with the Brock String cord, etc …
The patient can download this document before performing the exercises.
Save Therapy #
Once all the details of the Home Therapy have been filled in, we must click on the green save button (bottom right). This will immediately activate the access to home therapy for the patient on the start date established. From then on, the patient will be able to complete the exercises program on any computer, with their access keys.
We can make any alterations or changes to the program at any later moment, because each time we press the save button, the information will be immediately updated for the patient at home.
And the professional can also check on the progress of the patient at any time!
Access as Patient #
To access their orthoptic exercises from their computer at home, patients have to go to the website, at https://optonet.vision/ and just enter with their username and password:

If using a tablet instead, they will have to download the Optonet Vision Unit application from the corresponding store (their app store). However, it should be noted that Tablet screens tend to be small in size, which markedly limits the range of vergences that can be displayed during the exercises. Whenever possible, it is advisable to use larger computer screens; especially at the more advanced stages of visual training.
The first time a patient accesses with their credentials, a series of screens are displayed to calibrate that device with the help of images and voice. The calibration will be saved, so it will not be necessary to perform it on subsequent occasions.
First, a screen with welcome instructions (in text and voice) is shown, to inform the patient what they need to have on hand during the calibration:

The calibration screens have a button at the bottom left to repeat the voice instructions if necessary.
Next, the Optotypes calibration screen is displayed, where the patient will have to adjust the size of the drawing of a (bank) card to match it with a real card of the patient.
To assist the patient, the system offers the option of automatic calibration, without the patient’s intervention. For this, it is necessary to download and install a small program and finally press DONE.

Upon pressing the DONE button, the drawing of the card will automatically adjust to its real size, and the patient will only have to verify that the displayed size of the card drawing matches the actual size.

If the patient does not have a card, they could use a ruler by pressing the ruler button.

Finally, the patient will need to press the green save button.
Next, the patient will have to assign a name to that device and press confirm. This way, the calibration will be saved under that name.
The observation distance does not need to be modified, as it will always display a standard default value of 500 mm (50 cm).

A screen to calibrate the red filter:

And another to calibrate the blue filter:

And that’s all. Once the calibration is completed, the program will ask the patient to activate full screen mode by pressing a button.

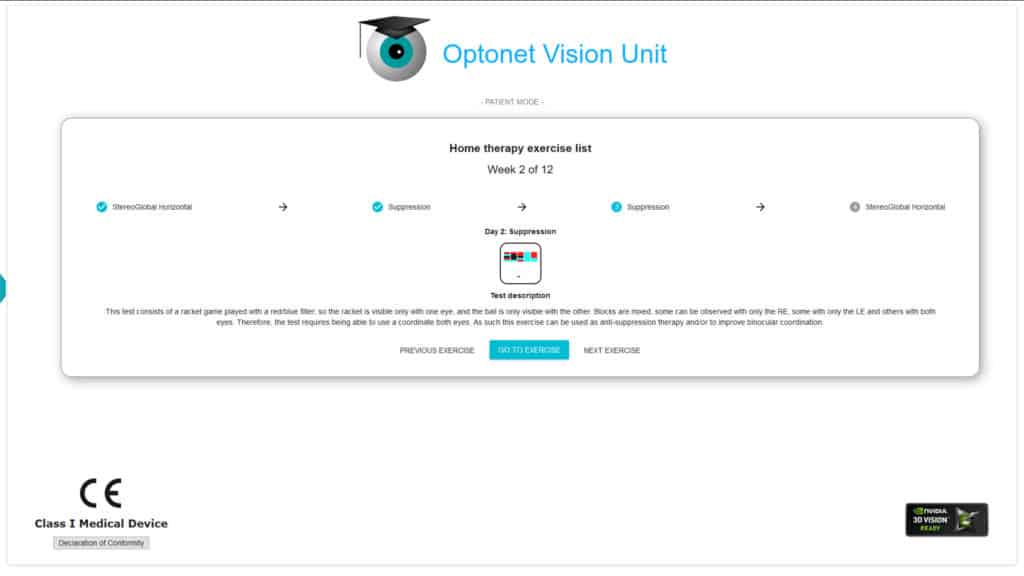
Following that, a list of the exercises that the patient needs to perform during the week will be displayed, in their order of execution.

Each day’s exercises are numbered on their left. When selecting an exercise, the digit changes to a blinking green background. Then, its name and the day of the week it corresponds to (Monday, Tuesday, etc.) are displayed below.
At the end, there’s a button to start the exercise, flanked by two other buttons to go to the previous or next exercise.
Upon pressing the Perform Exercise button, the patient will need to put on their therapy glasses and press start, as shown in this example:

Once an exercise has been completed, its results will appear on the screen, and patients must be instructed to save them with the green button.
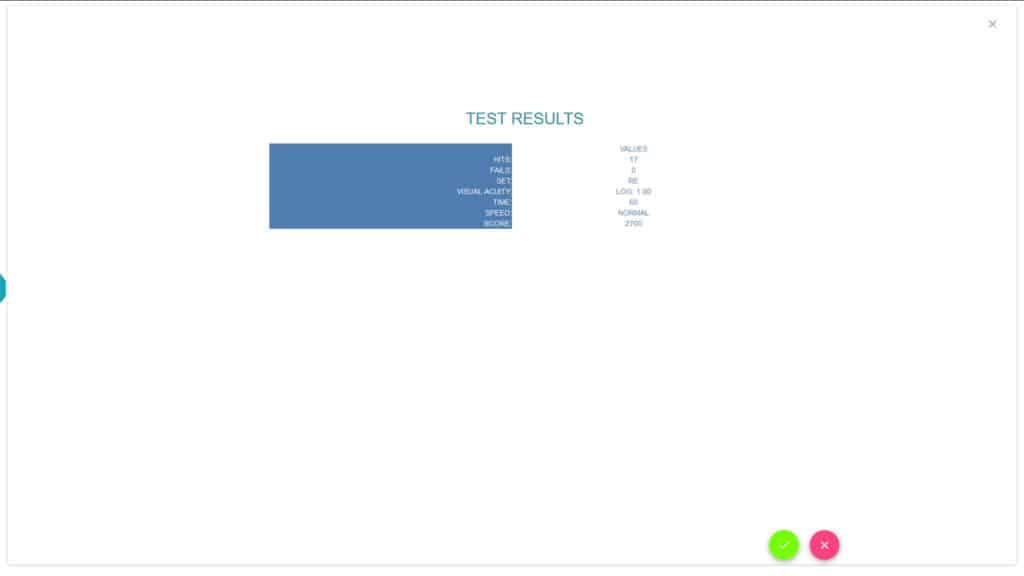
Each exercise completed and saved will get a tick. In this example, the patient has already completed Horizontal StereoGlobal and Suppression Exercises. The program also indicates when the exercises for the upcoming days will be available.
The program allows doing or repeating any past exercises, but not those scheduled for future dates. Practitioners may also ask the patient to repeat an exercise several times on the same day. Each time, results must be saved at the end of the exercise, to keep a record.
Remote monitoring of patient progress #
Professionals can check real-time patient’s progress, through the Optonet Vision Unit.
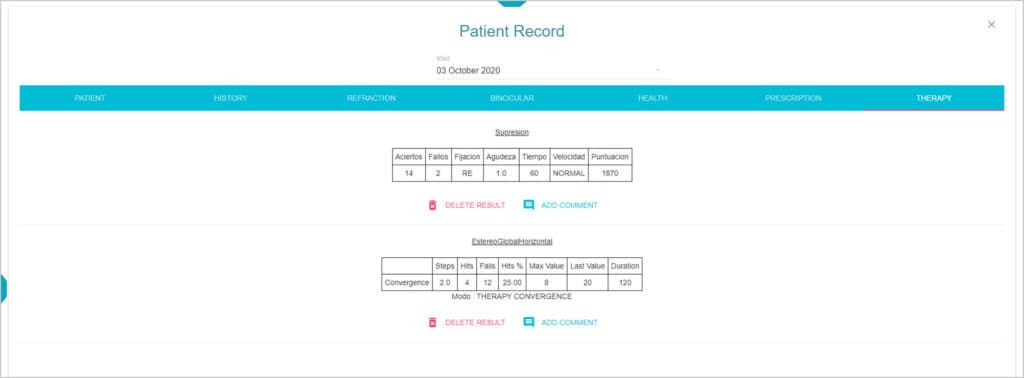
Once the patient saves the result of an exercise, it will appear immediately in their file, at the practitioner’s Optonet Vision Unit. The professional can check patient’s progress at home therapy by selecting their name from the main menu, and then clicking on to the therapy section.
We can see the results of the exercises completed on any date selected. The top dropdown menu allows for the selection of any Visit date.
At the end of each week, patients can download a Diploma for having completed the exercises of that week.

Management of Patient’s Access #
The practitioner can delete a user from the Home Therapy screen, simply by leaving their “Username” field blank, and then clicking on the green save button. This action sends a request to deny access to that user.
Professionals can also change patient’s login details at any time, by filling in the new data, and then clicking on save. The change of credentials is immediate.
In any case, denying access or modifying user’s login details does not affect the information stored from exercises previously completed, since this information has been already saved in the patient’s record.
In an active therapy program, the professional can add new exercises, change them, or delete those already performed, at any time.
Patient Progress Report #
The Vision Unit allows exporting all the results of a specific visual therapy exercise performed by the patient to PDF format. This way, we can assess their progress more quickly.
To do this, click on the Report icon in the lower right corner:

Next, select the exercise (e.g., Suppression) and click on export.

En el documento PDF se muestran los resultados de cada día (visita) para el ejercicio en cuestión. Estos resultados se pueden imprimir o guardar como archivo PDF:

Finally, we would like to remind you of some statistics: it is estimated that some 5% of the general population, and around 20% of patients between 8 and 12 years old who come for a visual examination, could benefit from therapy for Convergence Insufficiency.
We trust this new tool within the Optonet Vision Unit will be highly cost effective, making it easy to cover the subscription fee for the OVU, with just a few cases of CI treated every year.