
Optonet offers a tool for ophthalmic video consultations that allows high-quality vision charts to be displayed on the patient’s device (computer, tablet, or mobile phone) to remotely assess their visual function while maintaining simultaneous contact via video call.
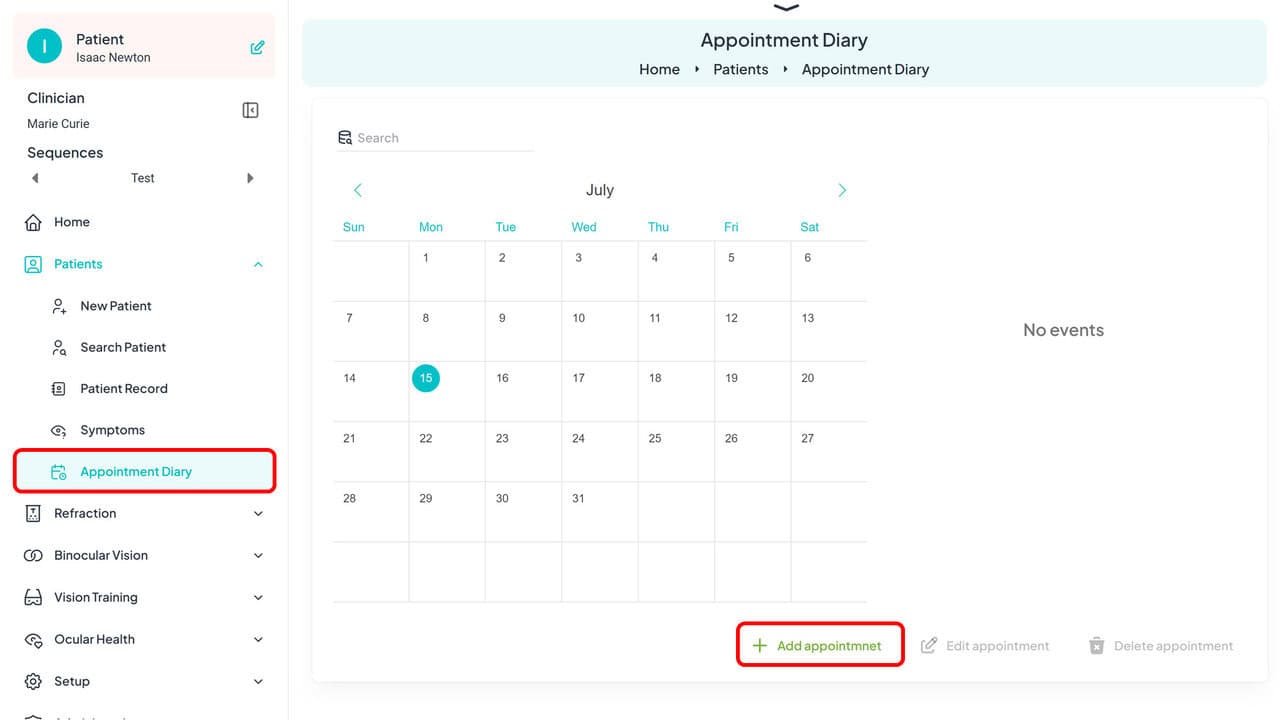
Set up the Appointment #
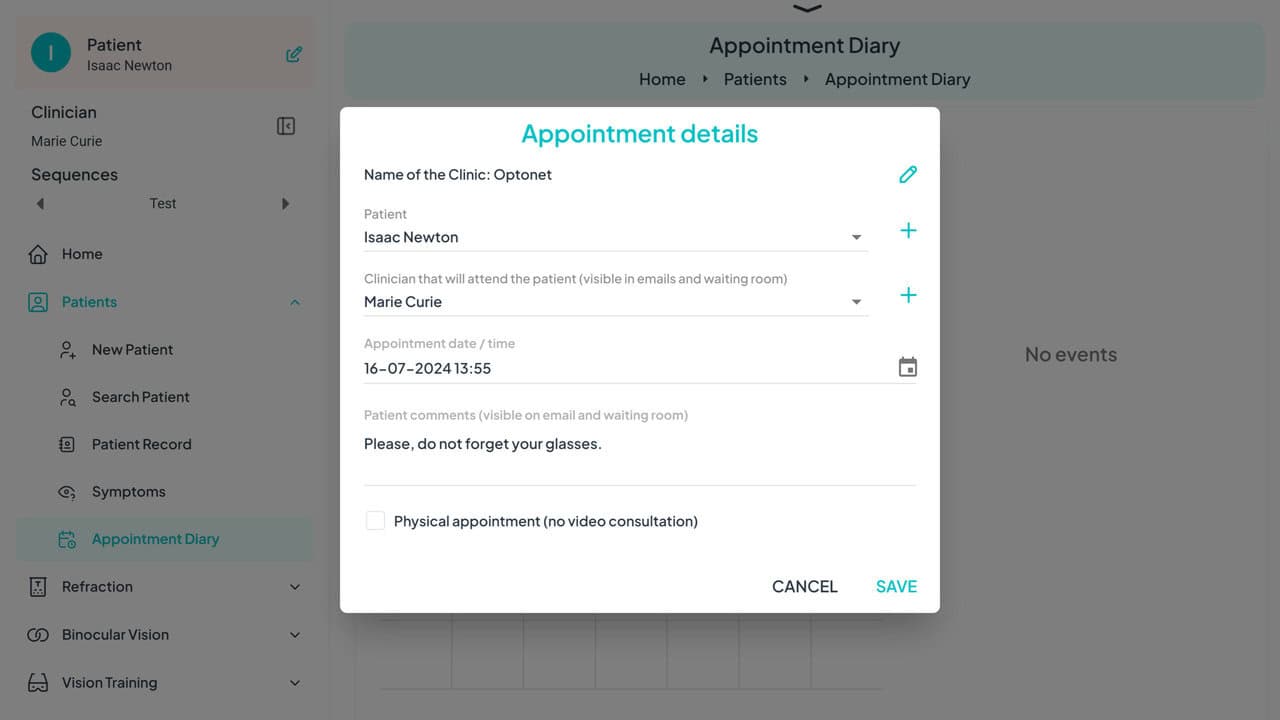
A window will open where you can:
– Indicate the name of the Clinic.
– Select (or create) the patient and clinician.
– Set the date and time of the appointment.
– Add any additional comments for the confirmation email sent to the patient.
Appointment Confirmation #
Once the appointment is scheduled, the system will automatically send an email to the patient with the appointment details, including the link and instructions to access the virtual “Waiting Room” on the day of the appointment.
Patient Preparation #
If the patient is using a phone or tablet for the video consultation, they must install the Optonet Vision Unit app from the App Store or Google Play.
Appointment Reminder #
Two days before the appointment, the program will send a reminder email to the patient.
Example of the email the patient receives:

Video Consultation as a Patient #
Patient’s Device #
Patients can use any of the following devices to conduct the video consultation:
– Smartphone
– Tablet
– Laptop
– Other types of computers
While phones and tablets are widely accessible and may be the preferred option for many patients, it is essential to consider their limitations. In particular, some tests, such as Hess-Lancaster or Visual Field, may be restricted on smaller screens, especially on phones.
Materials Needed #
The patient should have:
– A bank card or a millimetre ruler
– A measuring tape (optional but recommended)

Preparation Instructions #
For distance vision examination:
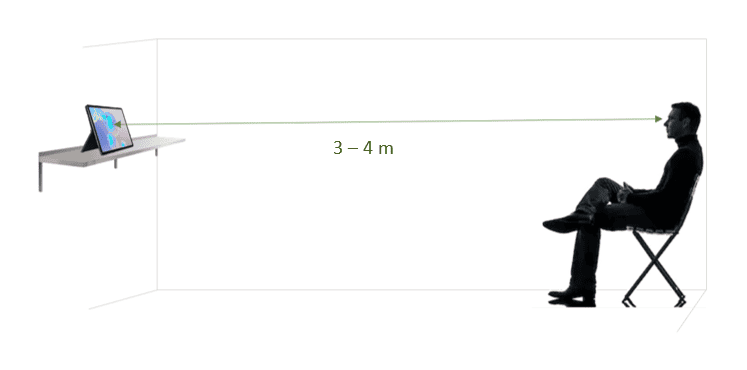
Recommend the patient to identify a space in their home where their device’s screen is visible at an ideal distance of 3 to 4 meters. Advise them to place a chair at this distance and ensure it is oriented towards the screen of the selected device.
For near vision examination:
Instruct the patient to situate themselves at their usual near working distance, approximately 45 cm from the screen.
Start Video Consultation as Patient #
Early Connection
The patient should connect ten minutes before the scheduled appointment to complete a brief calibration. The connection link from the confirmation or reminder email will be available from half an hour before to three hours after the scheduled appointment time.
Access from a Computer
The link will automatically open the device’s default browser. Optonet is compatible with most browsers, but Google Chrome is recommended for a better experience.
Access from a Mobile Device
The link will open the Optonet Vision Unit app. Ensure the app is installed from the App Store or Google Play and necessary permissions are accepted.
Access Permission
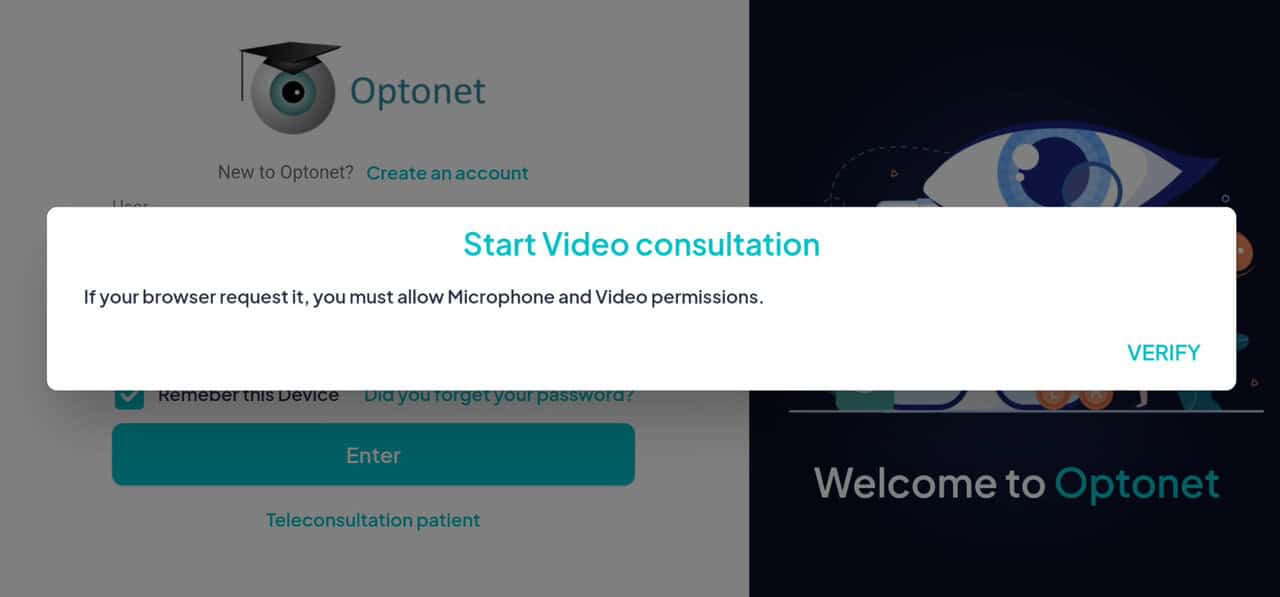
Upon clicking the connection link, a screen will remind the patient to accept microphone and video permissions. The patient should click to verify and begin hardware verification.
Hardware Verification #
Before accessing the virtual Waiting Room, Optonet will perform checks to verify the proper functioning of the microphone, audio, and camera. It will also assess the device’s compatibility with WebRTC video calls and internet connection quality.
Patient Confirmation
The patient must manually confirm that everything is set up correctly by clicking the “Connect” button to start the video consultation.

Screen Size Detection #
It is essential to know the size and resolution of the patient’s device screen to accurately display vision charts during video consultations. This process varies depending on the type of device used:
Mobile Devices (tablets/phones)
The Optonet app automatically detects screen size and resolution on mobile devices.
Computers (Windows or Mac):
When using a computer, a pop-up dialog will request the patient to download and install the OptonetMonitor™ application to measure screen size and resolution. This application is certified safe by Microsoft and Apple.
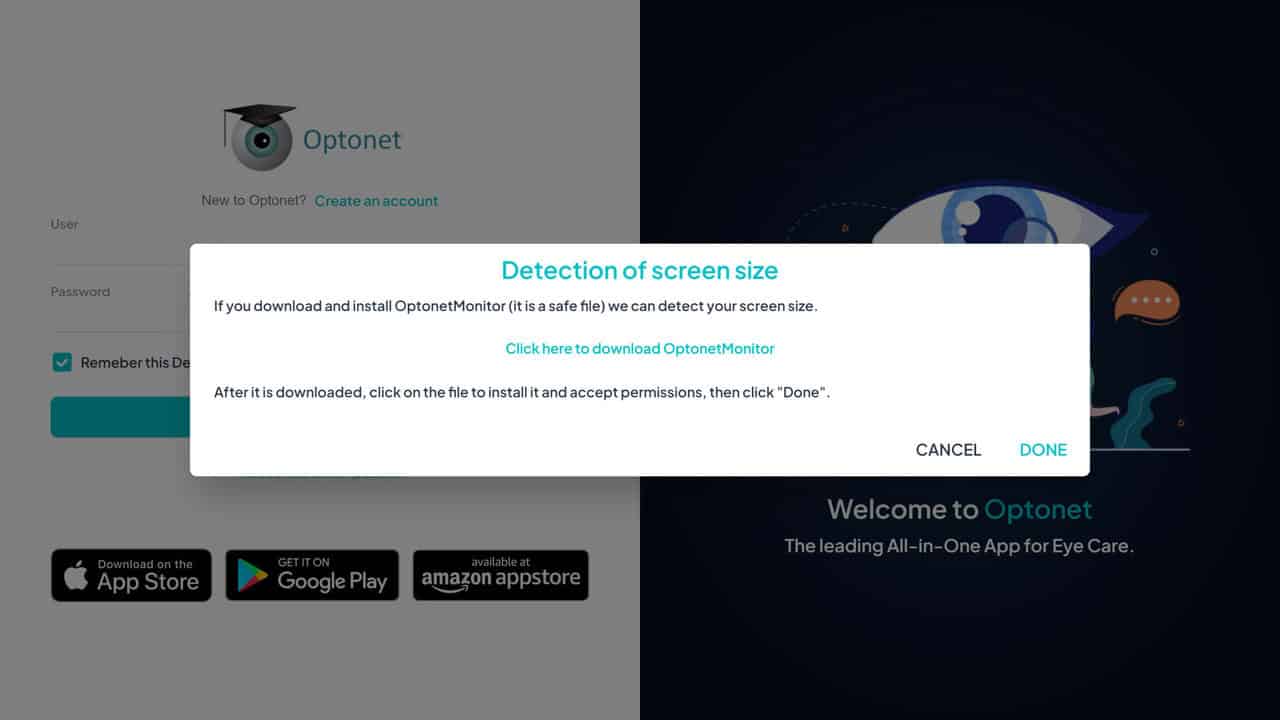
Troubleshooting
If the patient does not install or run OptonetMonitor™ before accessing the Waiting Room, the program will offer to install it again during the video consultation with the clinician’s assistance.
Calibration Saved
Screen size measurement is required only once per device. Screen parameters will be saved for future consultations.
Interocular Distance (IOD) Measurement #
Automatic Measurement Process
Once the screen size is determined, the system uses the patient’s device camera to measure their interocular distance (IOD) through facial detection and artificial intelligence. This measurement will be employed to automatically determine the viewing distance between the patient’s eyes and their screen during the video consultation in real time.
Start of the Process
The IOD measurement starts automatically with audible and visual instructions. The patient must position themselves in a well-lit area and have a bank card for reference.
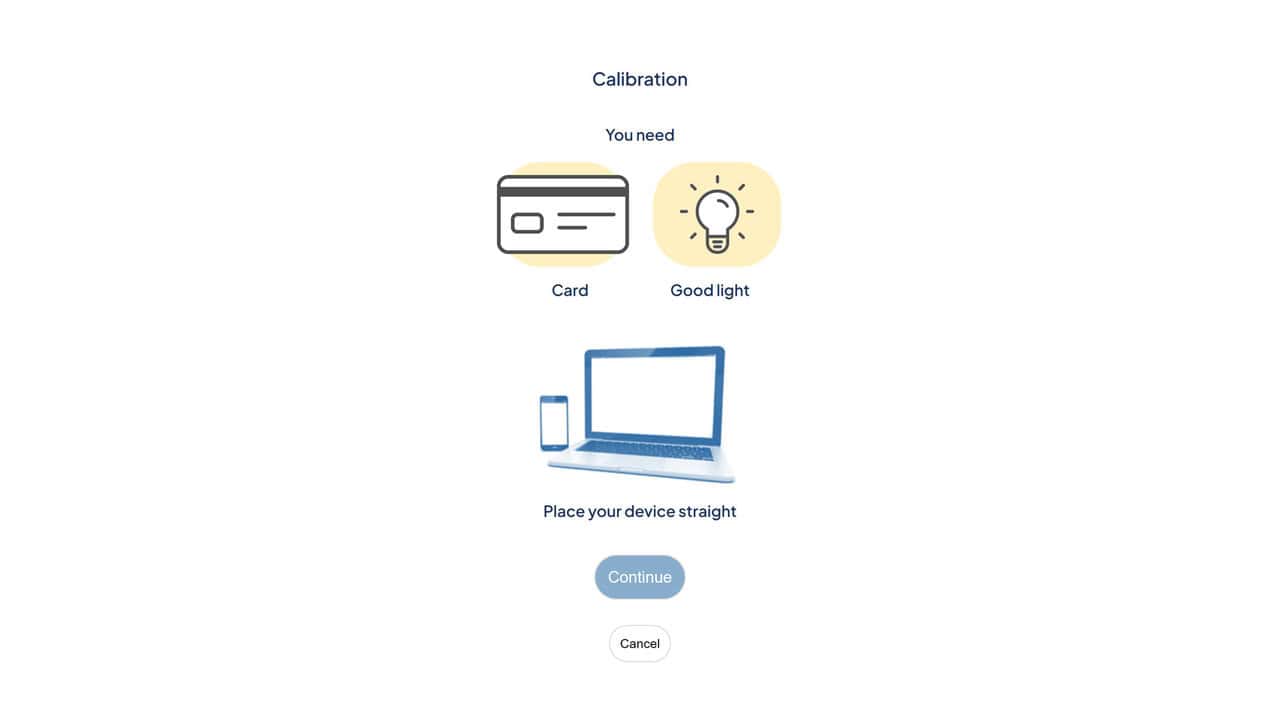
Patient Instructions
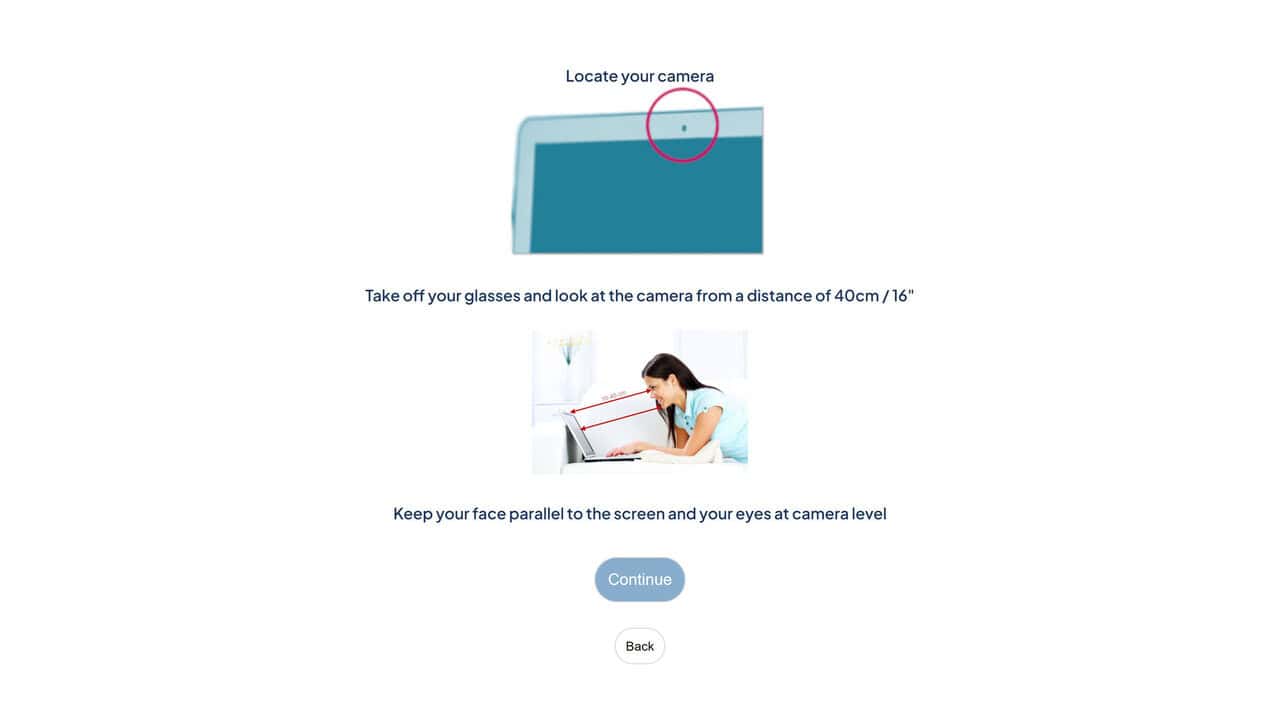
The patient will be asked to:
– Remove their glasses if they wear them.
– Position themselves at a distance of approximately 35-40 cm from the camera, similar to taking a “selfie”.
– Look directly at the camera.
Detection Process
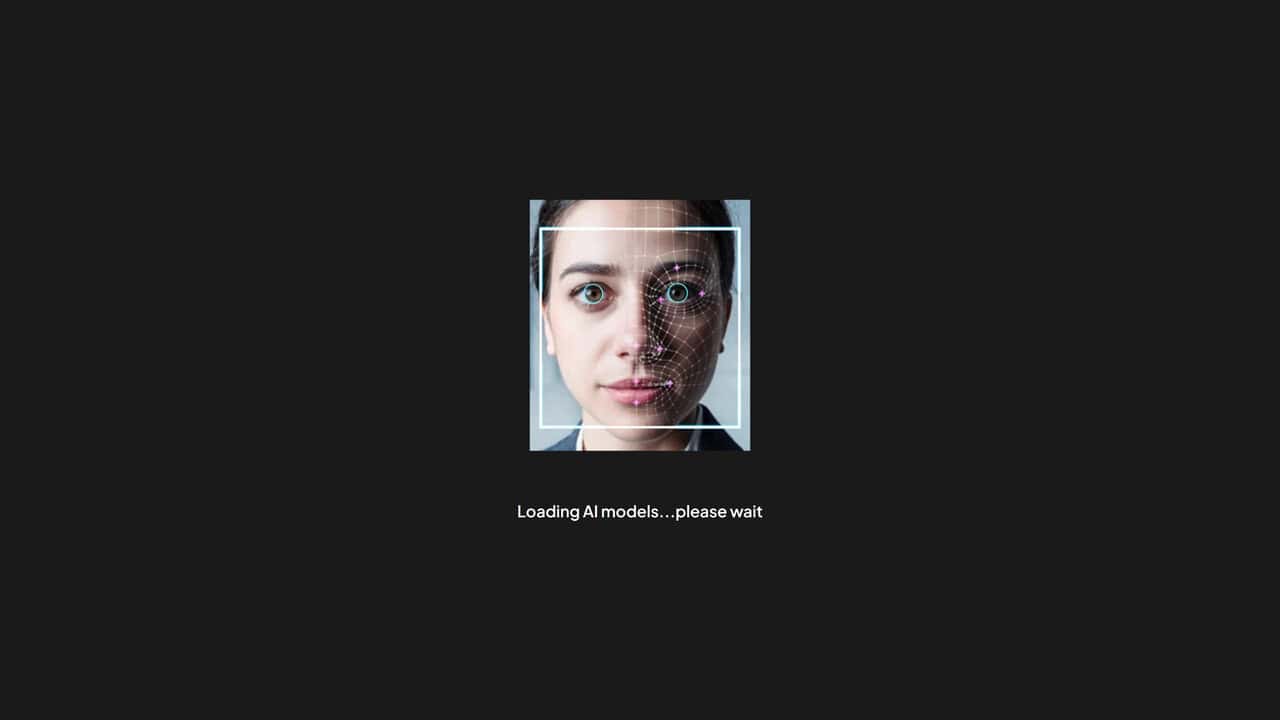
The system identifies reference points on the patient’s face and calculate the IOD. This process can take up to 90 seconds.
During detection, audible prompts will be given to adjust the patient’s position if necessary (e.g., “move closer”, “move farther”, “keep your head straight”, etc.).
Calibration Saved
The IOD measurement is done only once; the patient’s interocular distance is saved in their device for future video consultation sessions.
Troubleshooting
Ensure only one person is in front of the camera and the patient’s eyes are aligned with it.
Optonet is compatible with the cameras of smartphones, tablets, and laptops, but currently does not support external webcams for IOD measurement.
If the patient chooses to cancel the automatic IOD measurement before accessing the waiting room, the program will offer to measure the IOD again during the video consultation with the clinician’s assistance.
If the patient has trouble completing the IOD measurement, the Optonet system will assign a standard value of 63 mm. The clinician can subsequently initiate the IOD measurement through facial detection during the video consultation, if desired.
Patient Waiting Room #
Automatic Access
After IOD measurement, the patient is directed to the virtual Waiting Room.
Information in the Waiting Room
Important details such as appointment time and the clinician’s name will be displayed.
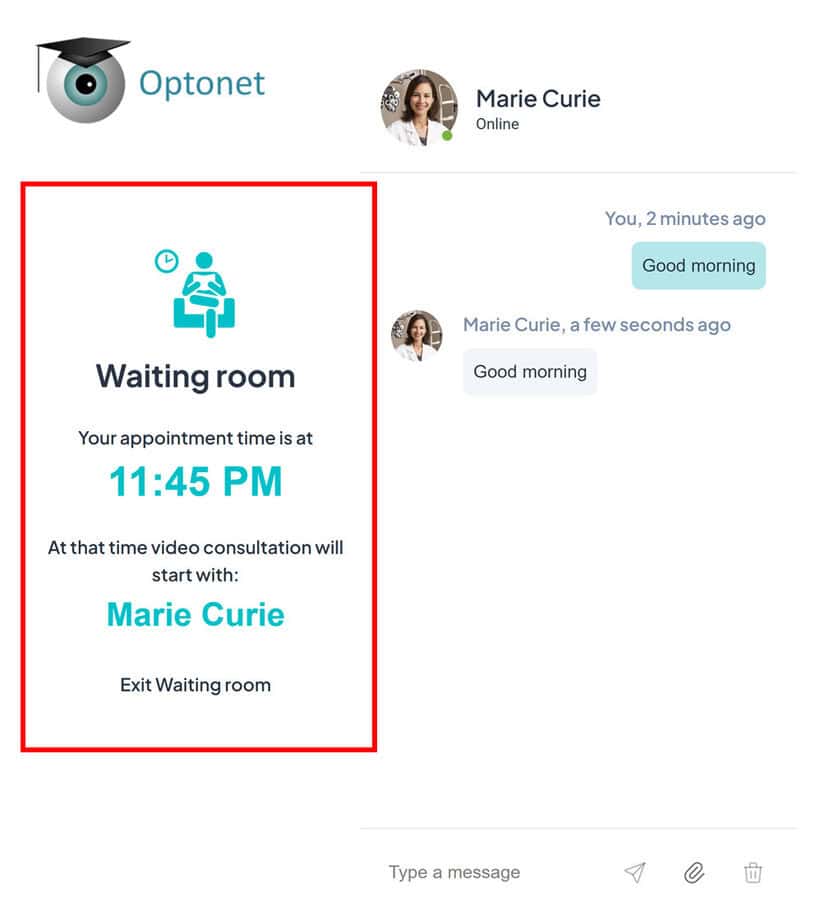
The patient should remain in the Waiting Room until the clinician starts the video consultation.
Communication in the Waiting Room
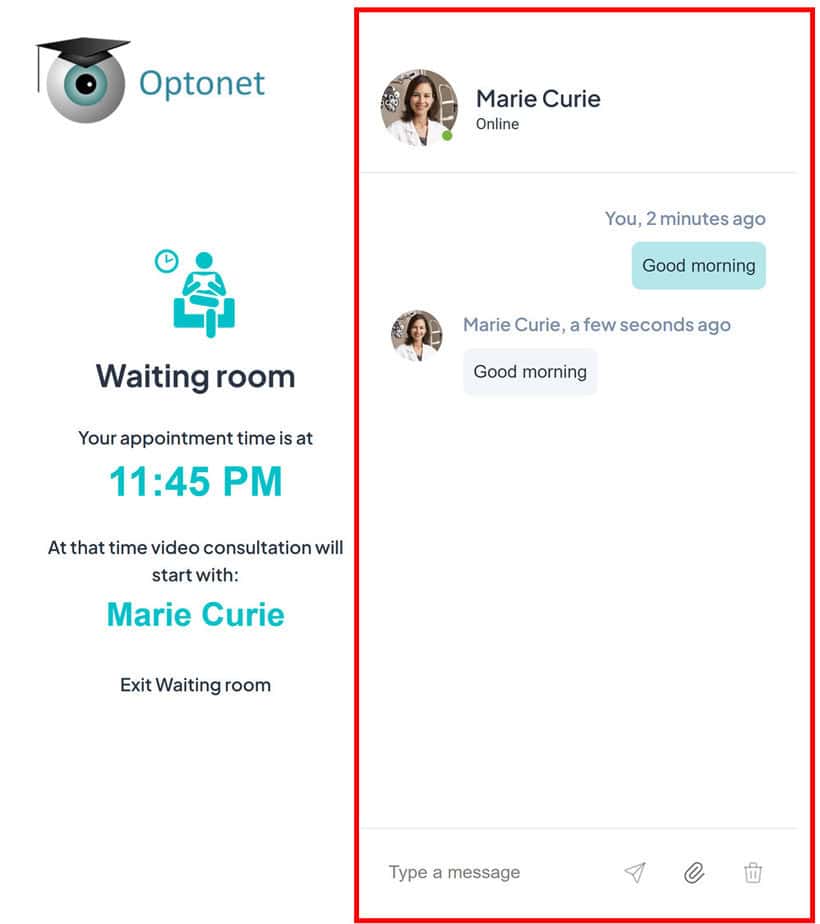
The Waiting Room includes a chat for communication between the patient and the professional. Through this chat, patients can send messages or any necessary files before the consultation begins.
Video Consultation as a Clinician #
Access to the Waiting Room
On the appointment day, the clinician must access the Waiting Room by clicking the “Waiting Room” link in the Main Menu.
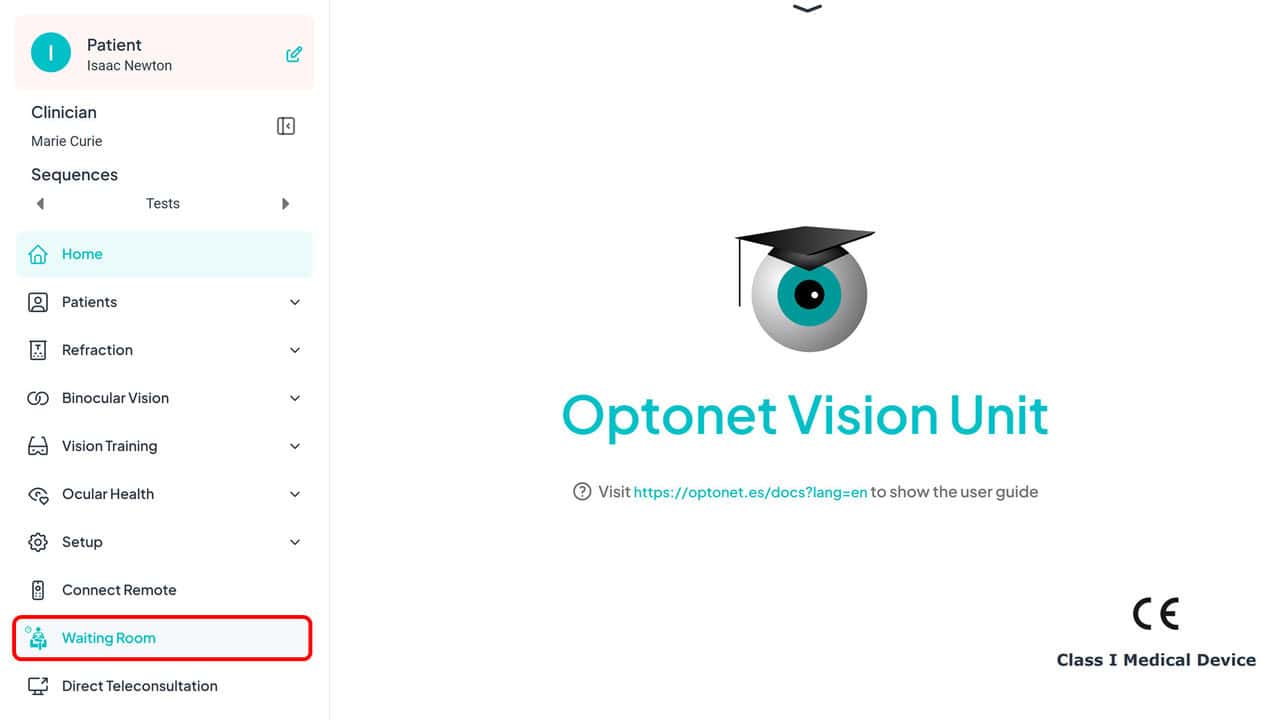
Note: The “Waiting Room” link in the Main Menu is enabled only when a patient is selected.
Viewing Waiting Patients
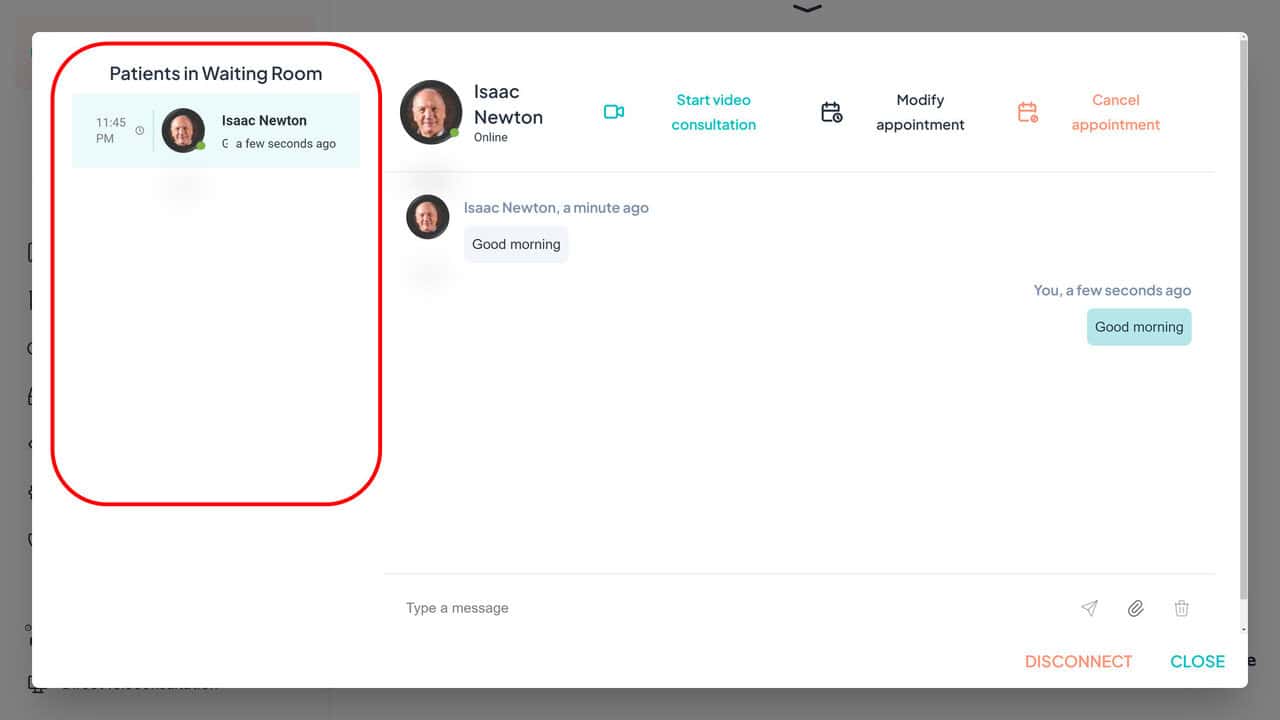
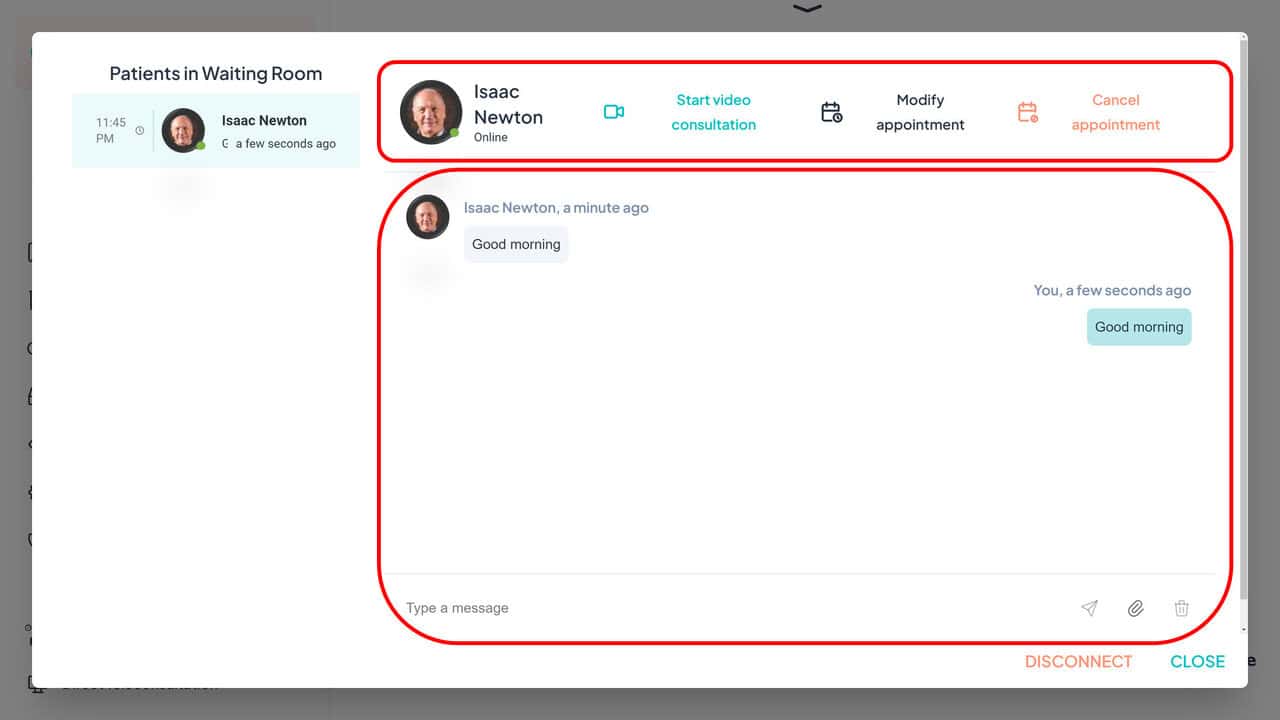
A list of waiting patients will be displayed, including appointment times, patient names, and temporary photos taken during facial detection calibration.
Interaction with the Patient
Clicking on a patient’s name allows the clinician to select them. This also activates the chat for communication.
Options When Selecting a Patient
When a patient is selected, their name, photo, and three buttons allowing “Start video consultation”, “Modify appointment”, and “Cancel appointment” are displayed on the right side.
Video Call #
Start Video Call
Clicking “Start video consultation” connects both parties through Optonet’s WebRTC video platform.
Clinician Interface
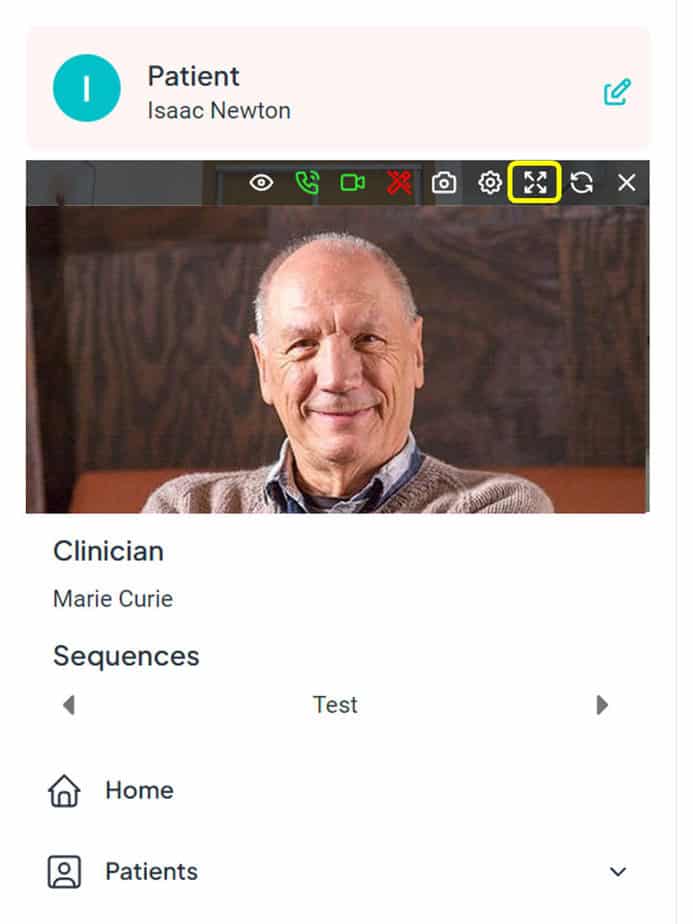
The clinician’s screen includes the Main Menu, a video window, and a real-time view of what the patient sees on their device.
– The Main Menu is shown open on the left side.
– At the top of the Main Menu, the patient’s name is indicated.
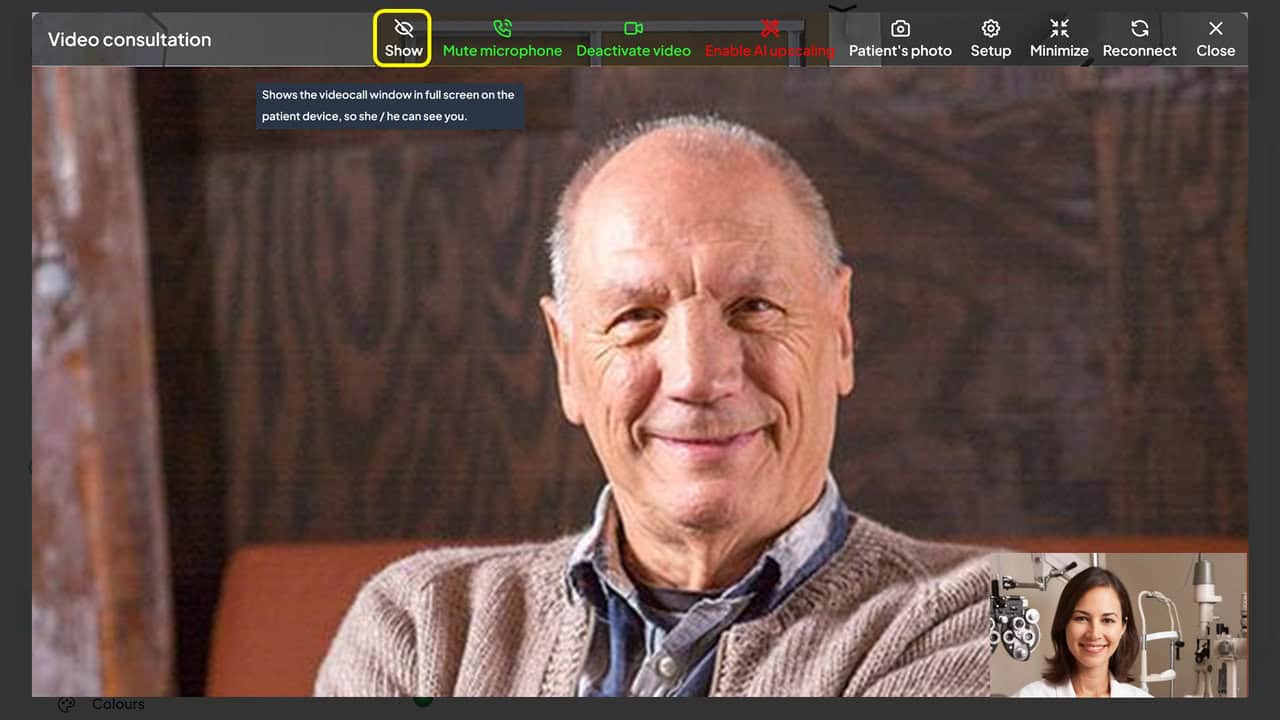
– Just below, there is a video window where the clinician can continuously see the patient. This window includes a control bar at the top with options such as “Maximize,” allowing the video window to occupy the entire screen of the clinician’s device if desired.
Real-Time Viewing
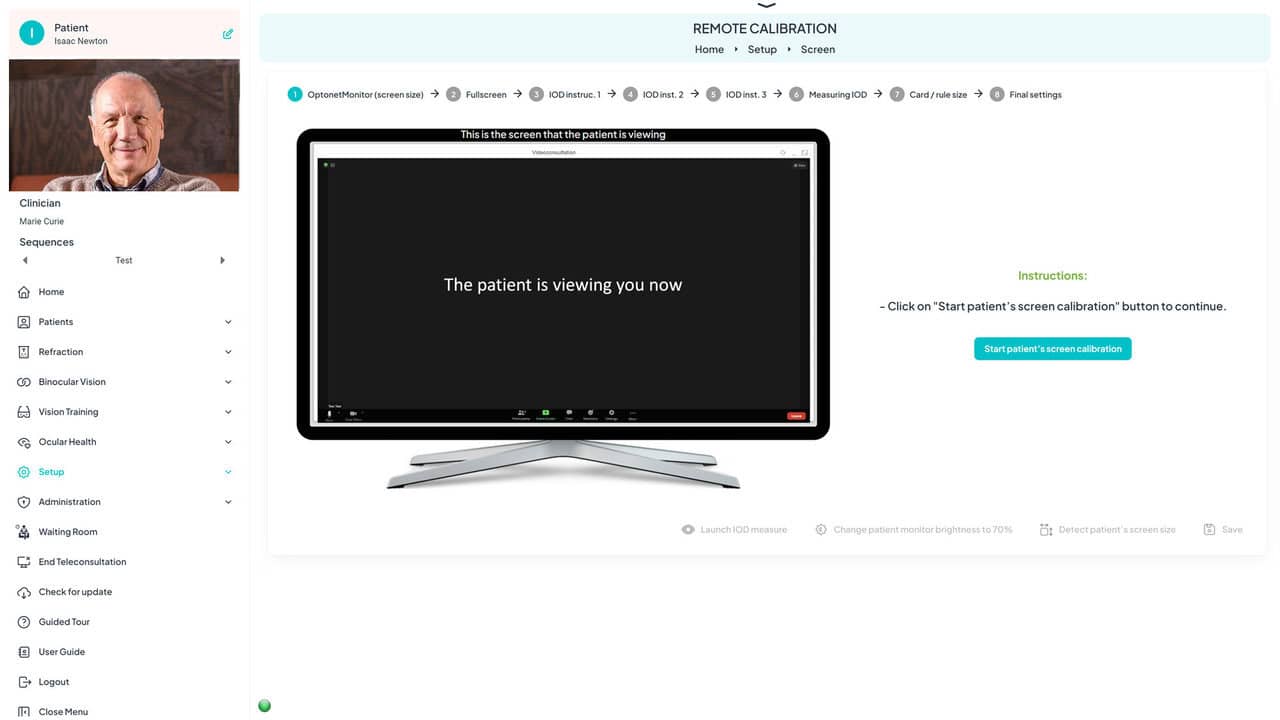
Additionally, the clinician’s screen displays an image of a computer monitor reflecting what the patient is seeing on their device in real-time. This helps the clinician stay aware of what the patient is observing, which is especially useful during the calibration process.
Patient Interface
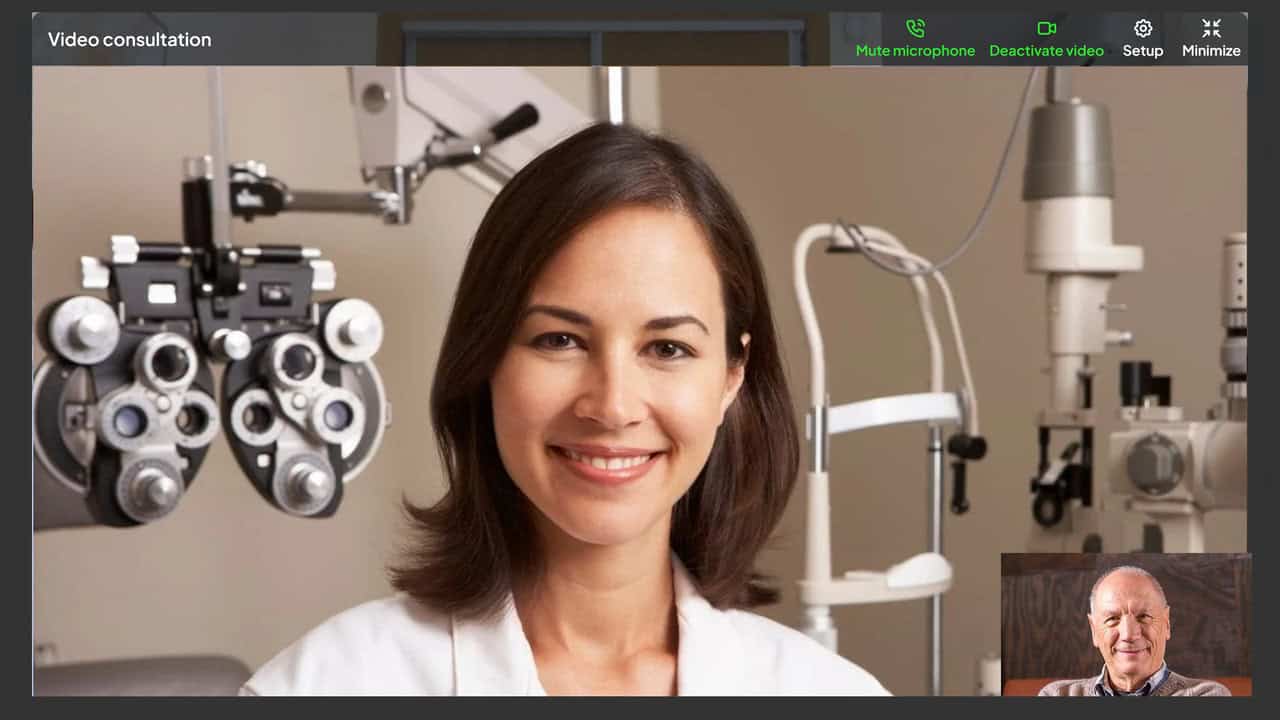
On the patient’s device, the video window will initially be shown in the entire visible screen.
Managing Space During the Video Call
The video window on the patient’s device will automatically minimize during calibration and visual assessment to maximize screen space and avoid interference with the vision charts.
However, the clinician can reactivate the full view of their video for the patient at any time. This is done by clicking the “Show” button (with an eye symbol) on the video window control bar, allowing the clinician’s video to occupy the entire patient’s screen and resume direct visual interaction.
Calibration #
Start of Calibration
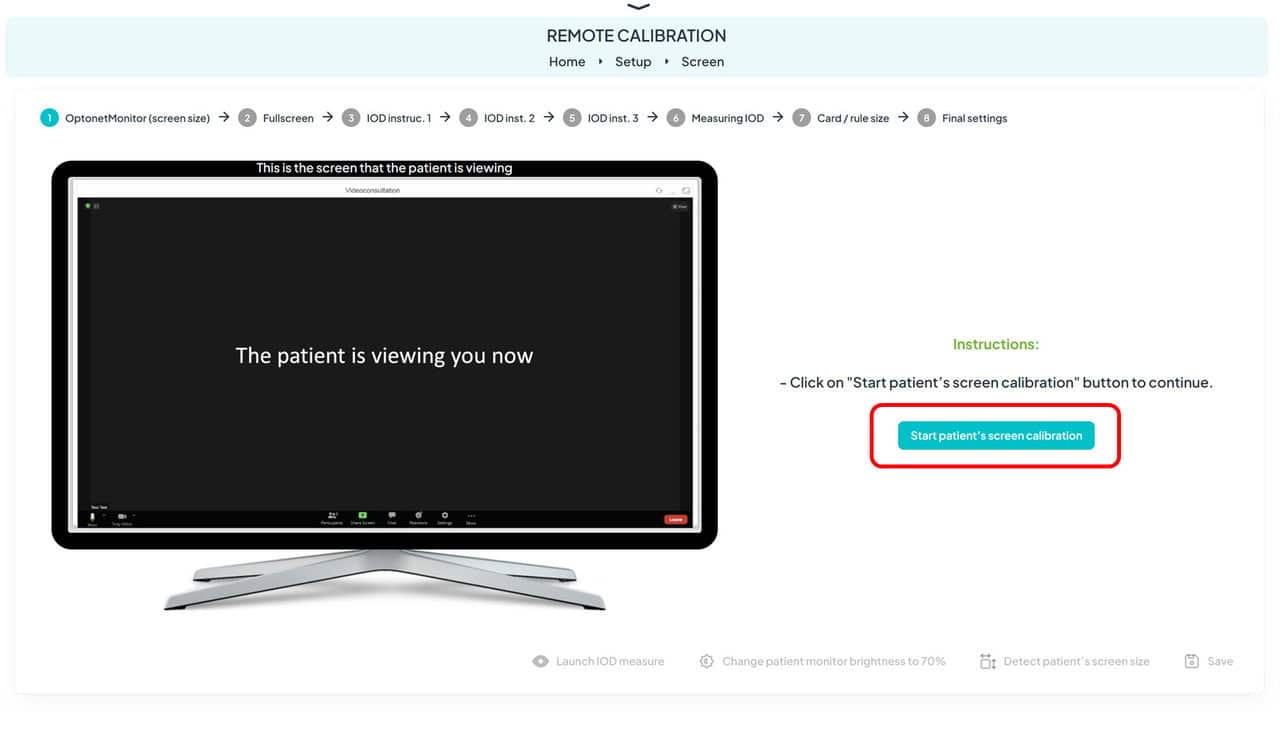
The clinician starts the calibration by clicking the “Start Patient Screen Calibration” button:
Detailed Calibration Process
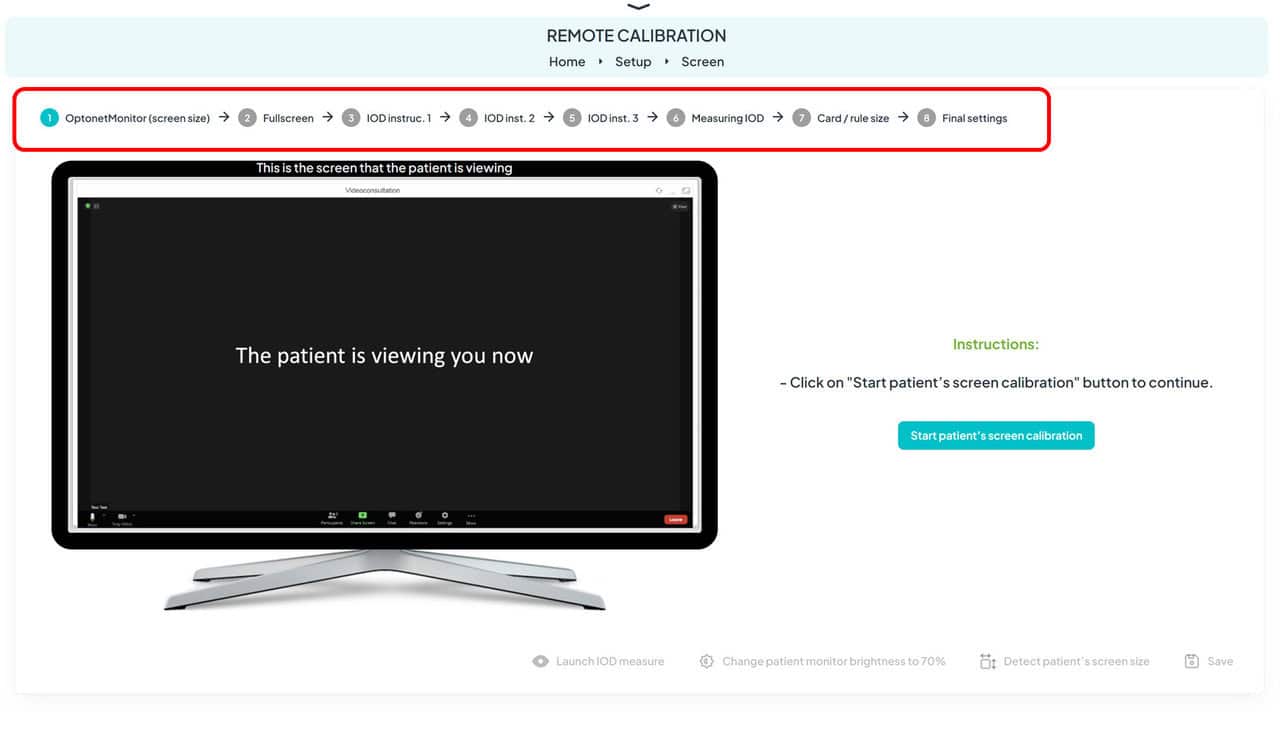
The process includes 8 steps, displayed in a timeline on the clinician’s screen. As the process progresses, the completed steps will be highlighted.
Calibration Steps
Step 1. Screen Size #
The screen size and resolution are automatically detected on mobile devices or through the installation of OptonetMonitor™ on computers. Typically, the installation and execution of OptonetMonitor™ will be performed by the patient on their own before accessing the Waiting Room, saving consultation time. If the patient has difficulties downloading or installing OptonetMonitor™, the program will offer this installation again during the video consultation calibration phase with the clinician’s assistance.
Alternative Manual Calibration
The patient can opt for manual screen size calibration. This process involves placing a card or ruler on the screen and adjusting the size of the displayed image by moving a selector until it matches the actual size of the card or ruler. Both the patient and the clinician can make this adjustment remotely (more details in Step 7 of the calibration).
Step 2. Full Screen #
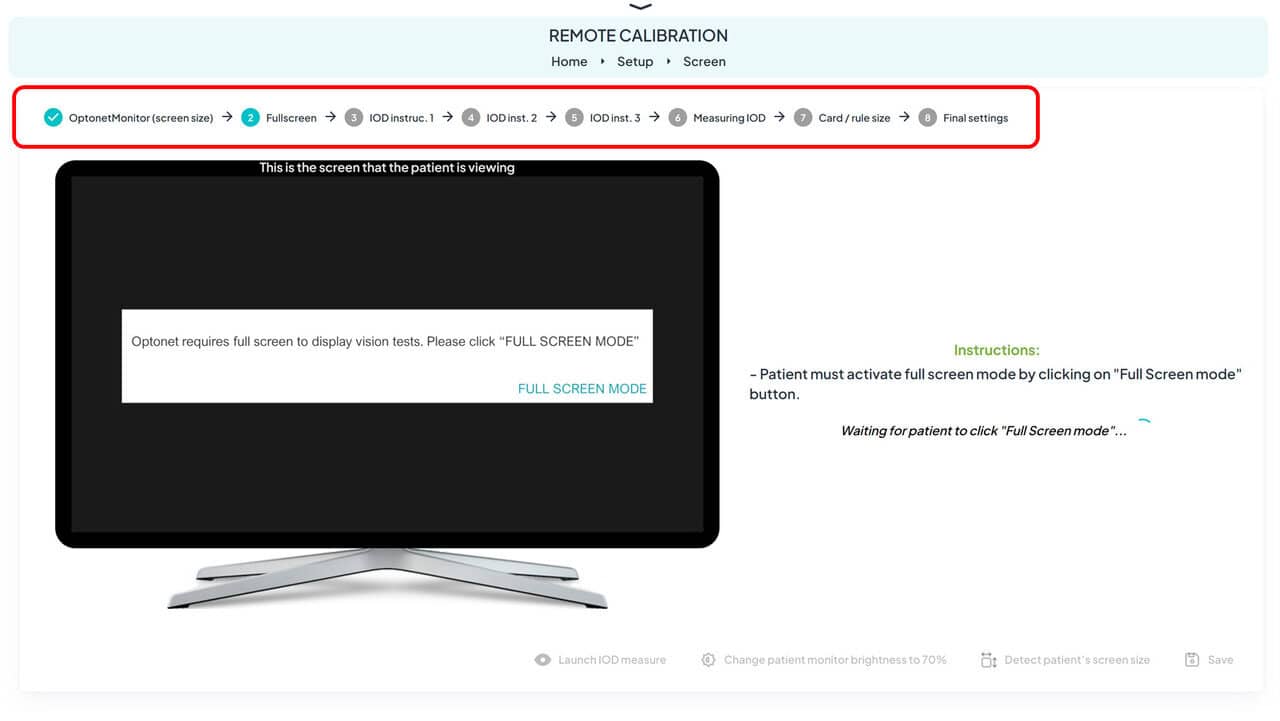
It is ideal for vision charts to be displayed in full-screen mode. On mobile devices (tablets and phones), this process is automatic. However, on computers, a pop-up dialogue will appear asking the patient to activate “Full Screen Mode”.
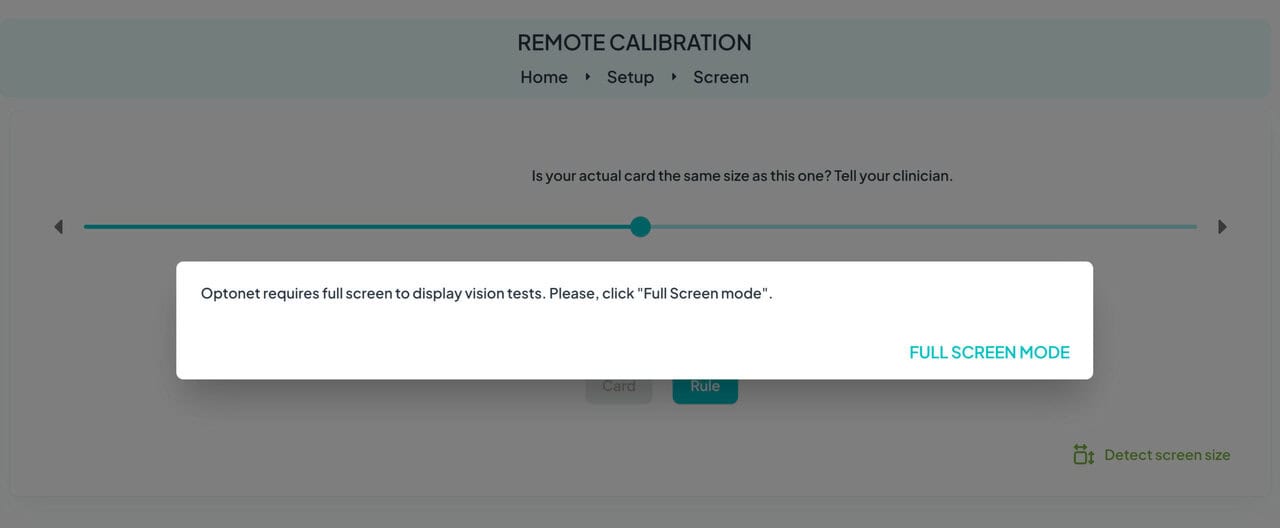
The clinician’s screen shows in real time what is displayed on the patient’s device:
Steps 3 to 6. IOD Measurement #
The interocular distance (IOD) measurement is usually performed by the patient on their own before accessing the Waiting Room to save consultation time. Steps 3 to 6 involve detailed instructions (text, images, and audio) and the interocular distance (IOD) measurement.
Again, if the patient has any problems, the IOD measurement can be performed with the clinician’s assistance and supervision during the video consultation calibration phase.
Step 7. Card/Ruler Size Verification #
In this calibration step, a real-scale image of a bank card/ruler is displayed on the patient’s screen, and the patient is asked to place a physical card/ruler on the screen to verify that the sizes match. This step aims to offer a double-check of the screen calibration accuracy.
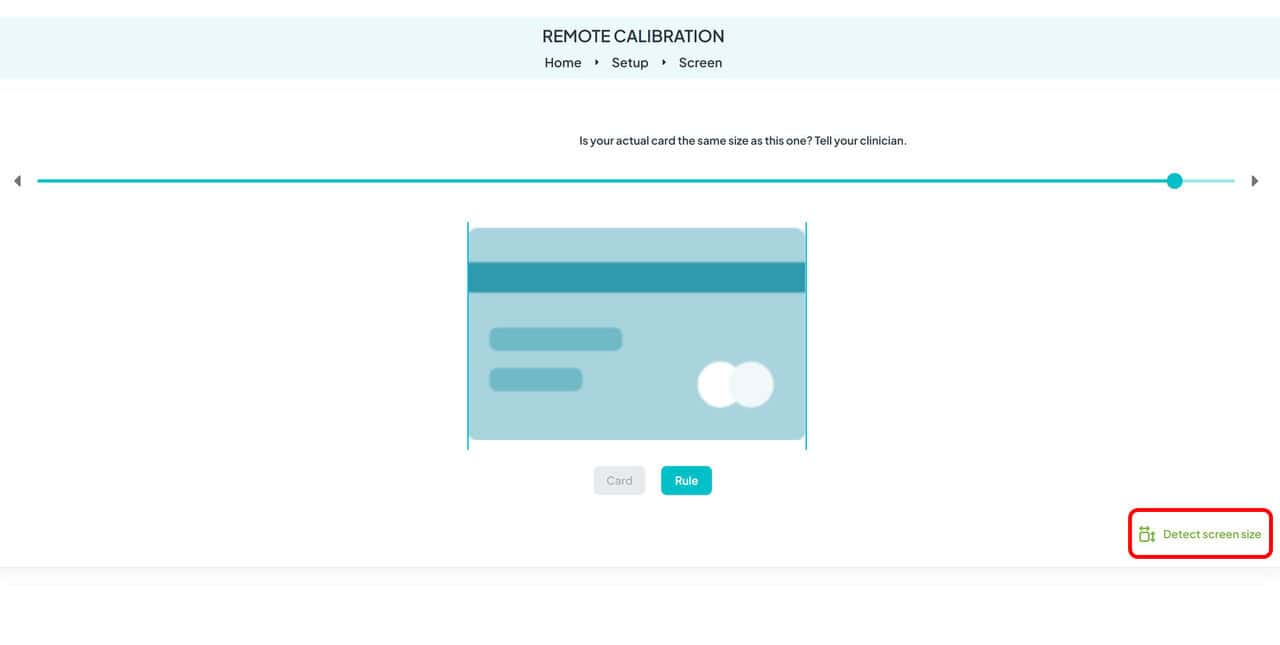
If the on-screen card does not match the physical card size, both the patient and the professional can click the “Detect patient’s screen size” button at the bottom right to automatically readjust the size. Alternatively, they can opt to manually adjust the size using a slider above the card drawing.
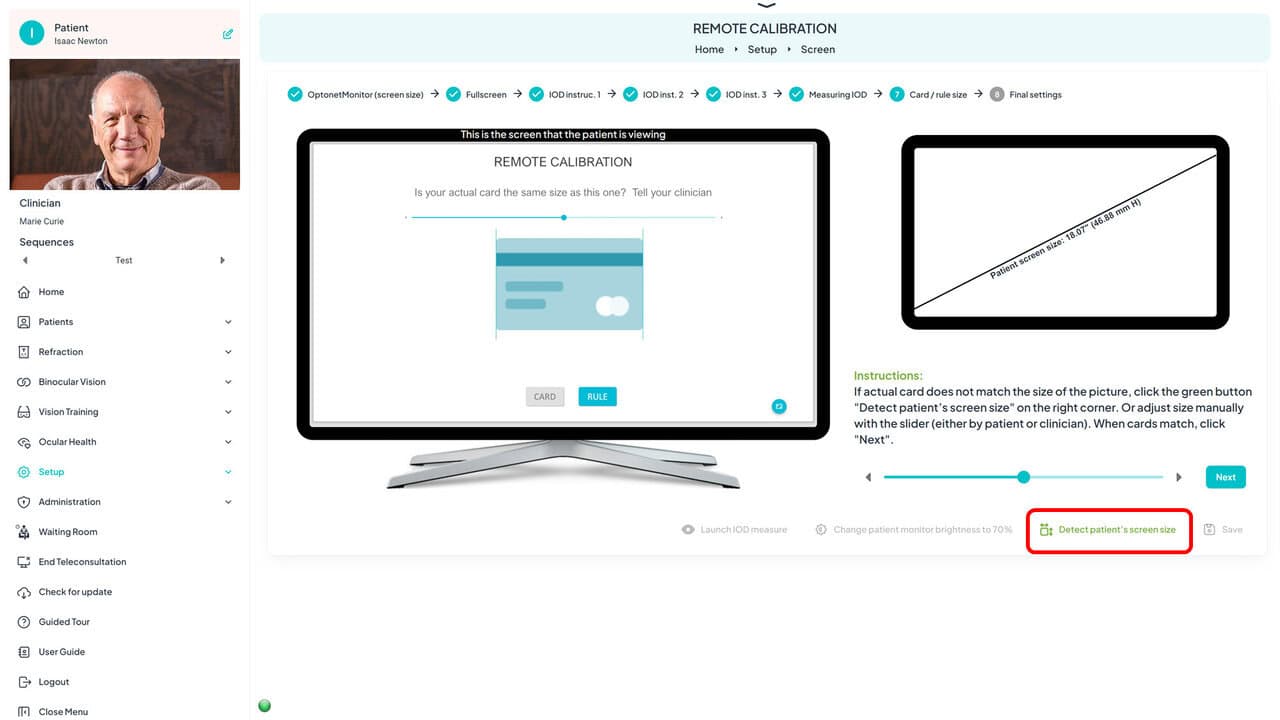
If the patient does not have a bank card, they can use a millimetre ruler for verification. To replace the card image with the ruler image, the patient is asked to simply click the corresponding button below the card drawing on their screen.

During the verification process, the estimated diagonal size of the patient’s screen, in inches and millimetres, is displayed on the clinician’s screen to the right for information. On the left, instructions for the patient are displayed.
At the bottom, there is a slider that allows the manual adjustment of the card size reflected on the patient’s screen. However, in most cases, this tool will not be necessary.

Once the patient confirms that the card size is correct, the clinician proceeds by clicking the “Next” button to measure the distance from which the patient will observe the vision charts.
Step 8. Viewing Distance Measurement #
Now, the clinician instructs the patient to sit at the appropriate distance from their screen for the vision assessment. It is advisable for the patient to sit in a chair facing their device.
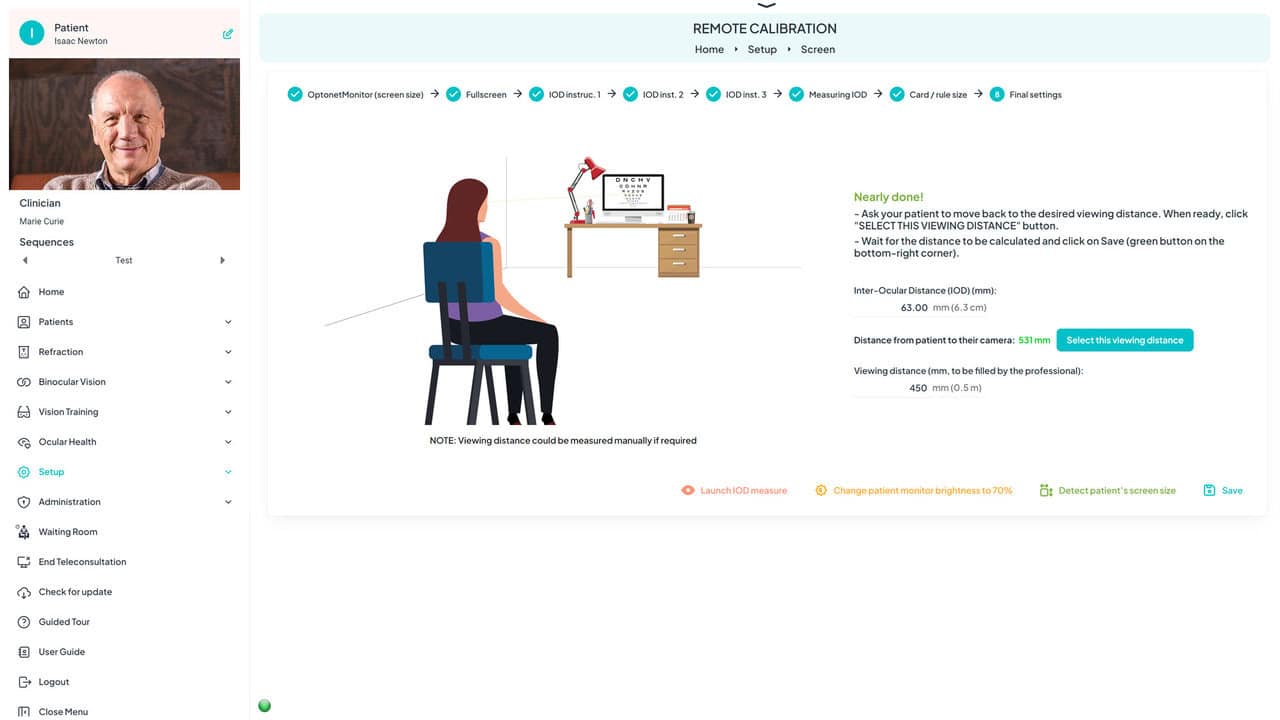
With the patient facing their device, Optonet will determine the patient’s viewing distance to their screen using the patient’s device camera. This measurement appears in green numbers on the professional’s screen (in millimetres) and is updated in real-time. Small fluctuations in the value are normal.
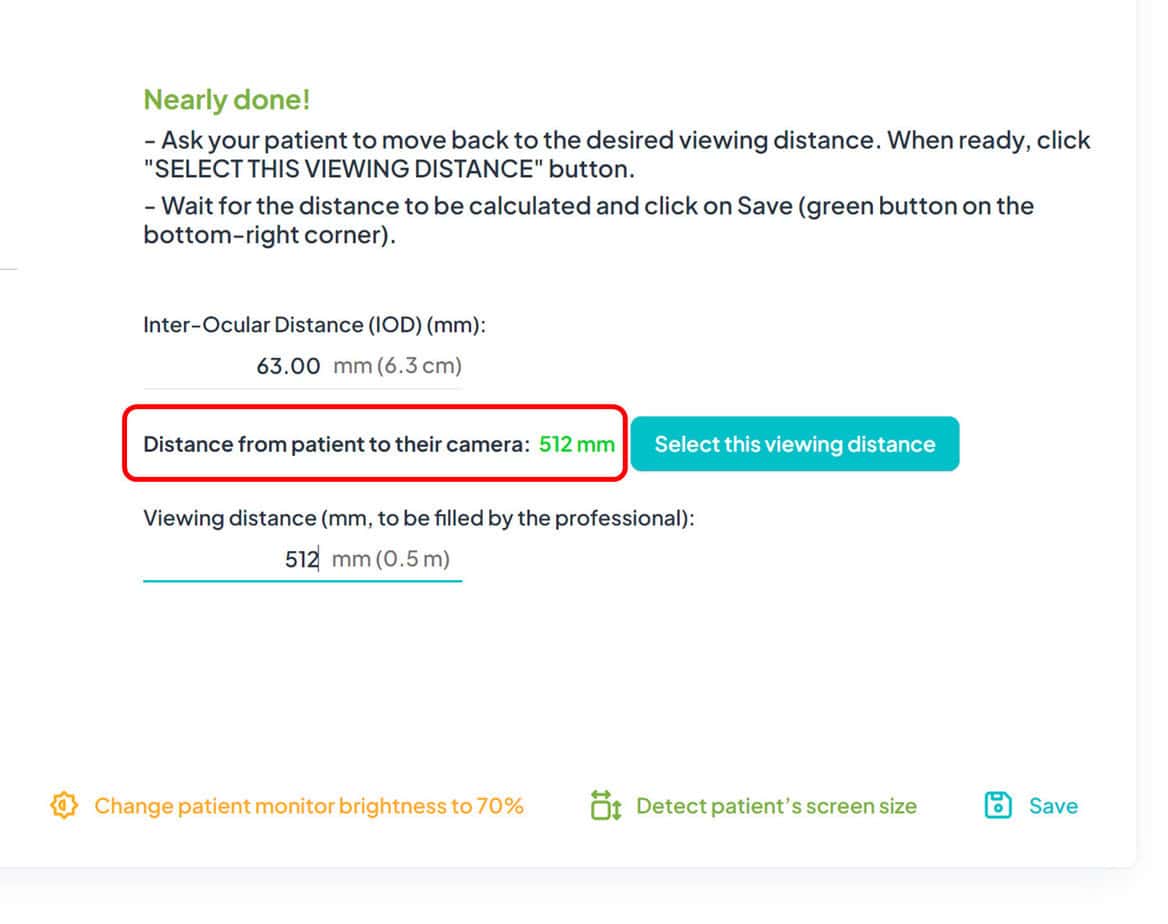
Once the clinician decides that the patient is at the appropriate distance, they should ask the patient to remain still for a moment, facing the camera with their eyes wide open. Then, the clinician will click the “Select this viewing distance” button. The software will take a moment to process the information and automatically display the calculated distance in the corresponding “Viewing distance (mm, to be filled in by the professional)” box, which can be used for calibrating the vision charts during the video consultation.
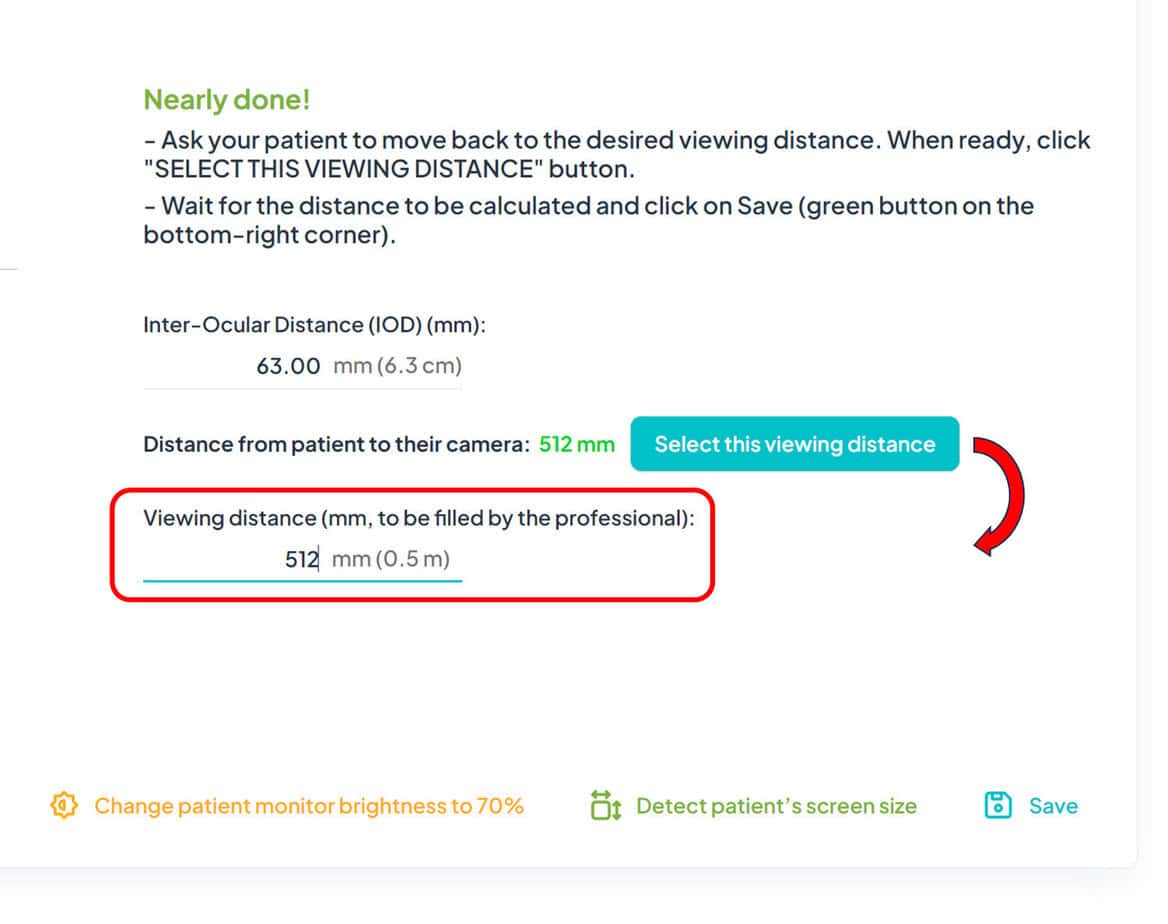
The “Select this viewing distance” button and the real-time distance measurement visualization are only active if the patient is effectively looking at their screen and is the only one in front of the camera.
Note: There is an alternative for the patient to manually measure the viewing distance using a measuring tape. In this case, the patient must communicate the distance to the clinician, who will manually enter it in the corresponding “Viewing distance (mm, to be filled in by the professional)” box.
Ideally, the camera measurement and the distance provided by the patient should be used for greater reliability.
The clinician’s screen also displays the interocular distance (IOD) obtained through previous facial detection. The clinician also has the option to change the IOD value manually.
Calibration Completion
Once all calibration steps are completed, the clinician saves the configuration by clicking the “Save” button in the bottom right corner. This ensures that the vision charts are calibrated for the selected viewing distance, and the Optonet home screen will be displayed on both the clinician’s and the patient’s devices.
Remote Visual Examination #
Start of the Examination
Once the calibration is completed, the clinician is ready to begin the patient’s visual examination. To start a test, select the desired chart from the top or the left menu.
Charts Control and Viewing
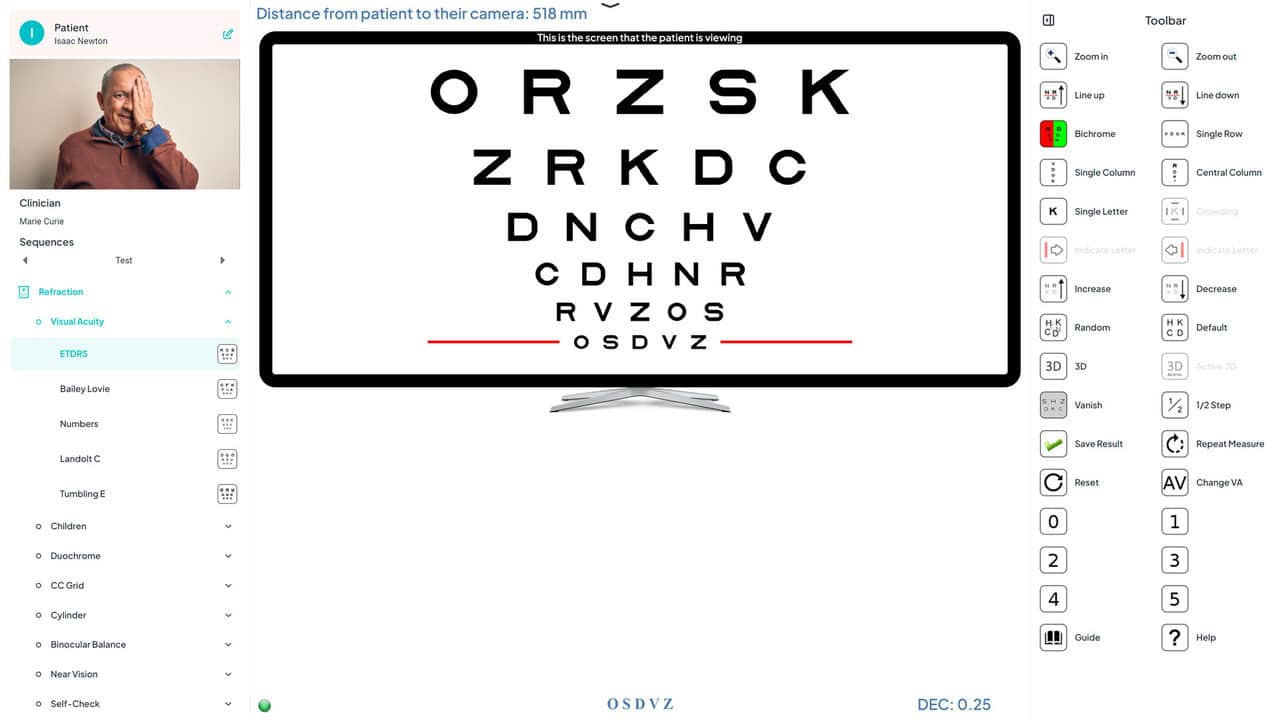
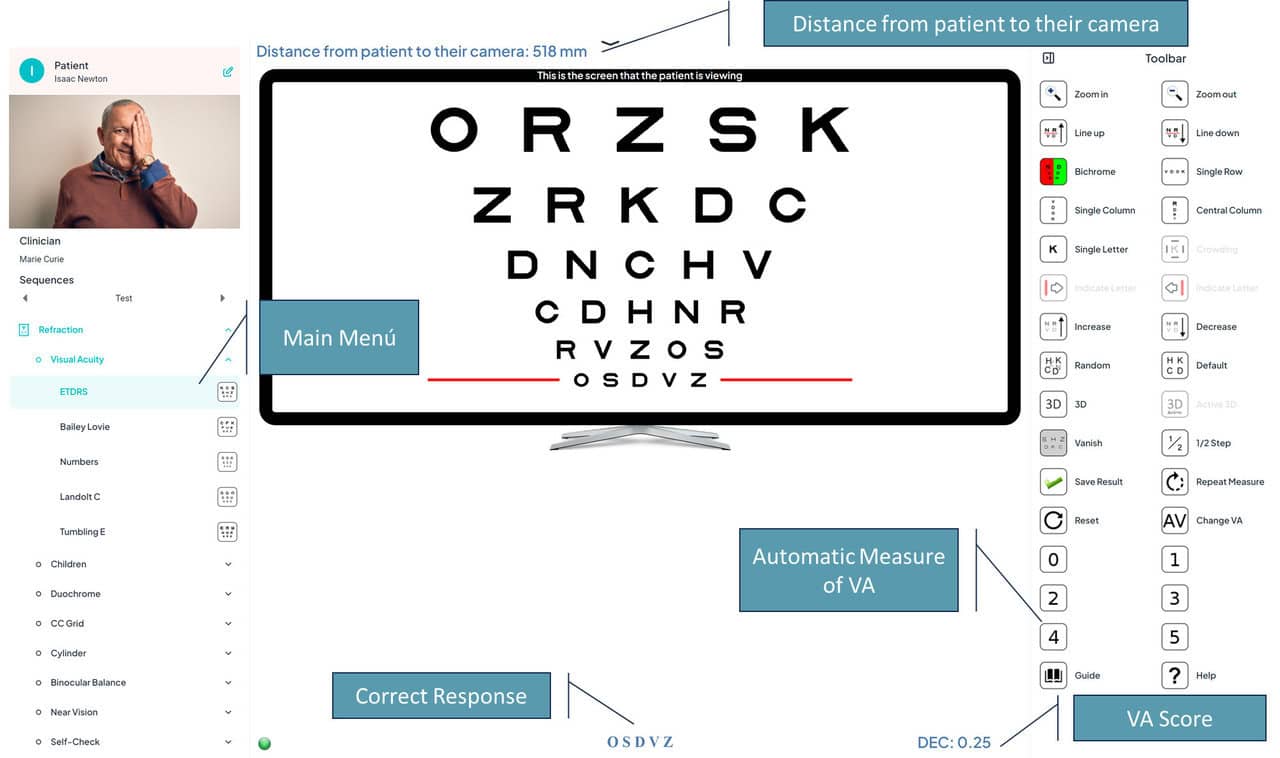
After selecting a vision chart, the control panel on the clinician’s screen is activated. This panel displays the same charts the patient sees in real-time, reflected within the monitor image.
Synchronization of Changes
Any adjustments or changes made to the vision charts by the clinician are first reflected on the patient’s screen and then updated on the clinician’s screen. This ensures that the clinician is certain that what they see on their screen matches exactly what the patient has seen, minimizing delay or desynchronization issues due to the internet connection.
Visual Examination Objective
The aim of this phase is to accurately and efficiently assess the patient’s visual function using various charts that can be adapted and adjusted in real-time according to the patient’s specific needs and responses during the consultation.
Tool Menu #
Location and Description
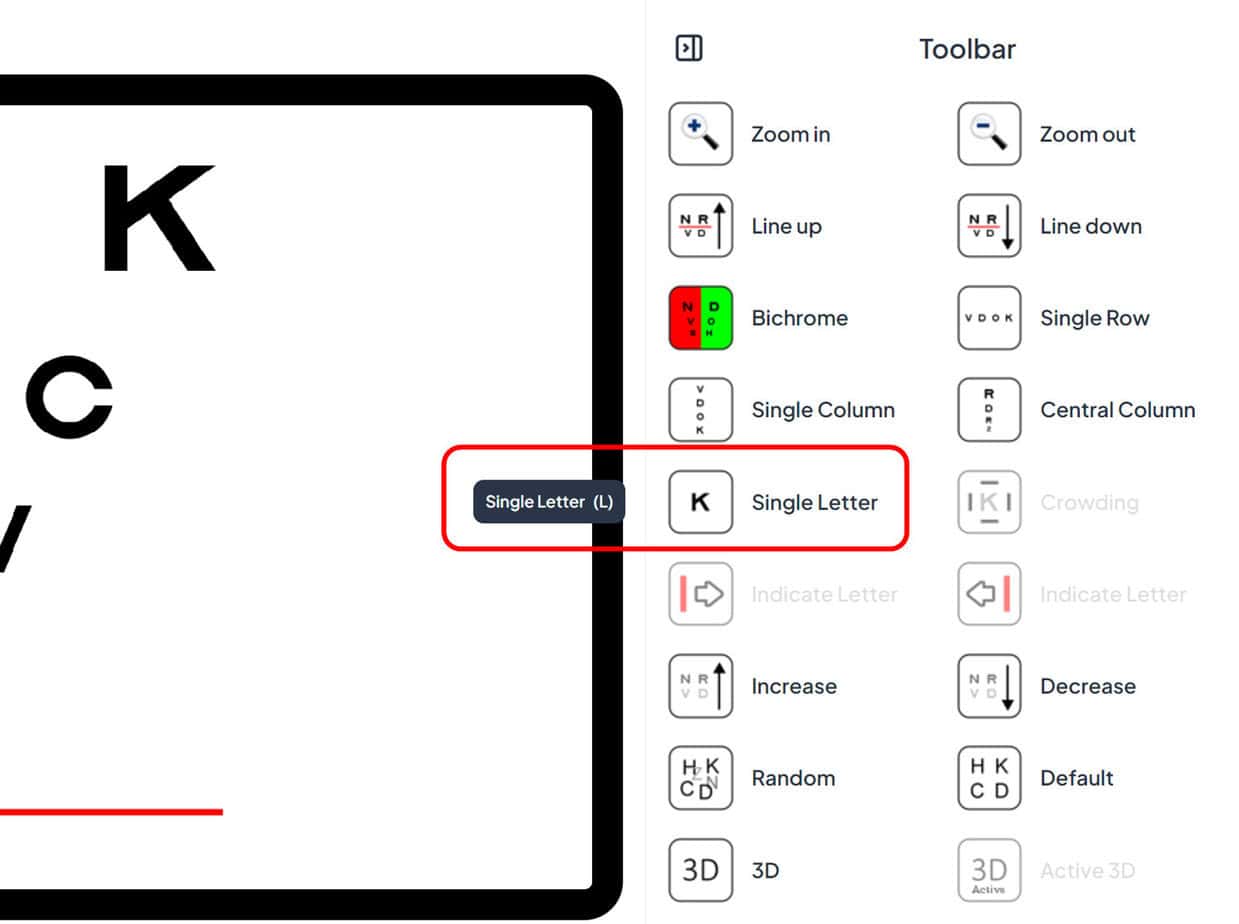
On the right side of the control panel is the tool menu, essential for managing the options of each chart. Each button in this menu has a descriptive text next to it explaining its function.
Interaction and Accessibility
Hovering over any of the buttons will display a tooltip explaining its function. For greater efficiency and ease of use during the video consultation, each tool menu function is also assigned a keyboard shortcut, indicated in brackets next to the button. For example, the button to isolate a single letter can be activated by pressing the “L” key on the keyboard.
Help and Interactive Tutorial Function
The tool menu includes a help button that, when selected, shows a brief interactive tutorial for each chart. This tutorial is designed to concisely and effectively explain the available functions in the tool menu.

Example of the ETDRS visual acuity (VA) chart tutorial. This tutorial provides step-by-step instructions on how to use the specific tools for the ETDRS VA chart.
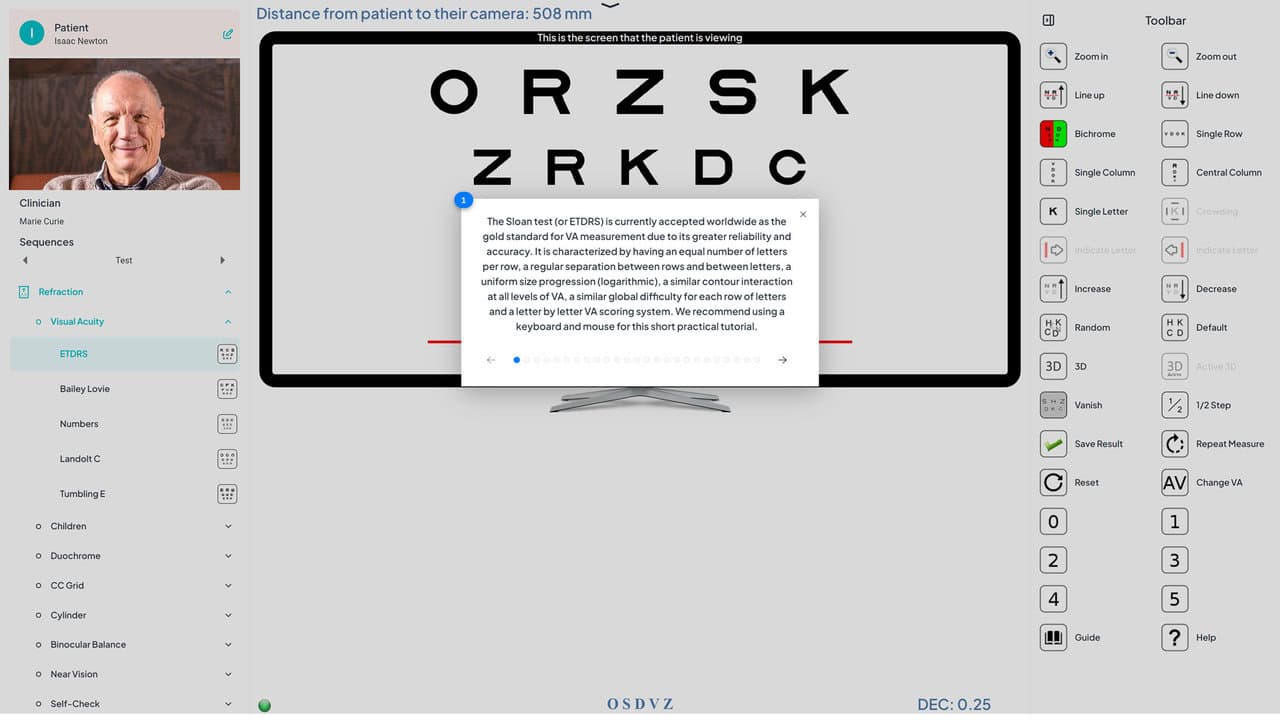
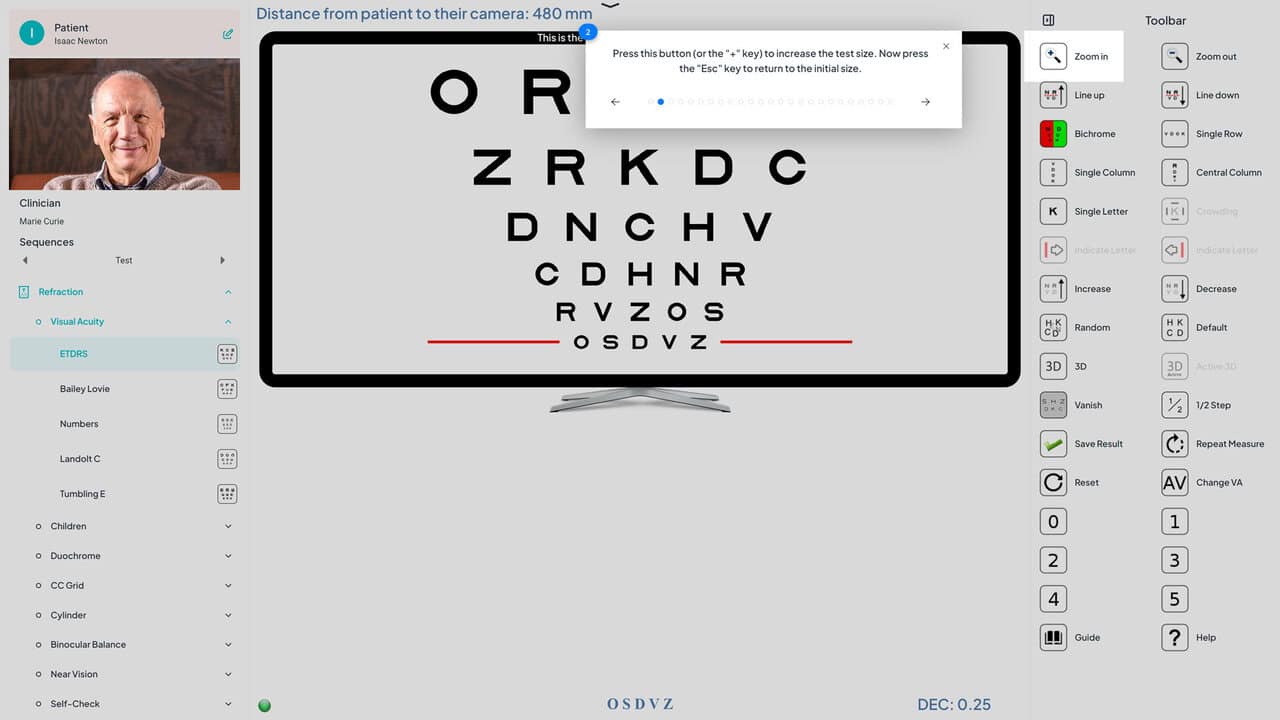
Example of the Clinician’s Control Panel for measuring visual acuity remotely with the Optonet Vision Unit. It shows how the professional can interact with the control panel to adjust the chart according to the patient’s needs.
Remote Visual Acuity in Young Children #
Preparation
Calibration: It is recommended that an adult (parent, guardian) perform the device calibration process before the evaluation. This ensures that the setup is appropriate for the visual assessment.
Space Setup: Once calibration is completed, the adult should place a chair at the previously determined viewing distance, preparing the space for the child to participate in the evaluation.
During the Evaluation
Child Positioning: For very young children, it is suggested that they sit on the adult’s lap during the test. However, it is crucial to remember that the camera is designed to calculate the viewing distance for one subject at a time, so the presence of two people in front of the camera does not allow this calculation.
Using Matching Cards
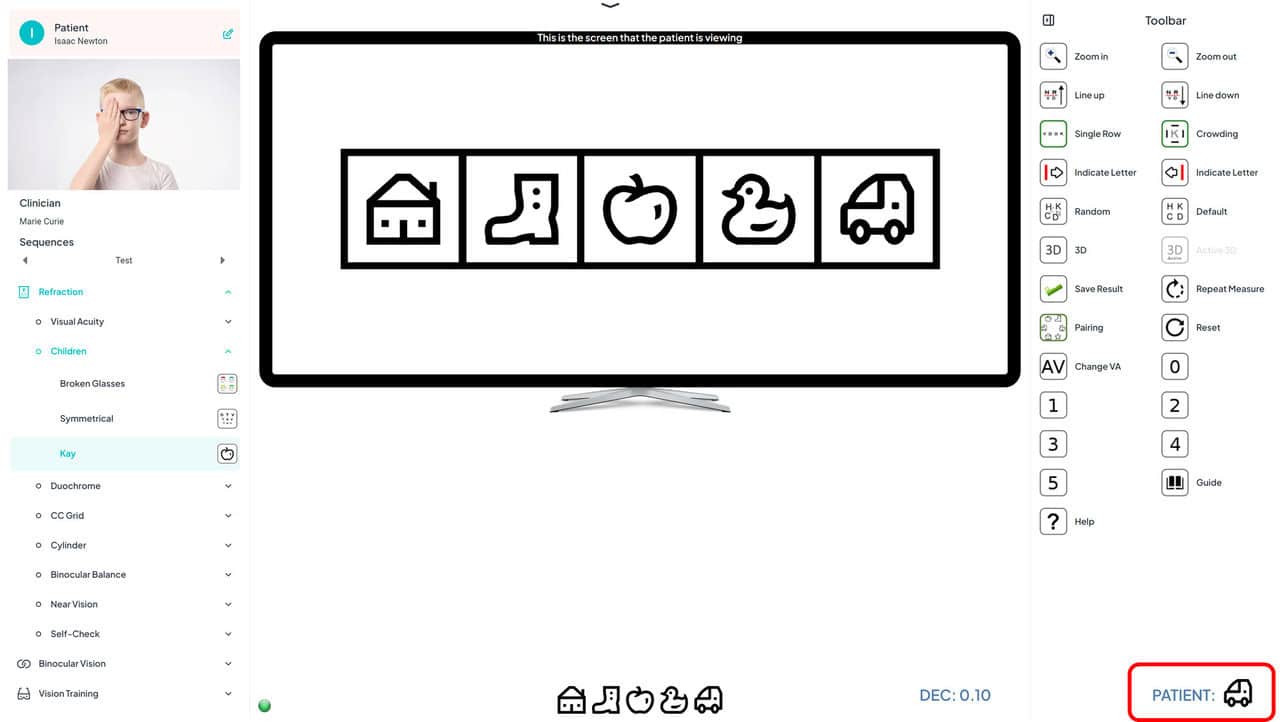
Interactive Digital Tool: For children who cannot yet communicate verbally, digital matching cards adapted to children’s vision charts (such as Symmetrical Letters, Kay® Pictures, and Broken Glasses™) can be used.
Activation and Use: When the professional selects the appropriate children chart and clicks the “Pairing” button:
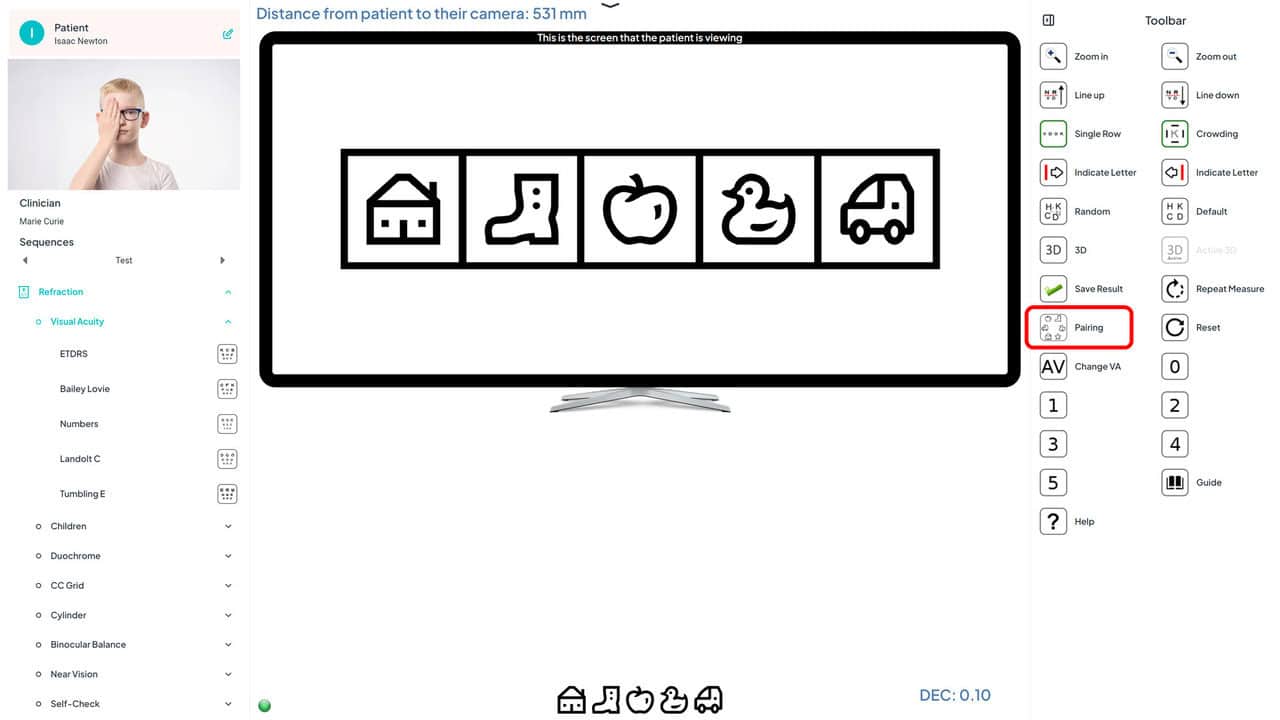
A QR code will be displayed on the patient’s screen:
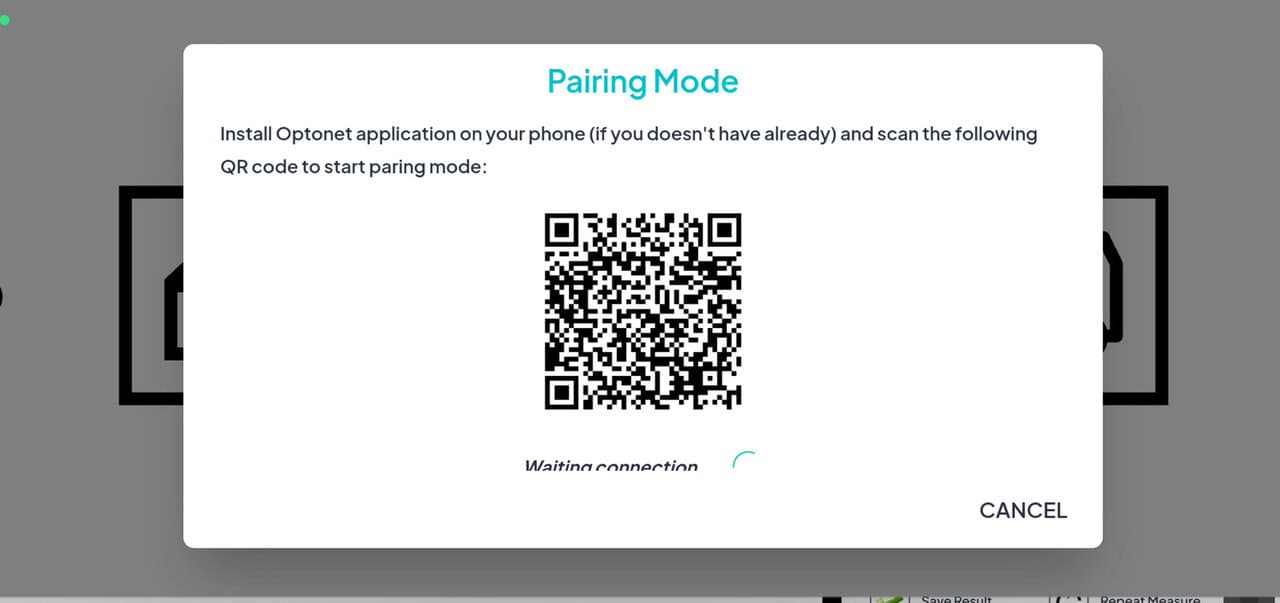
This code can be scanned using a phone or tablet, transforming it into an interactive matching card.

Child Interaction: The child should identify the symbol or image displayed on the main screen and select it on the phone or tablet. The child’s responses are automatically recorded and displayed on the professional’s screen, allowing real-time tracking of the child’s visual response.
External Eye Image Capture #
Optonet includes a feature that allows the clinician to capture a high-resolution image of the patient using the patient’s device camera.
This system has several advantages over observing the patient’s eye through the video image:
Superior Resolution: Video consultations, due to internet bandwidth restrictions, usually do not take full advantage of the camera’s maximum resolution, especially if internet bandwidth is limited.
Maximizing Device Potential: With Optonet, not only can this restriction be overcome, but it is also possible to capture images in 4K resolution (3840×2160) if the patient has, for example, an iPhone. To use this feature, simply click the “Patient Photo” button on the video window control bar on the clinician’s screen:

