The following section of the “Refraction” group is dedicated to the “Binocular Balance,” featuring three links: one for the “Prisms and Alternating Occlusion” method, another for “Polarized,” and a third for the “Turville” method.
Introduction #
Binocular balance is conducted at the end of subjective monocular refraction to determine the true spherical power difference between both eyes.
To perform this procedure, a dissociation method that allows displaying an image to each eye separately is required. Starting from the subjective refraction, we add a pair of positive lenses in binocular vision, typically +0.50 or +0.75 DS. After confirming that the lenses clearly reduce visual acuity, we compare the images seen by each eye. If one eye sees more clearly, we add +0.25 DS to it. This allows us to adjust the sphere for one eye or the other until both perceive the blurry image similarly. Then, we reduce the positive lenses binocularly in 0.25 steps until reaching the maximum positive that provides the highest visual acuity.
If the patient has different visual acuities, we cannot compare the sharpness of the images to balance the refraction. In such cases, we can display the Bichromatic test in binocular vision (dissociating, for example, with vertical prisms, polarizing filters, or the Turville test). We add a small positive to both eyes to improve vision on a red background, then ask the patient to focus on the image seen by one eye. We then adjust the sphere of that eye to make the letters on both backgrounds appear equally sharp, and repeat the process by adjusting the sphere of the other eye.
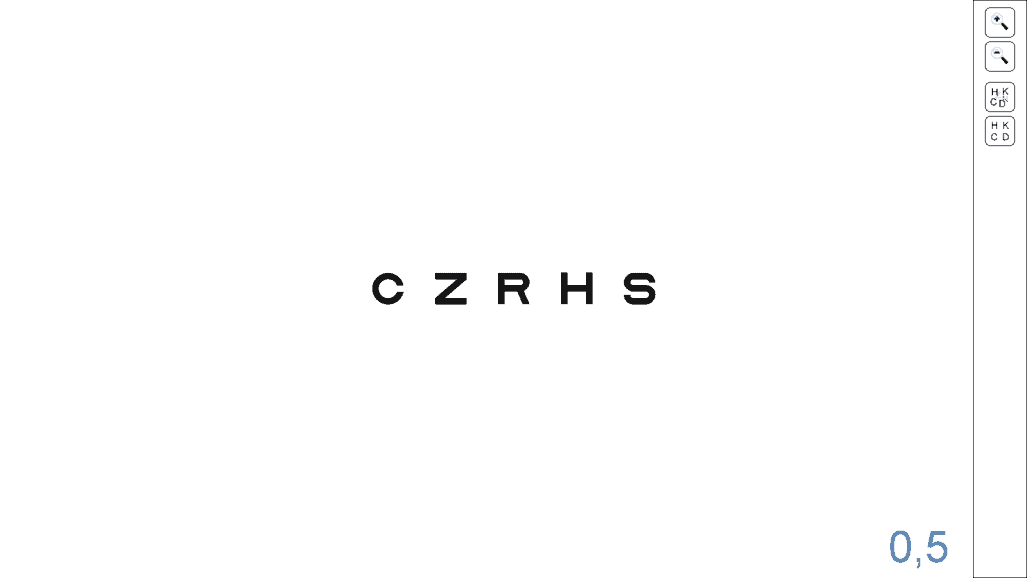
Prisms and Alternating Occlusion #
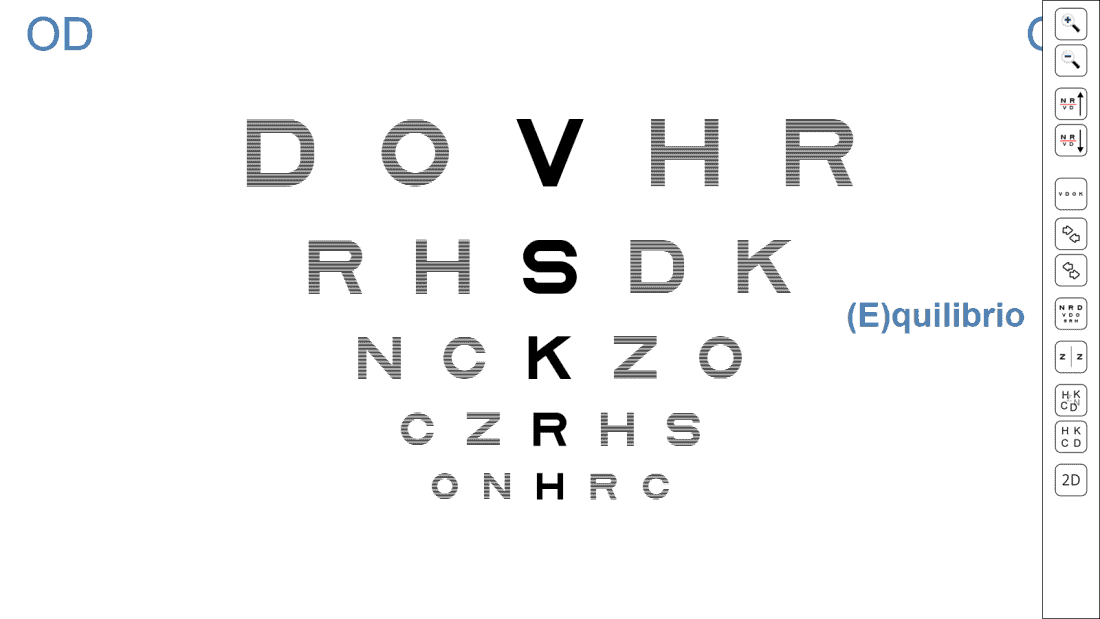
Clicking on this link, the program will display an isolated horizontal row of Sloan VA 6/12 (equivalent to 20/40, 0.3 log, 0.5 decimal), which can be used for binocular balance, dissociating with Vertical Prisms (3Δ base up and 3Δ base down, each in front of one eye), or the Alternating Occlusion method.
Just like with the rest of the VA tests, it is possible to increase and decrease the size of the letters, and also to randomly change the displayed letters; this can be done using the tool menu icons or the corresponding shortcut keys.
Polarized #
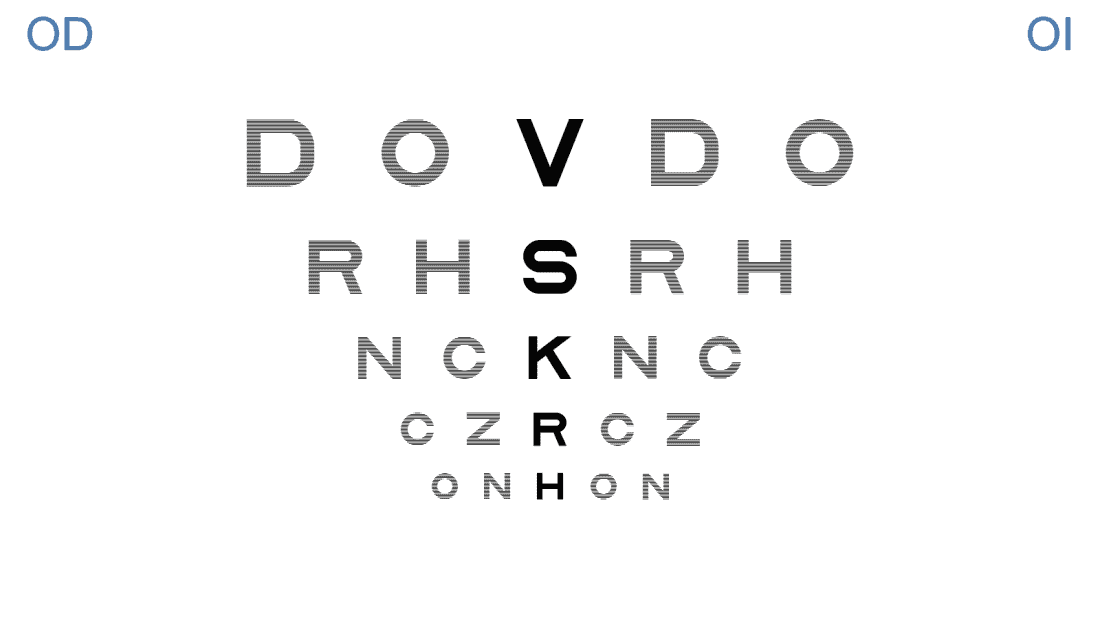
The polarized chart for binocular balance requires a passive 3D monitor, along with polarization filters to dissociate what each eye sees. This chart consists of three rows with 5 Sloan letters each, all the same size, initially corresponding to a VA of 6/12 (equivalent to 20/40, 0.3 log, 0.5 decimal), as indicated in the lower right corner. The separation between the rows equals twice the height of the letters displayed.
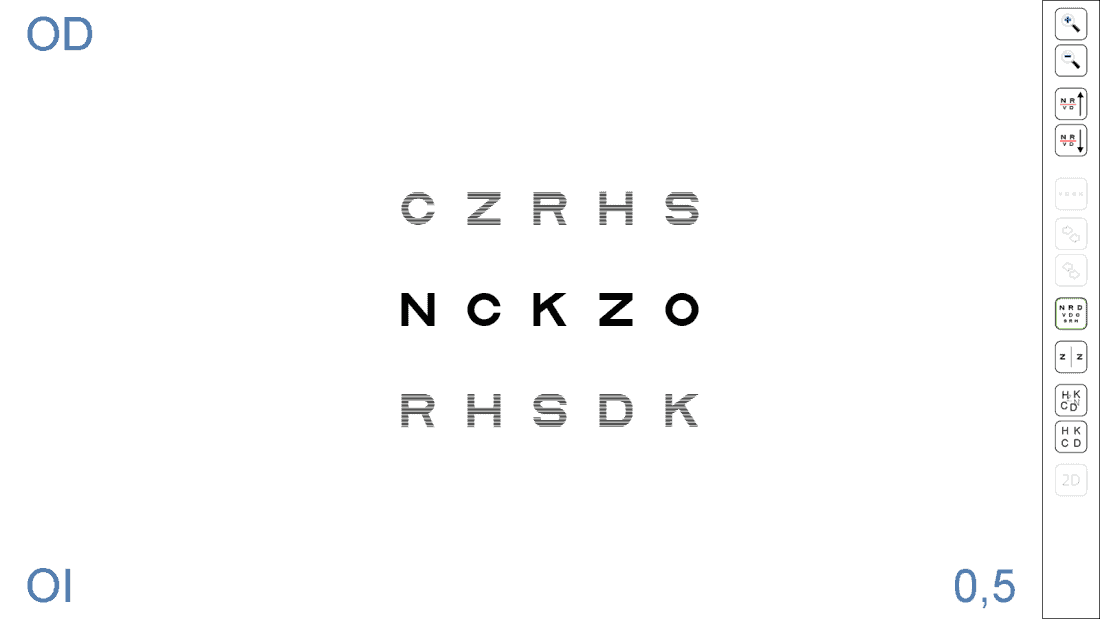
The tool menu icons (or their corresponding shortcut keys) allow changing the size of the letters and their distribution randomly. Moreover, the letters in the bottom row can be changed to match those in the top row, facilitating comparison. To display different letters again, the same icon must be pressed. The shortcut key for this function is “S” (for (S)ame).
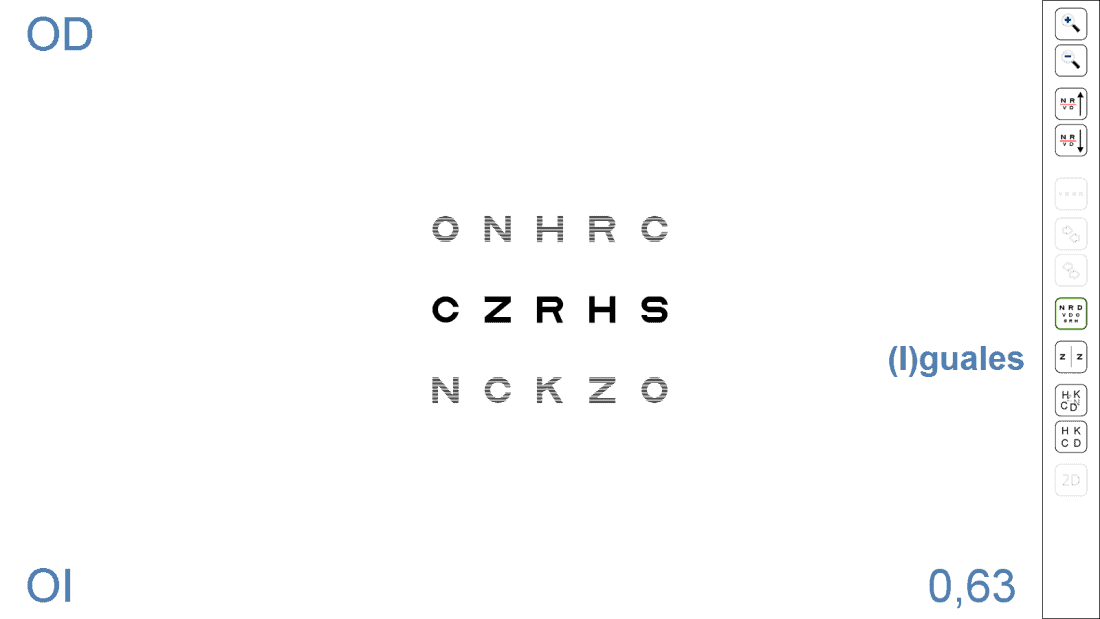
Through the polarizing filters, the top row will be visible only with the right eye (RE), the bottom with the left eye (LE), while both eyes see the middle one. In the left corners, it is indicated which eye sees each row.
Balance (2) #
This chart offers another polarized version for binocular balance, accessible from the tool menu or by pressing the “B” key: (B)alance.
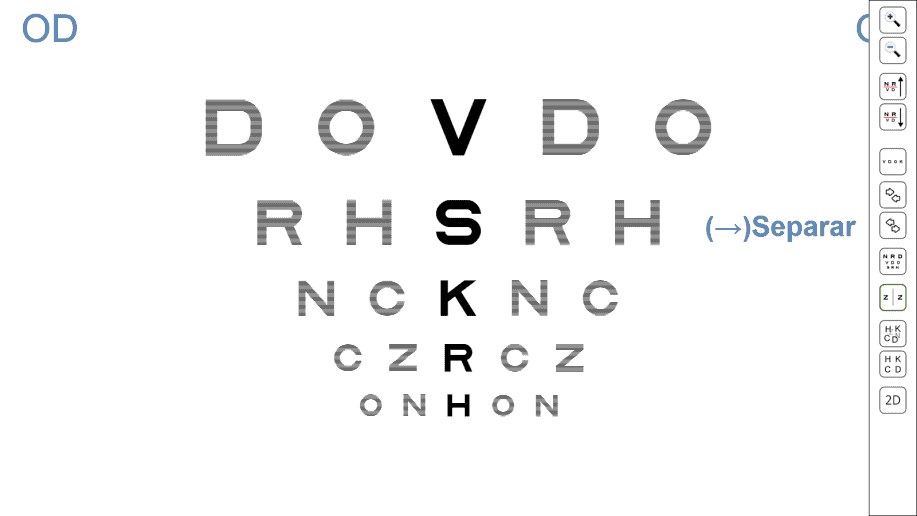
Here, a panel of letters in decreasing sizes is displayed so that, through the filters, the first two letters of each row are seen only by the RE and the last two only by the LE. The letters in the central column will be observed binocularly. This way, the patient can compare the letters seen by their RE with those seen by the LE to perform binocular balance.
In the upper corners of the screen, the letters “RE” and “LE” are shown to indicate to the professional which side of the panel the patient sees with each eye.
Again, if we press the (S)ame button (or the “S” key), the letters on the right will become the same as those on the left, facilitating comparison. Pressing the same icon (or the “S” key) again will display different letters on each side of the central column.
Once more, we can increase or decrease the size of the letters, select a row using the red lines, randomly change the displayed letters, and isolate a horizontal row:
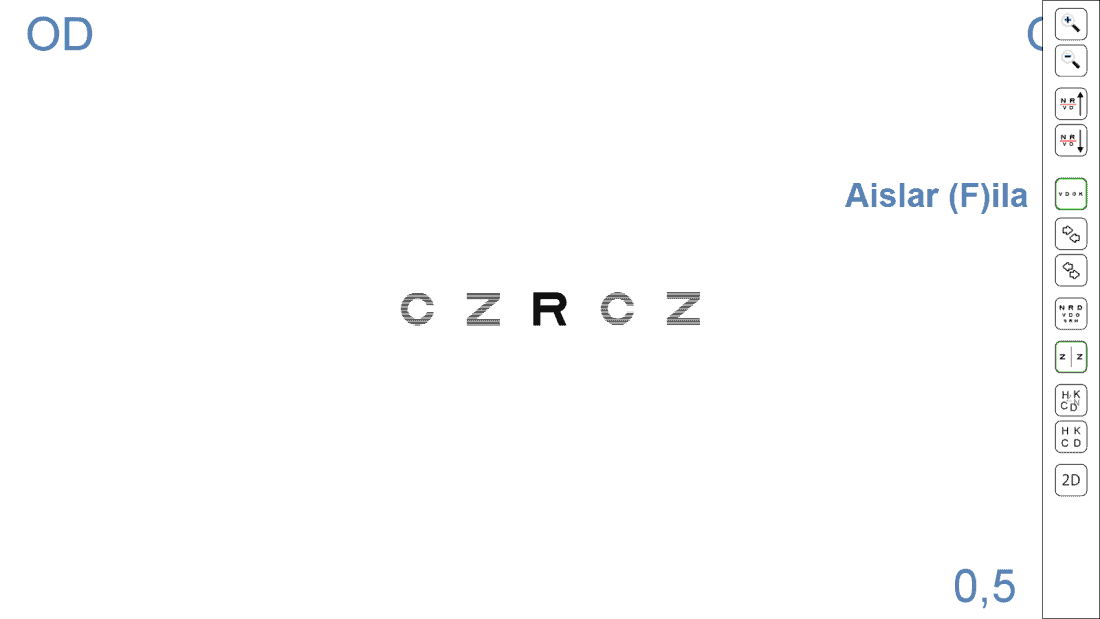
The tool menu also includes two buttons to separate or bring together the first and last letters from the central column, placing them as needed.
This function is useful for patients with unstable binocular vision who tend to mix the letters. Alternatively, the position of the letters can be adjusted with the horizontal arrows on the keyboard (right (→) and left (←)). The chosen separation will be automatically saved for the next execution of the test.
Turville Test #
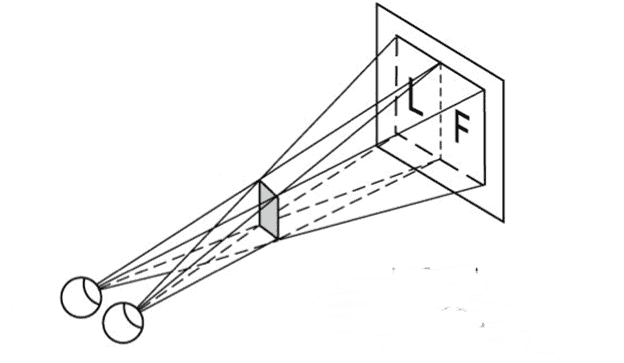
The Turville test was one of the first tests proposed for performing binocular balance. It utilizes a very simple principle: placing an occluder at a distance from the patient acting as a shutter (septum) to prevent each eye from seeing part of the visual field.
Test original de Turville
Original Turville Test #
This test has been valued as one of the most precise for performing binocular balance, as it does not use any type of filters or prisms to dissociate the images seen by each eye. It is also very useful for detecting vertical deviations. However, it fell out of use because it was very cumbersome to place a separator (septum) in the correct position in clinic rooms that do not use a mirror to duplicate the viewing distance.
At Optonet, we wanted to recover this test, as it does not require filters or prisms to perform binocular balance, making it more natural and effective. Thus, we have designed a way to perform this test with the phoropter and the Optonet Unit, which we explain step by step below. We invite you to try it.
Test Preparation #
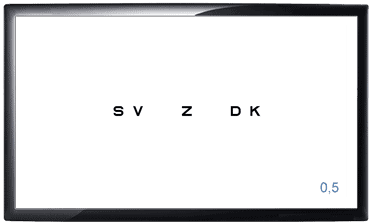
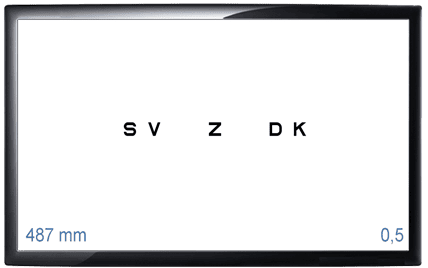
In the Vision Unit, we go to the binocular balance menu and select the Turville test. We see that a row of 6/12 VA letters (equivalent to 20/40, 0.3 log, 0.5 decimal), appears on the screen, with the first two and the last two letters separated from the central letter.
Next, we need to place the occluder (septum) in front of the patient. We recommend using a simple white cardboard rectangle, 5 cm wide by about 15 cm high (the height is not critical). We can hold it on the phoropter bar, as shown in the following image:
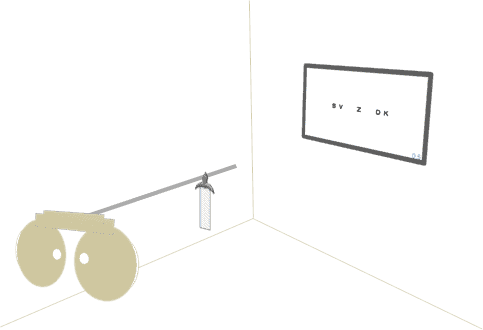
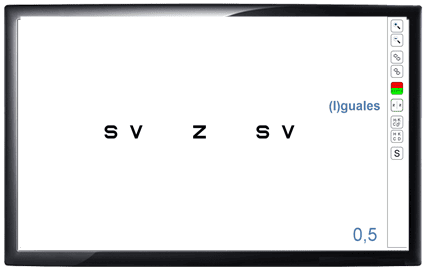
By placing the occluder in the middle line of vision, we aim to hide the left side of the visual field from the patient’s right eye, and the right side of the field from the left eye, but allowing both to see the central letter (see image below).
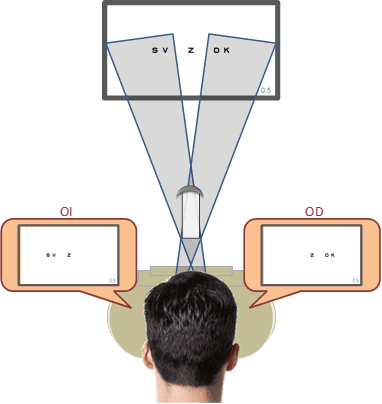
We will need to adjust the distance at which we place the cardboard on the bar to ensure that the two letters on the left (S, V) are seen only by the LE; the two letters on the right (D, K) are seen only by the RE, while the Z in the centre is observed by both eyes simultaneously. The placement distance of the cardboard depends on the viewing distance and the patient’s interpupillary distance; normally it will be between 40 and 60 cm from the patient. The Vision Unit includes a function that helps to calculate the distance accurately, as explained below.
Occluder Placement Distance #
One of the problems with this technique is that the position of the cardboard is critical to properly appreciate the effect, and it is not the same for all patients, as it depends on each patient’s interpupillary distance. To simplify this, we have included a tool that calculates the occluder (septum) distance for each patient: By clicking on the Septum icon (or the letter S on the keyboard), a window opens where you can enter the patient’s interpupillary distance.
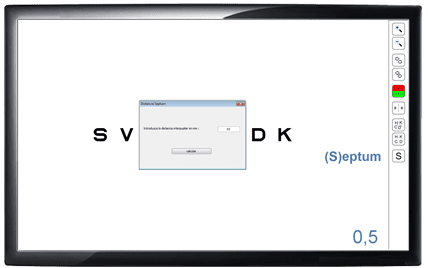
If we then click on calculate, the distance at which we have to place the cardboard for that patient appears in the lower left corner (in mm). In the following example, it would be at 487 mm. Since the near bar is always calibrated in centimetres, it is easy to find the correct position.
We will always check that the patient sees only the corresponding three letters with each eye and, if necessary, make small adjustments by moving the cardboard closer or further until achieving it. It is also possible to separate or bring together the letters on the screen with the right and left arrows on the keyboard, or with the menu buttons.
The program also allows us to display the same or different letters on both sides, as well as modify the size of the letters or change the displayed letters randomly.
Method #
Once the cardboard is placed in the correct position, we can perform binocular balance in the usual way: starting from the final monocular subjective refraction and placing a pair of positive lenses in binocular that reduce VA (+0.50 / +0.75 DS). The Turville test allows comparing the sharpness of the letters seen by one eye relative to the other, and adjust the sphere until sharpness is equalized. This method maintains binocular vision on the central letter (Z) and has the advantage of not using any filter or prism that could distort the image.
We can only compare image quality if acuities are equal. Next, we explain how to perform binocular balance if VAs are different between one eye and the other.
Turville for Different Acuities #
As with other binocular balance techniques, it is necessary for both eyes to have similar visual acuity to compare the sharpness of the images and equalize it by adjusting the sphere to each eye. In case of a difference in VA between both eyes, we can perform the balance with the occluder and the binocular bichromatic chart shown in the following image:

Just like before, the occluder ensures that the first two letters of each row are seen only by the LE and the last two by the RE, while the central letters are observed with both eyes. This chart allows comparing the sharpness of the letters on red and green backgrounds for each eye separately (comparing the top letters with the bottom ones), but with both eyes open. The goal is to alter the final sphere until the letters on the left (LE) are equally sharp on red and green backgrounds, and also the letters on the right (RE).
This binocular bichromatic test is useful for performing binocular balance in patients who do not have the same VA in both eyes, but is not effective if there is suppression.
Vertical Deviations #
The Turville chart is also ideal for subjectively assessing vertical deviations in distance vision. We will ask the patient if the letters are at the same level or if some are higher than others. If with the head and phoropter straight, one eye sees the letters higher or lower than the others, it indicates that eye has vertical fixation disparity.
With this method, we can even determine the prism that neutralizes the deviation, which will be the prism that makes all letters appear at the same level and without oscillating. This prism could be included in the patient’s final prescription.