“Broken Glasses” chart #
The Children Visual Acuity (VA) section includes a new test (the “broken glasses” chart) to evaluate acuity in the preschool population. The “broken glasses” chart uses Landolt C optotypes, which have traditionally been considered as the standard in the measurement of VA, and the reference against which the rest of optotypes should be compared. (1) The optotypes are presented in a modified, four-choice format, which substantially improves validity over an older (Broken Wheel) test which uses a two-choice format. (2)
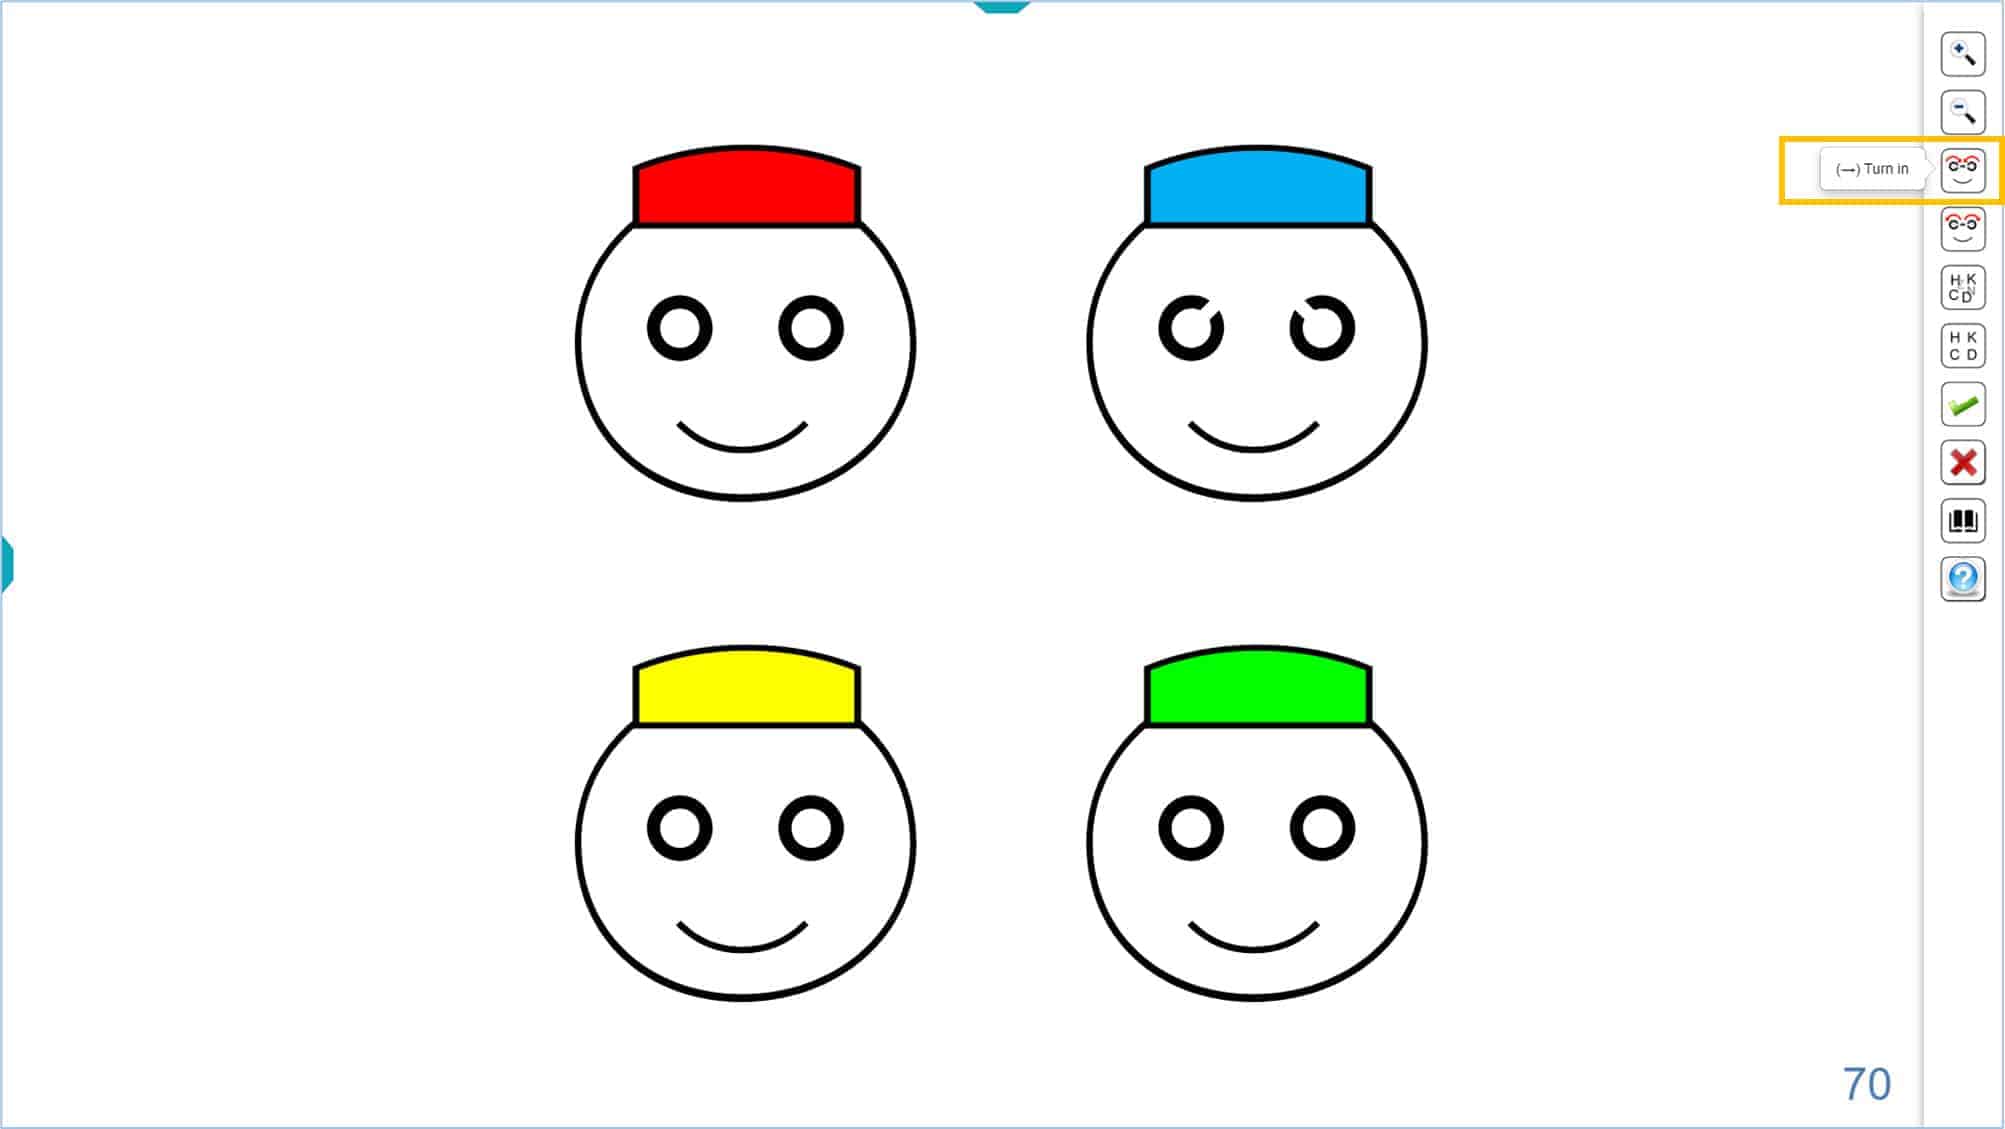
The test consists of 4 smiling faces “wearing glasses”, three of which have complete eyeglass rings, while the rings of the fourth face are open. The open rings in the face with “broken glasses” are actually calibrated Landolt Cs. All the rings on the screen have the same size and stroke thickness. The strokes on the face and cap guarantee sufficient contour interaction for improved amblyopia detection in the preschool population. Four simple colours have been used for the caps: red, blue, green, and yellow. The layout of the colours is always the same, on every screen.
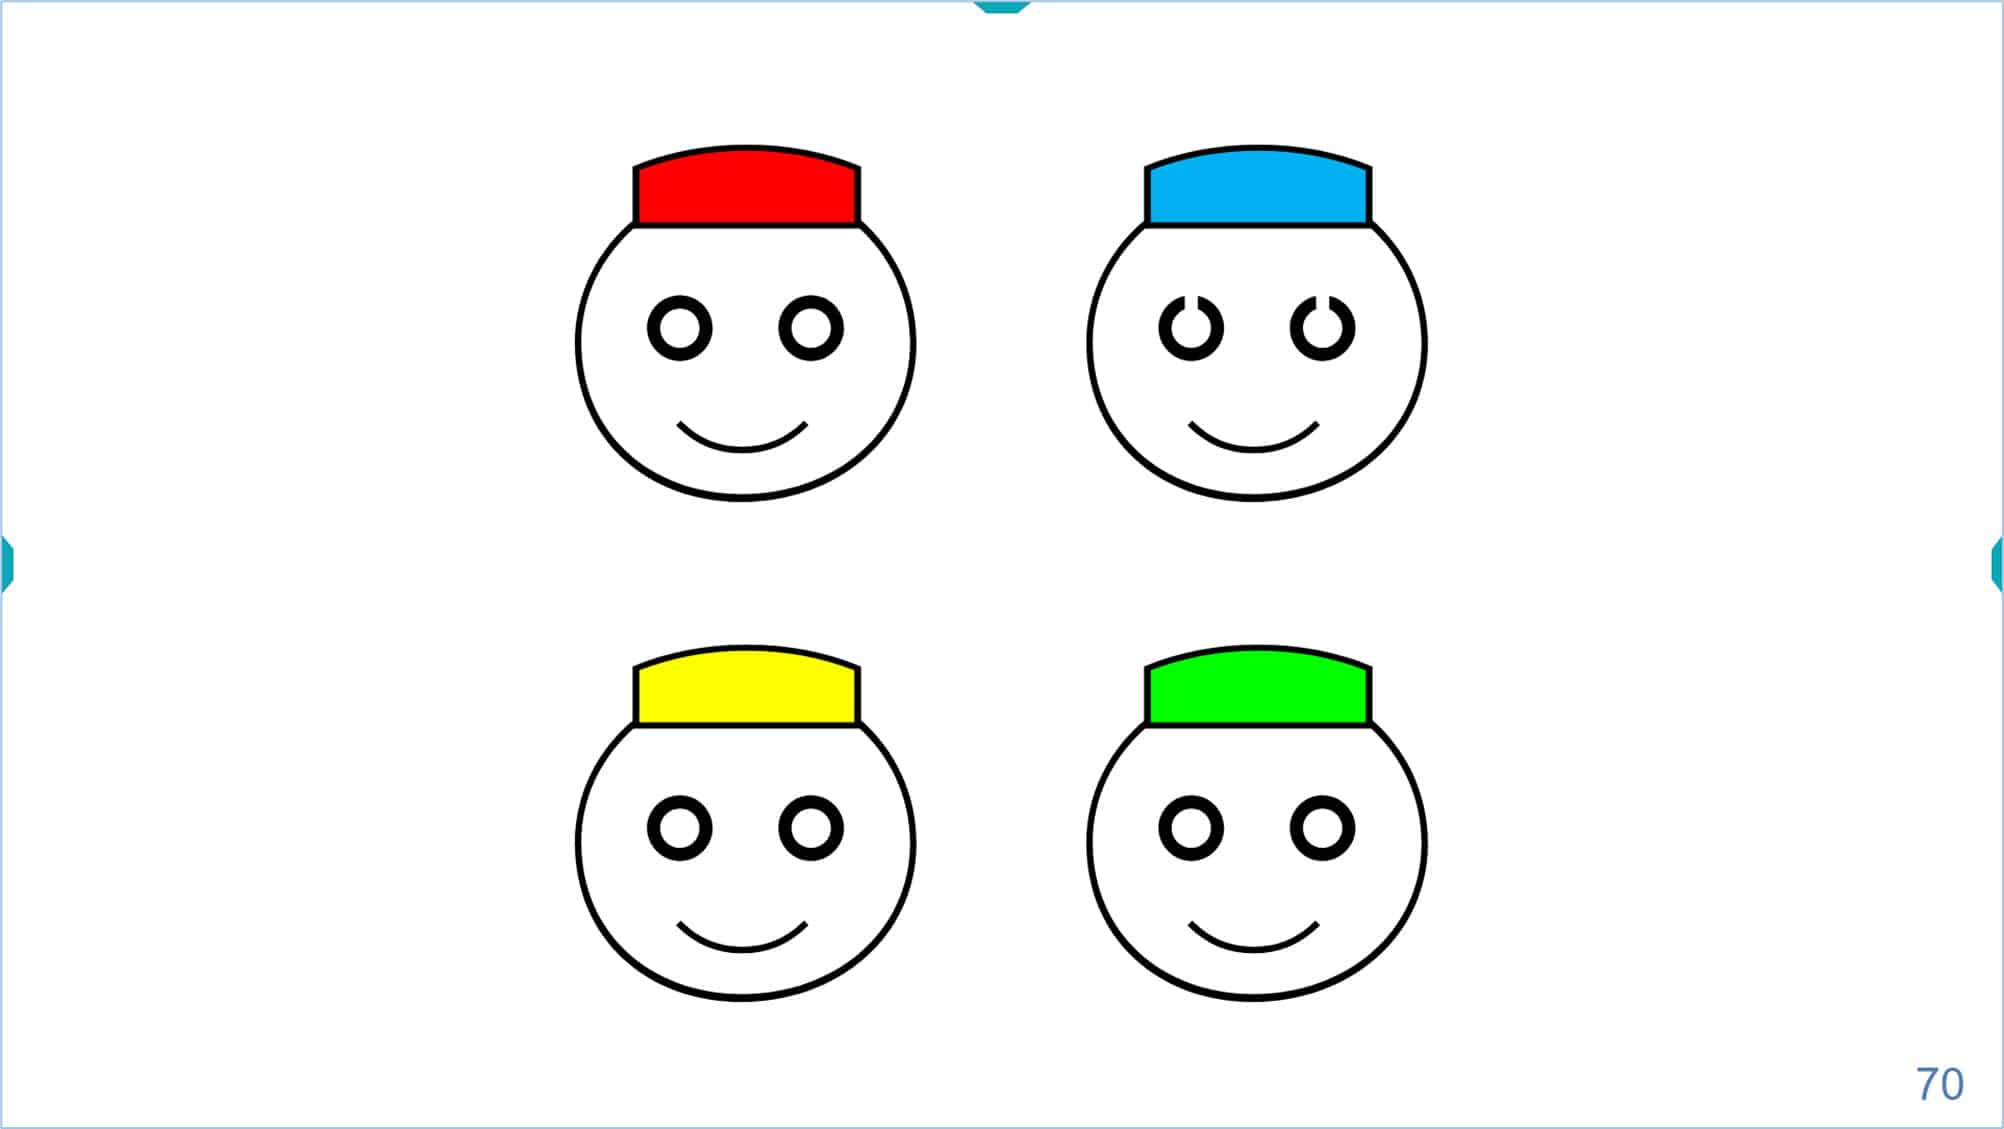
The child simply has to point out which face has the “broken glasses”, either with a gesture or by telling the colour of the cap. We can also print a “Pairing Card” (which we can download from the vision Unit documentation), which allows the child to point out which of the 4 faces has the Landolt C, or broken glasses.
It is recommended that the parents practice the test with the child at home, before examination, so that the child knows what to identify. Sheets with figures can also be downloaded from the documentation so that parents can practice with the child. Practising at home will make the child more comfortable and cooperative in the unfamiliar examination setting.
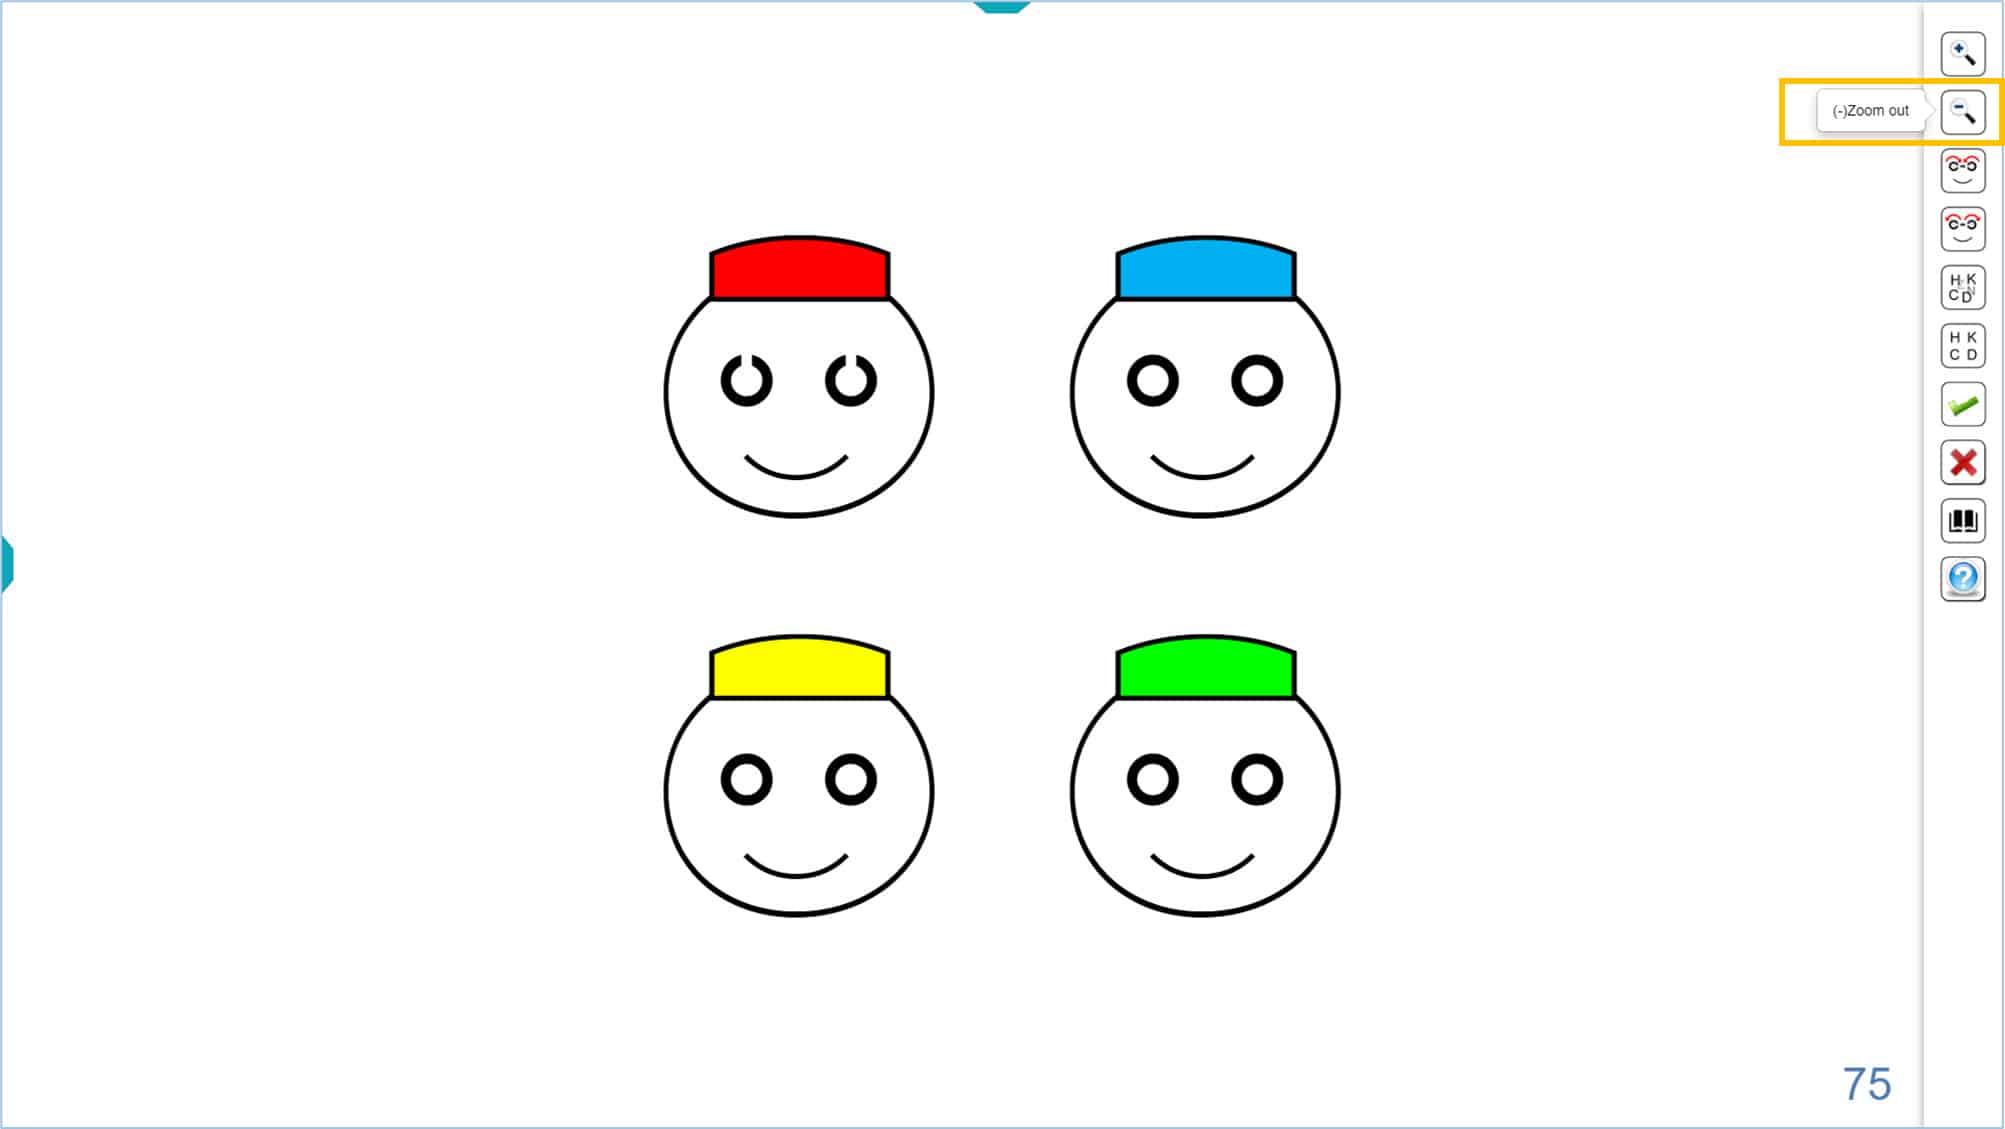
The size of the faces and rings can be increased using the icon of the tools menu or the keyboard shortcuts (the “+” sign, or with the up arrow “↑” of the keyboard). Size can be decreased using the icon, or the keyboard shortcuts (the “-” sign, or the down arrow “↓”).
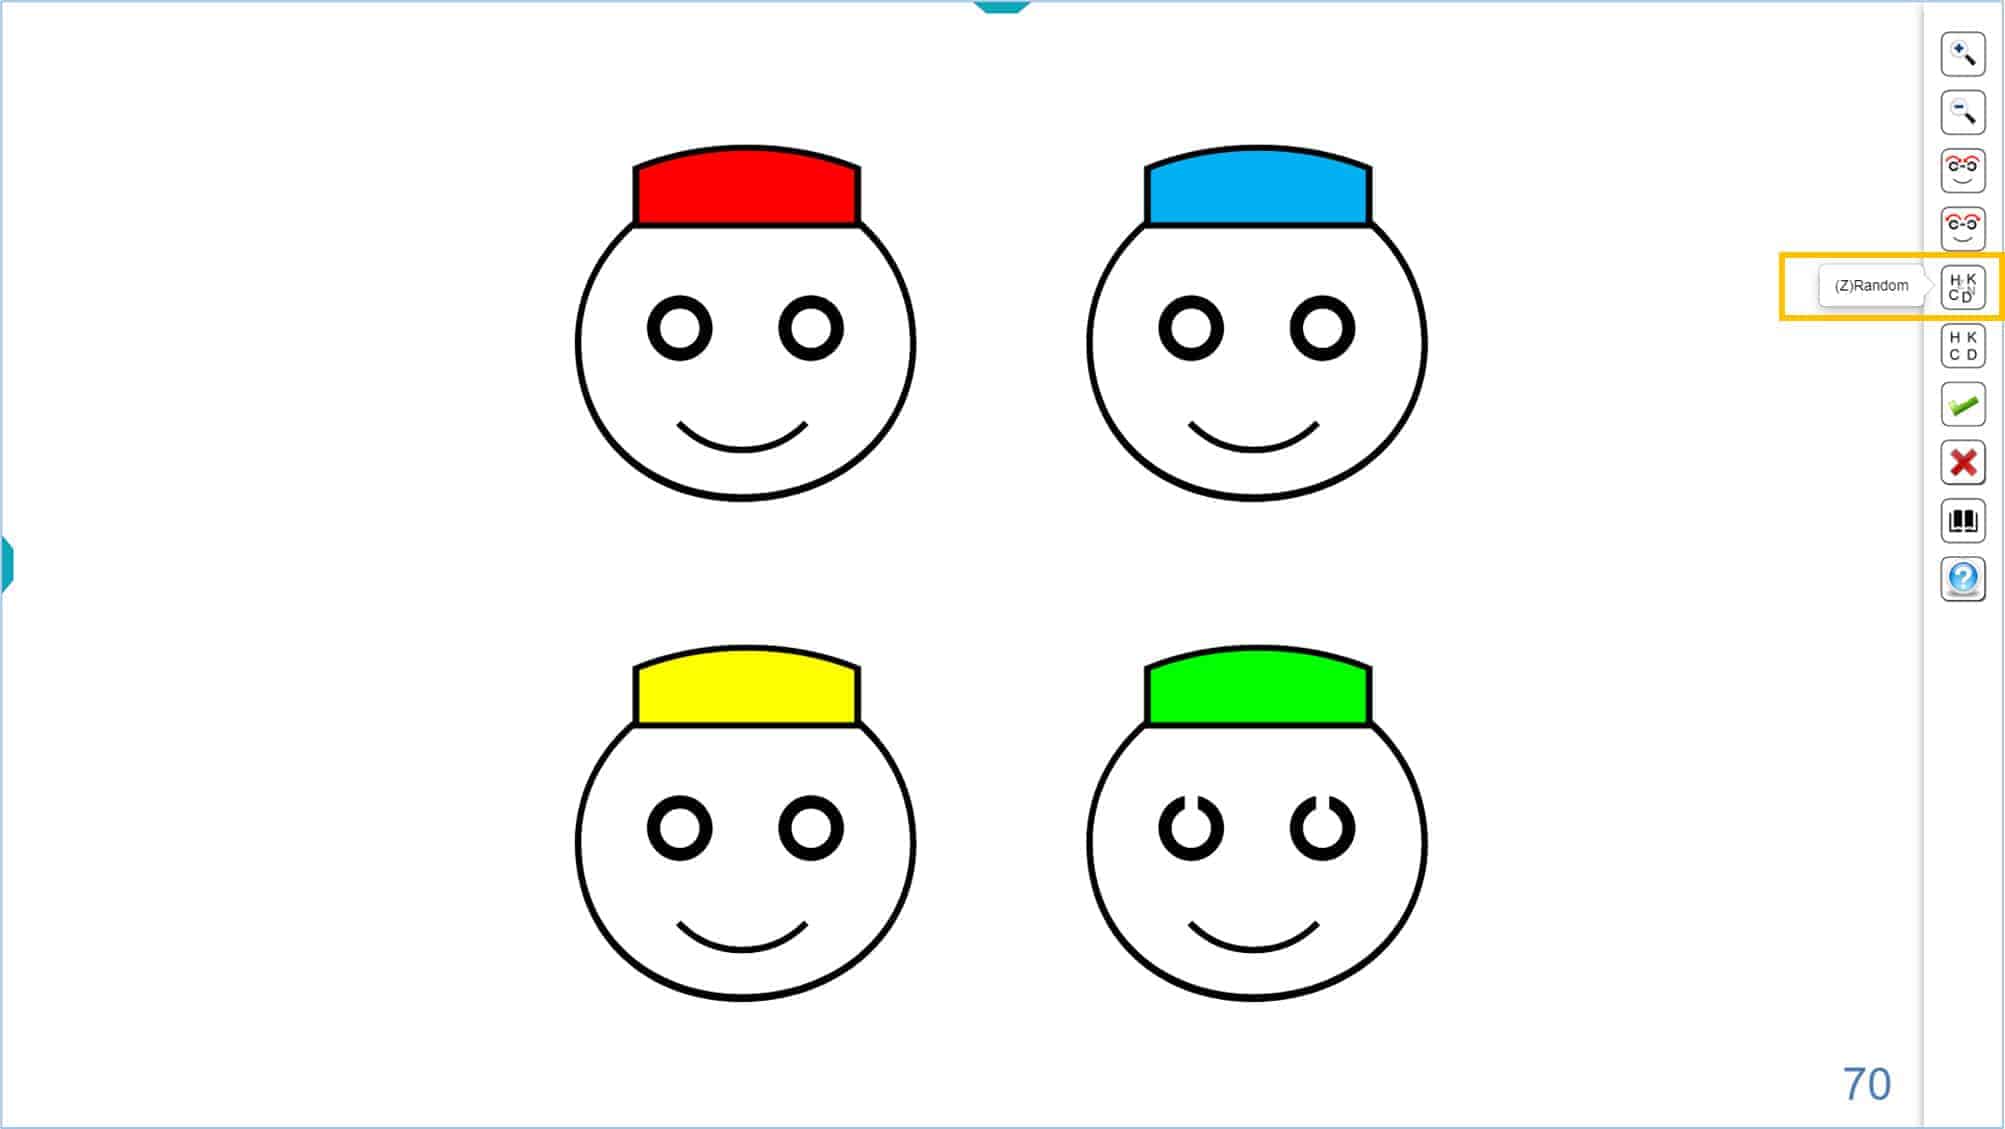
The default location of faces with the broken glasses is always the same for a given acuity level (i.e., the broken glasses appear in the same location at first). To avoid memorization and allow repeated attempts at the threshold level, the location of the broken glasses can be randomized using the tools’ menu icon or the keyboard shortcut (type “Z” on the keyboard). While the sequence of coloured caps remains the same, the broken glasses appear randomly on any of the four faces. To return to the usual layout, use the corresponding icon or type “X” on the keyboard.
The orientation of the gap in the Landolt C can also be changed. Using the icons below; the gap will move 45° (clockwise or counter-clockwise) each time you press these buttons.
Alternatively, you can use the keyboard shortcuts (the right → and left ← arrows). This might be useful for children with astigmatism, for whom you can modify the orientation of the apertures before beginning the measurement of the VA without correction. Ideally at 45º of the axis of astigmatism, so that you don’t under- or over-estimate acuity.
This chart displays a full range of acuity optotypes, up to 115 VAR (6/3, 20/10, 2.0 Dec). As always, the lowest VA value (largest target) that can be displayed will depend on the size of each screen. The VA value is always displayed in the lower right corner of the screen.
If the dimensions of the monitor do not allow the 4 faces to be displayed, only two will appear. The progression of size is logarithmic, in steps of 0.1 log, like the rest of VA optotypes.

It is recommended to perform the test initially at a distance of 3 or 4 m, to enhance cooperation. If desired, other distances can also be used. The program offers a specific calibration for the desired test distance of paediatric tests (within “Screen Calibration” setup).
The program also includes an automatic method for the measurement of the VA using the “Broken Glasses”. This method is explained in detail on the “VA Testing Protocol” which can be found on the Optonet Vision Unit documentation.
Symmetrical Optotype #
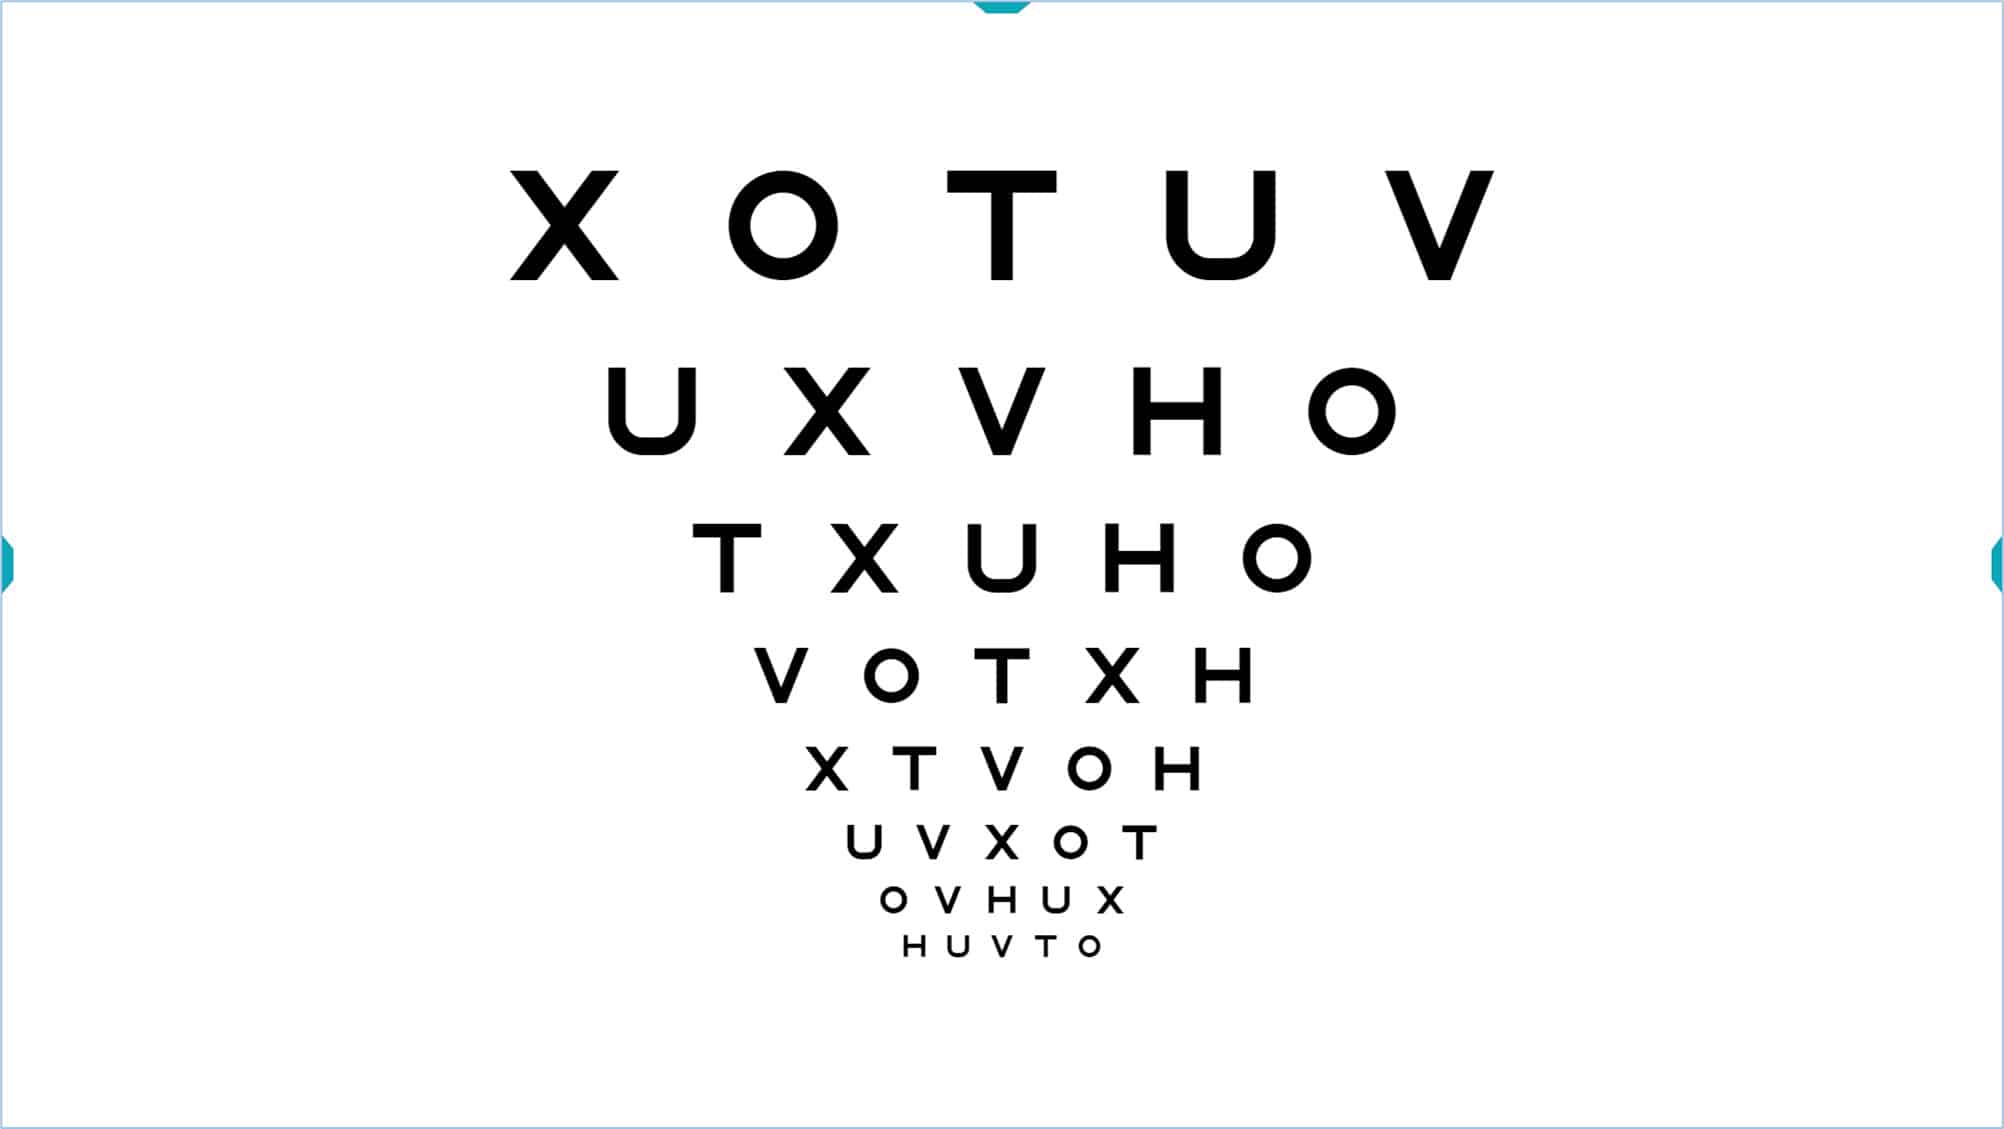
This optotype is recommended for VA measurement of preschoolers who can successfully match letters during a practice session. Children develop horizontal laterality later than vertical, so all the letters selected for this test are symmetrical with respect to the vertical midline, which avoids confusion in the smaller ones. Six symmetric letters are used: X, T, U, O, H, and V, whose difficulty is statistically similar. (3) These letters are drawn on a 5×5 grid, using a stroke 1/5 of the size of the letter.
As with all paediatric acuity tests, an initial test distance of 3-4 meters elicits better cooperation from most preschoolers, thus reducing the time necessary to estimate the VA. Within the “Screen Calibration setup” menu there is a separate calibration section for the three paediatric tests (the “Symmetrical Optotype”, the “Broken Glasses Test”, and “Kay Pictures”). This option allows calibration of the VA values for whatever test distance is desired.
Strategy #
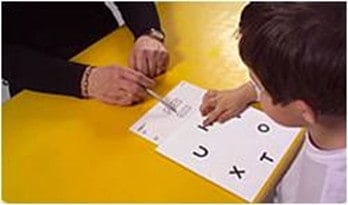
Many young children are able to match letters before they will correctly name them, especially in the unfamiliar examination setting. Using a matching card, i.e., a sheet with the printed letters, and teaching the child to point to the same letter held or shown by the examiner, will quickly teach the task. This will also identify which children are ready before testing begins. The child may eventually say the name of the letter, but this is not necessary for the test. “Matching cards” can be downloaded from the OVU documentation.

It is also often very helpful for the child to practice with their parents before the visual examination. To do this, parents can use the “matching card” together with printed sheets with several lines of optotypes (downloaded from the OVU documentation), which will allow them to practice at home. This training could also be carried out with a digital animation that it is included in Optonet Webpage: https://optonet.co.uk/practice-visual-acuity
Thus, the child can practice indicating (pointing or telling) the same letter on the matching card as shown by the parent and will easily learn the dynamics of the visual acuity test. This practice can significantly improve the child’s cooperation and acuity measurement.
When the child comes to the examination, we usually have his attention and cooperation for a very limited time. To take advantage of their limited window of cooperation, start testing using isolated letters with contour interaction in successive, decreasing size, until the threshold is estimated. (4)
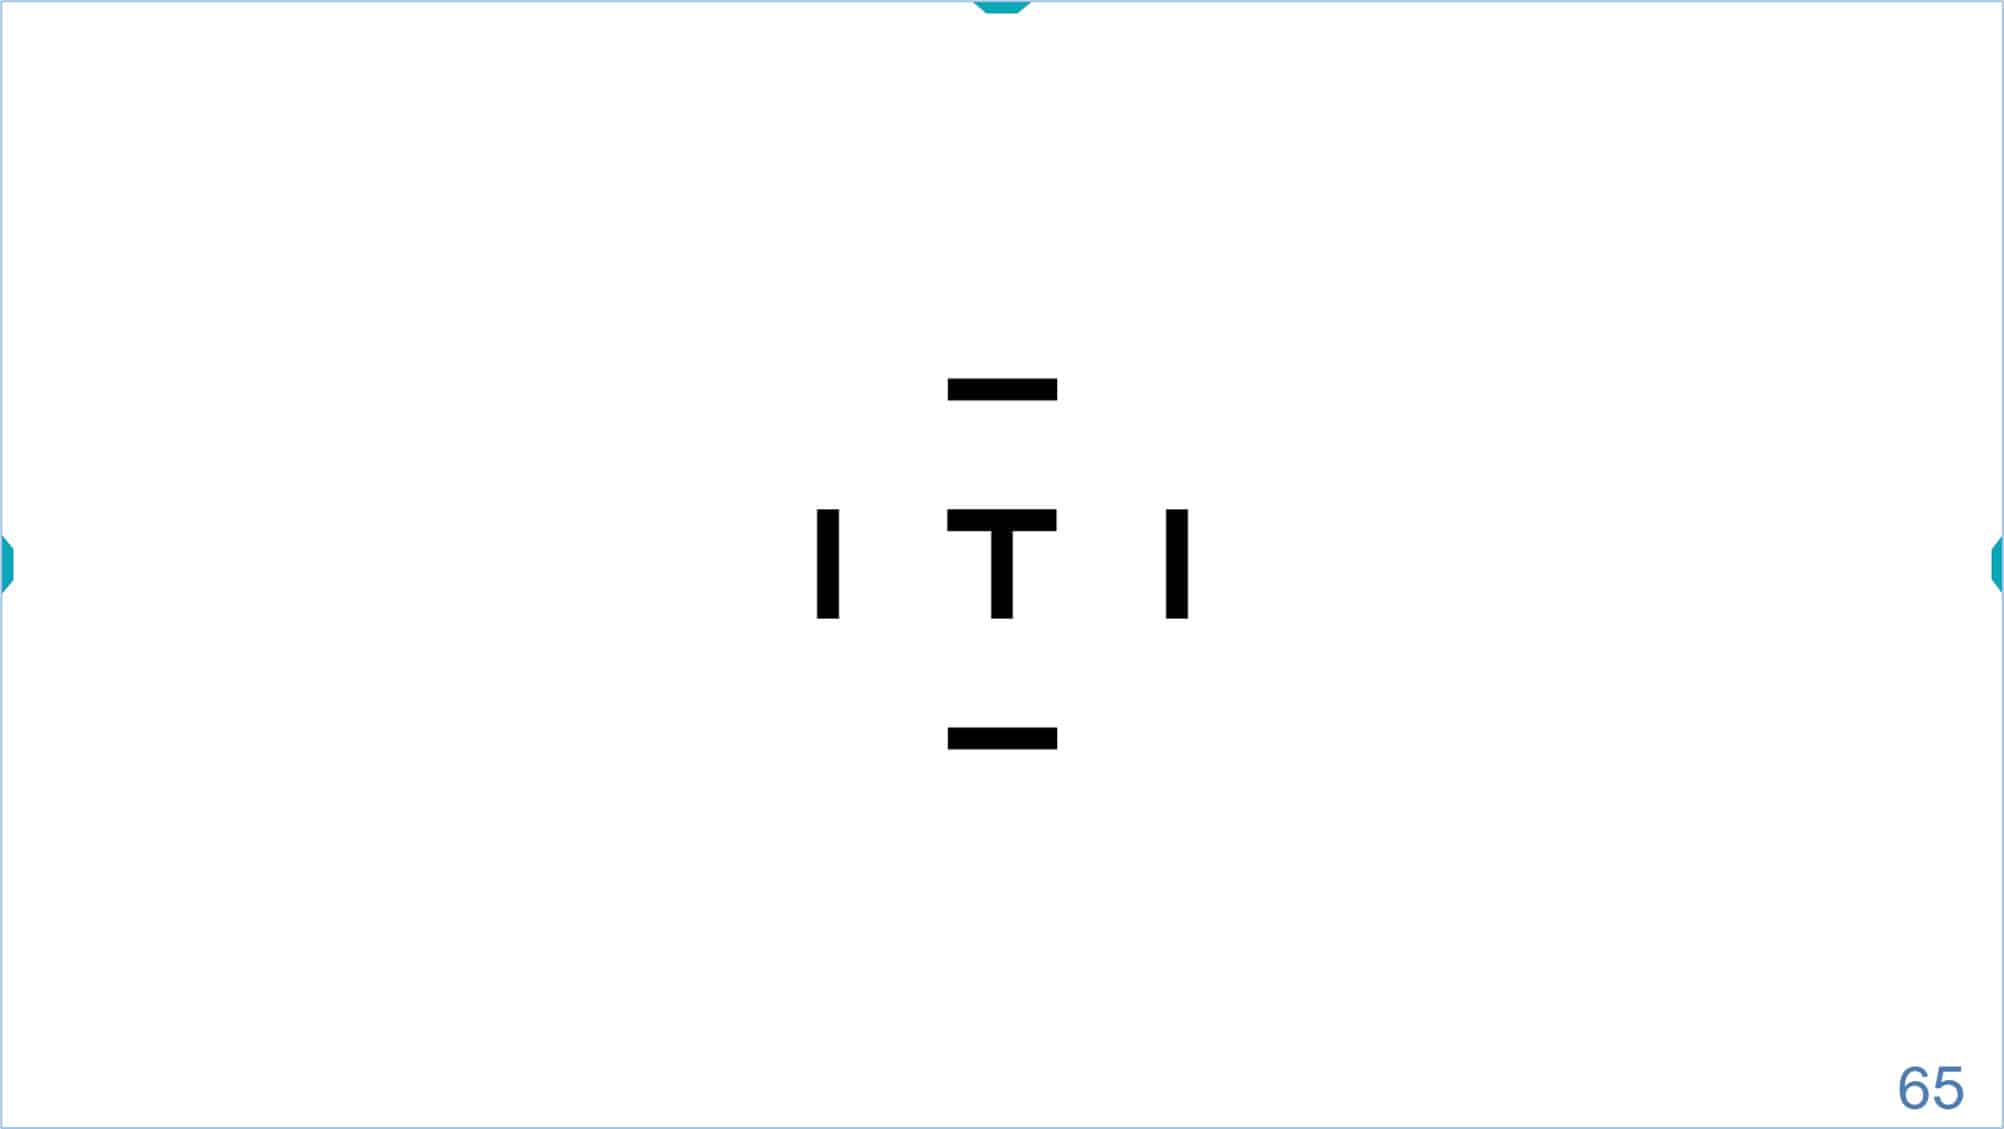
Once the threshold value is estimated, isolate a row of letters from a slightly larger size, and introduce the contour interaction bars, to make the test more sensitive for detection of amblyopia.

From this row, we can increase or decrease the size of the letters. The final VA value will be set based on the total number of letters correctly identified using the crowded test format.
Percentile Curves #
The “Symmetrical Letters” optotype is especially useful (both for the professional and for the parents) when monitoring how the child’s vision evolves through the “VA Percentile Curves”.
These curves come from a study carried out in 2008, in which VA was taken (with symmetric letters in isolated rows with contour interaction, similar to those included in the vision unit), to a population of about 3,000 patients. The patients were aged 2 years, 9 months to 8 years of age. (5),(6) The OVU documentation includes the Measurement Protocol along with the curves for monocular and binocular VA.
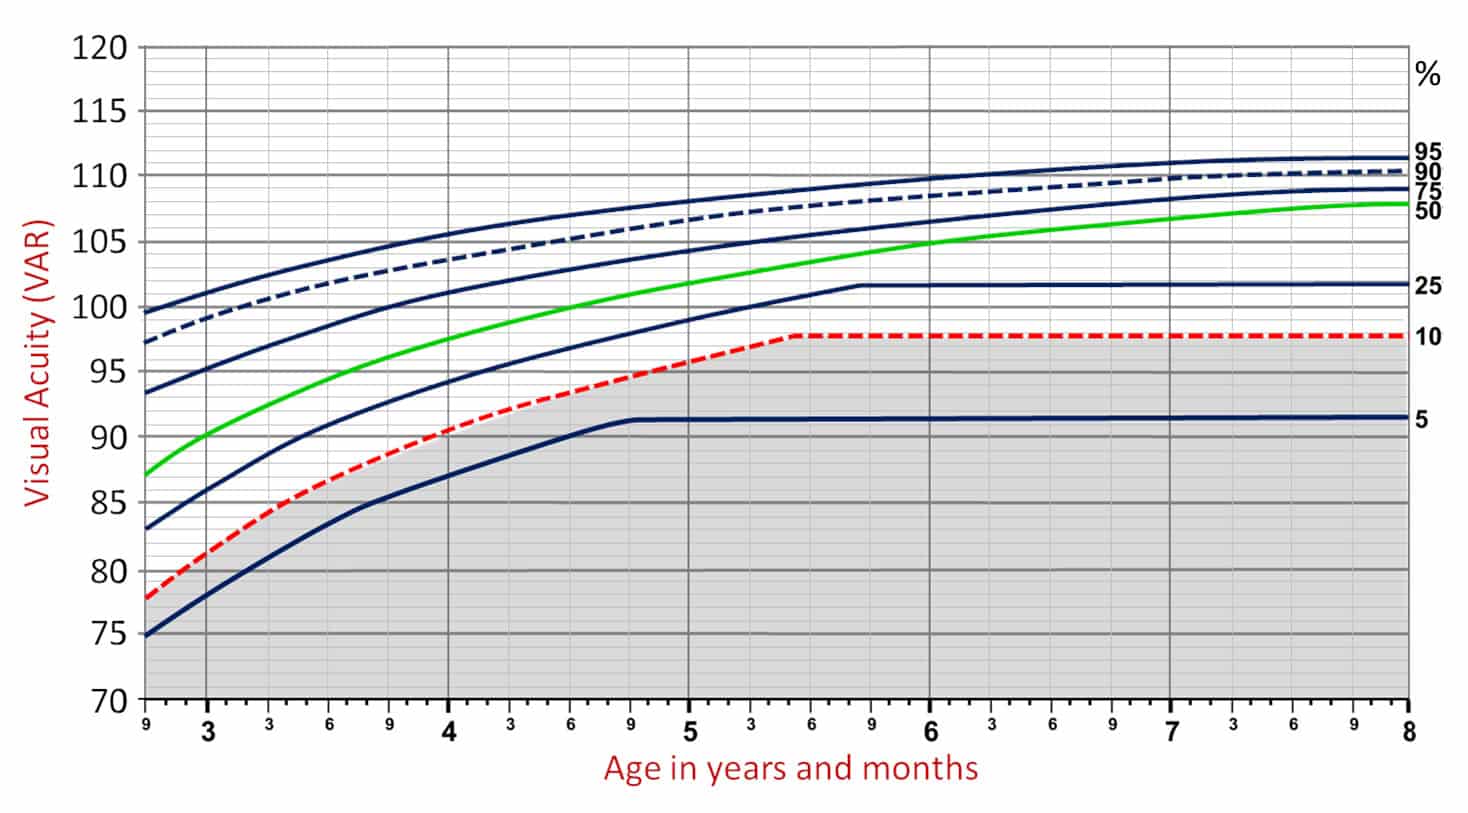
We can give parents the printed percentiles chart in which we will record the VA values obtained in their child at different ages, to show the progress and evolution of their VA with age. Parents usually have percentile charts for monitoring children’s weight and height, so they are familiar with this type of curve.
The horizontal axis of the abscissa indicates the age of the child, in the left ordinate axis the VA in VAR notation and to the right the percentage of children representing each curve. The shaded area in gray corresponds to 10% of the VAs (the lowest). When a value falls in that area, a complete visual examination is recommended.
References #
1. Universale, C. O. & Committee, V. F. Visual Acuity Measurement Standard – International Council of Ophthalmology. 1–18 (1988).
2. Bennett, A. G. Ophthalmic test types. A review of previous work and discussions on some controversial questions. Br. J. Physiol. Opt. 22, 238–71 (1965).
3. Camparini, M., Cassinari, P., Ferrigno, L. & Macaluso, C. ETDRS-fast: implementing psychophysical adaptive methods to standardized visual acuity measurement with ETDRS charts. Invest. Ophthalmol. Vis. Sci. 42, 1226–1231 (2001).
4. Salt, A. T., Wade, A. M., Proffitt, R., Heavens, S. & Sonksen, P. M. The Sonksen logMAR Test of Visual Acuity: I. Testability and reliability. J. AAPOS Off. Publ. Am. Assoc. Pediatr. Ophthalmol. Strabismus Am. Assoc. Pediatr. Ophthalmol. Strabismus 11, 589–96 (2007).
5. Sonksen, P. M., Wade, A. M., Proffitt, R., Heavens, S. & Salt, A. T. The Sonksen logMAR test of visual acuity: II. Age norms from 2 years 9 months to 8 years. J. AAPOS Off. Publ. Am. Assoc. Pediatr. Ophthalmol. Strabismus Am. Assoc. Pediatr. Ophthalmol. Strabismus 12, 18–22 (2008).