Automated Visual Acuity Testing #
The Optonet Vision Unit incorporates an automated method for VA testing designed to simplify its use, avoid errors and improve reliability. Basically, it consists of asking the patient to read the letters until four or more mistakes are made on a line of five letters (or symbols). (1) The examiner records the responses by pressing the number of letters correctly identified on the computer keyboard or tablet (when used as a remote controller). If patients are not sure of any letter, they are strongly encouraged to guess.
A letter by letter scoring system is applied using the Visual Acuity Rating (VAR) notation proposed by Bailey. (2) The VAR scale is a simple transformation of the logMAR scale by this formula: VAR = 100 – 50(logMAR).
VAR represents an alternative system which assigns one point to each letter read correctly. This is simpler and more intuitive than the logMAR scale.
Accordingly, every time the patient reads a row of five letters, the examiner simply counts the number of letters correctly identified and presses the appropriate number on the computer keyboard (0 to 5), or in the tablet. When the number “1” key (four mistakes) or “0” (five mistakes) is pressed, the software calculates the final VA score automatically and displays the results on the screen (in different VA notations). The procedure also stops when the patient reaches the smallest row of letters of VA 115 VAR (-0.30 Log, Snellen 6/3, 20/10).

It is important to mention that this automated method can only be initiated on rows that contain 5 letters/symbols (when the letters are very large, in low VA, the screen cannot accommodate 5 letters).
Isolated Letters
The program provides an alternative automated method to calculate visual acuity (VA) using isolated letters or symbols, with or without contour interaction. The practitioner asks the patient to read an isolated letter and records the response by pressing “1” for a correct answer or “0” for an incorrect one. Once the response is recorded, the automatic calculation is triggered, displaying a provisional VA value in the upper left corner of the screen. Following this, five different consecutive letters of the same size are randomly presented. Based on the accuracy of the responses, another letter, smaller in size, will appear in successive cycles of five letters until the program reaches the termination rule set in the configuration options.
 |
 |
Termination Rule
This termination rule of stopping after four or more mistakes is employed by default in the following VA charts: ETDRS (Sloan letters), Bailey-Lovie (British letters) and Symmetrical letters. The rest of the VA charts employs a termination rule of three or more mistakes by default, since there are fewer response alternatives to choose from, and therefore it is much easier to correctly identify a symbol at random.(1)
The Optonet Vision Unit allows the individual configuration of the termination rule for every chart, through the options setup screen, if desired.
The Broken Glasses chart constitutes a four-alternative, forced-choice (four-AFC) task (smiling face with red, blue, yellow, or green cap). Similarly, the Tumbling E is a four-AFC task, (right, left, up and down), whereas the Landolt Ring could be a five-AFC (right, left, up, down and oblique) or an eight-AFC (plus four oblique positions) depending on the configuration chosen. The Round Numbers chart is a four-AFC task (8, 9, 6, 5) and the Square Numbers chart is a five-AFC (2, 3, 5, 6 and 9).
The automated VA procedure consists of five attempts for each level of VA and for every chart. This is explained in detail later in this protocol.
Note: The Optonet vision unit has been designed according to international VA chart standards. However, it should be calibrated before VA testing is carried out.
Please review How to check if my charts are well calibrated?
ETDRS, Bailey-Lovie, Snellen E, Numbers and Landolt C #
Note: In the present protocol, the VA testing procedure is explained by using a computer keyboard (ideally a wireless mini keyboard). However, all functions can also be accessed using a tablet (Android or Apple) as a Remote Controller.
Modified Fast Procedure #
Although the standard method for measuring VA with logMAR charts requires the patient to read all the letters beginning with the top row, a modified “fast procedure” (3) is chosen in the present protocol. The fast procedure consists of first asking the subject to read only one letter per row until a mistake is made.
The Optonet Vision Unit allows to isolate the central column, by simply clicking on the letter “T” of the keyboard (cen(T)ral), or ← arrow, as shown in the next image:
The patient is asked to read all the letters down the chart column until a mistake is made. (3) The up ↑ and down ↓ arrow keys can be used to point to each letter by showing a red line on either side of the letter. The arrow keys can also be employed to increase or decrease the size of the letters, if necessary, when the red lines are placed at the upper or bottom letters. Alternatively, the keys “+” and “-” could also be used to modify the size of the letters.
Once the patient has made a mistake, he/she is asked to read the whole preceding row, with no mistakes, i.e., we expect the patient to correctly read five letters of this row. If the patient makes any mistake, he/she will be asked to read the complete row above. This step must be repeated upward every time the subject makes one or more errors.
When a row is read correctly with no errors, the fast procedure becomes identical to the standard, i.e., asking the subject to read all the rows downward until four or more mistakes are made on a line of five letters or symbols.(1)
This procedure significantly reduces test time and yields results that are as accurate as those obtained with the standard method. (3)
Example #
Let us see this procedure through an example:
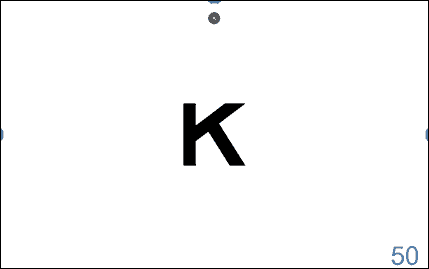
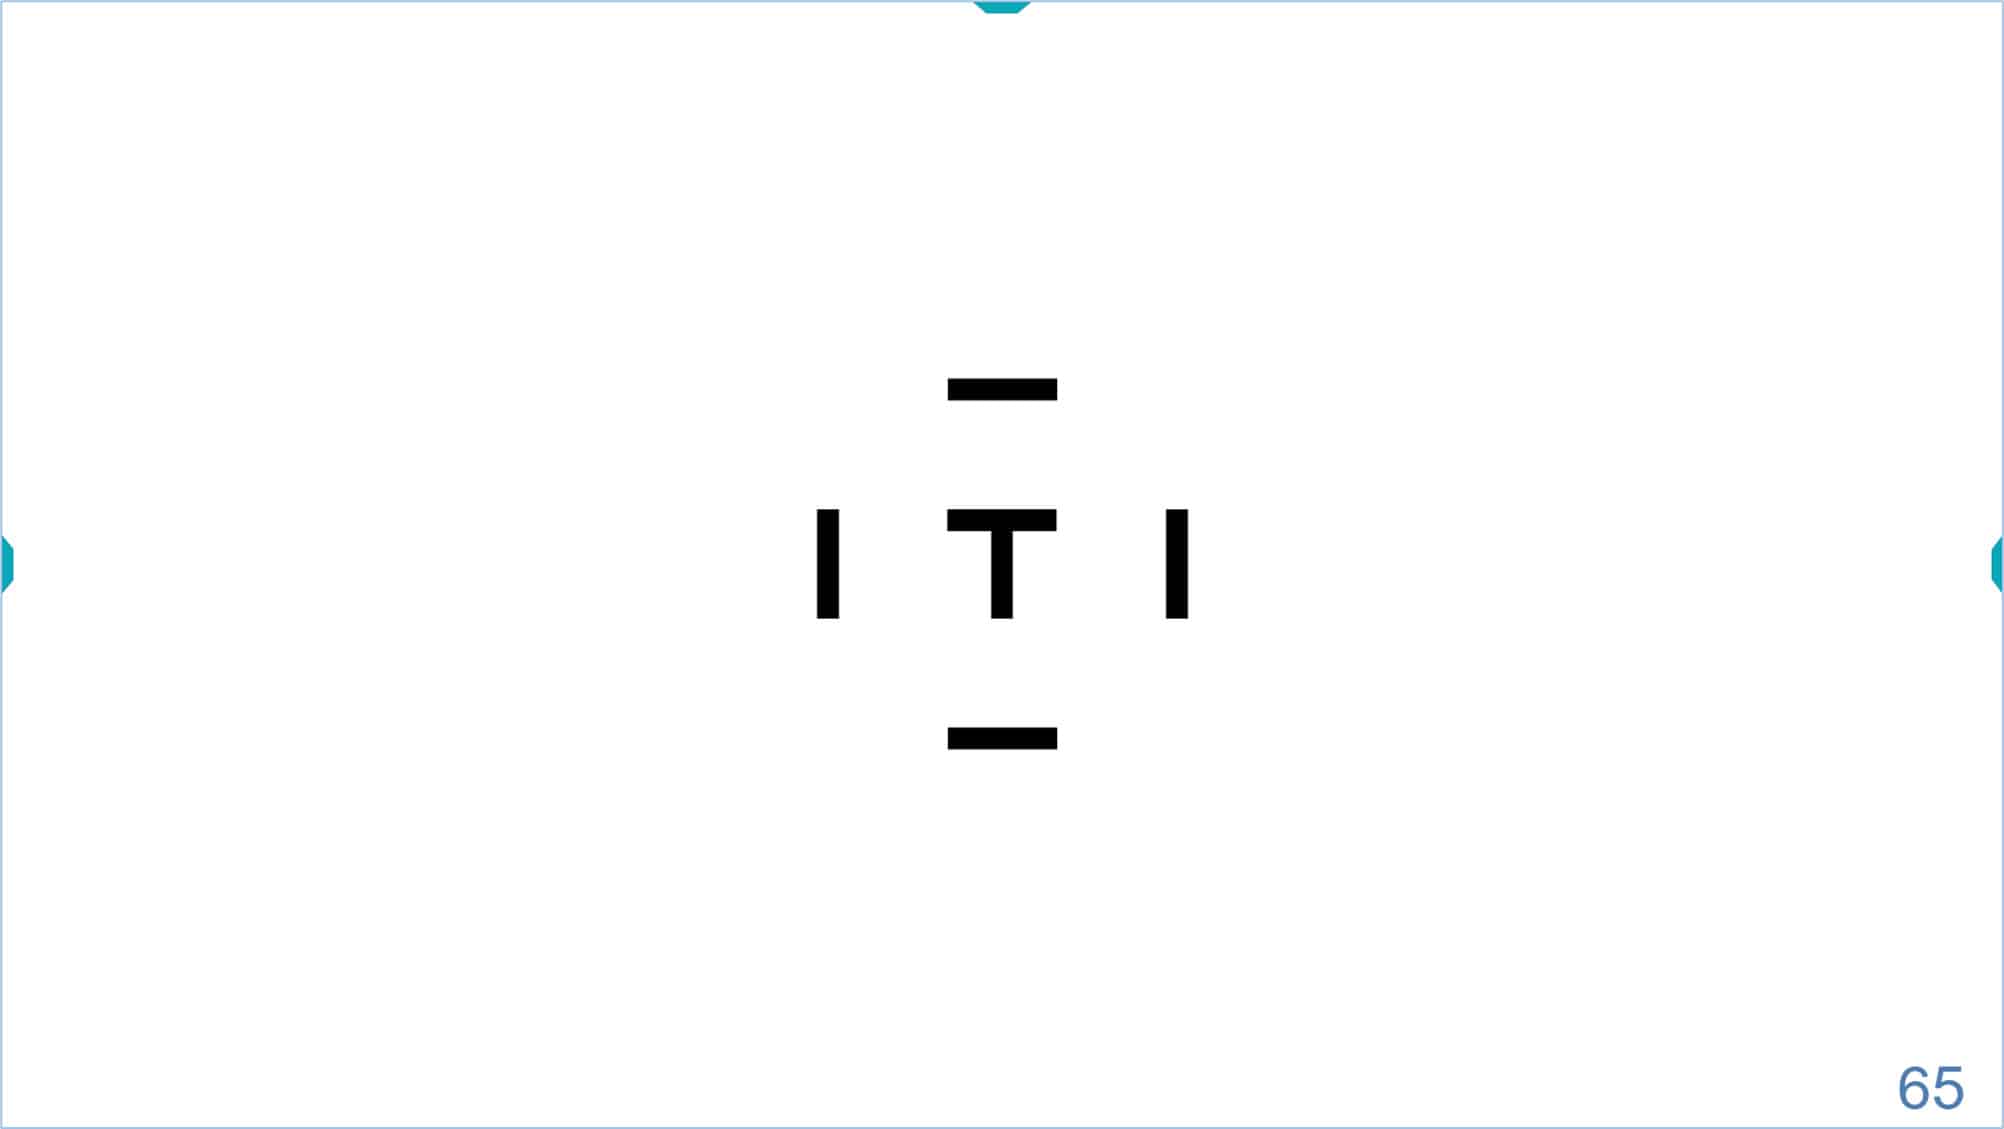
First, the patient is asked to read all the letters down the isolated central column until a mistake is made. Let us assume that the first letter that the patient is unable to read correctly is the “S” which represents a VA of 100 VAR (Snellen 6/6, 20/20, 1.0 Dec), as shown in the following figure (VA value appears in the lower right corner of the screen):

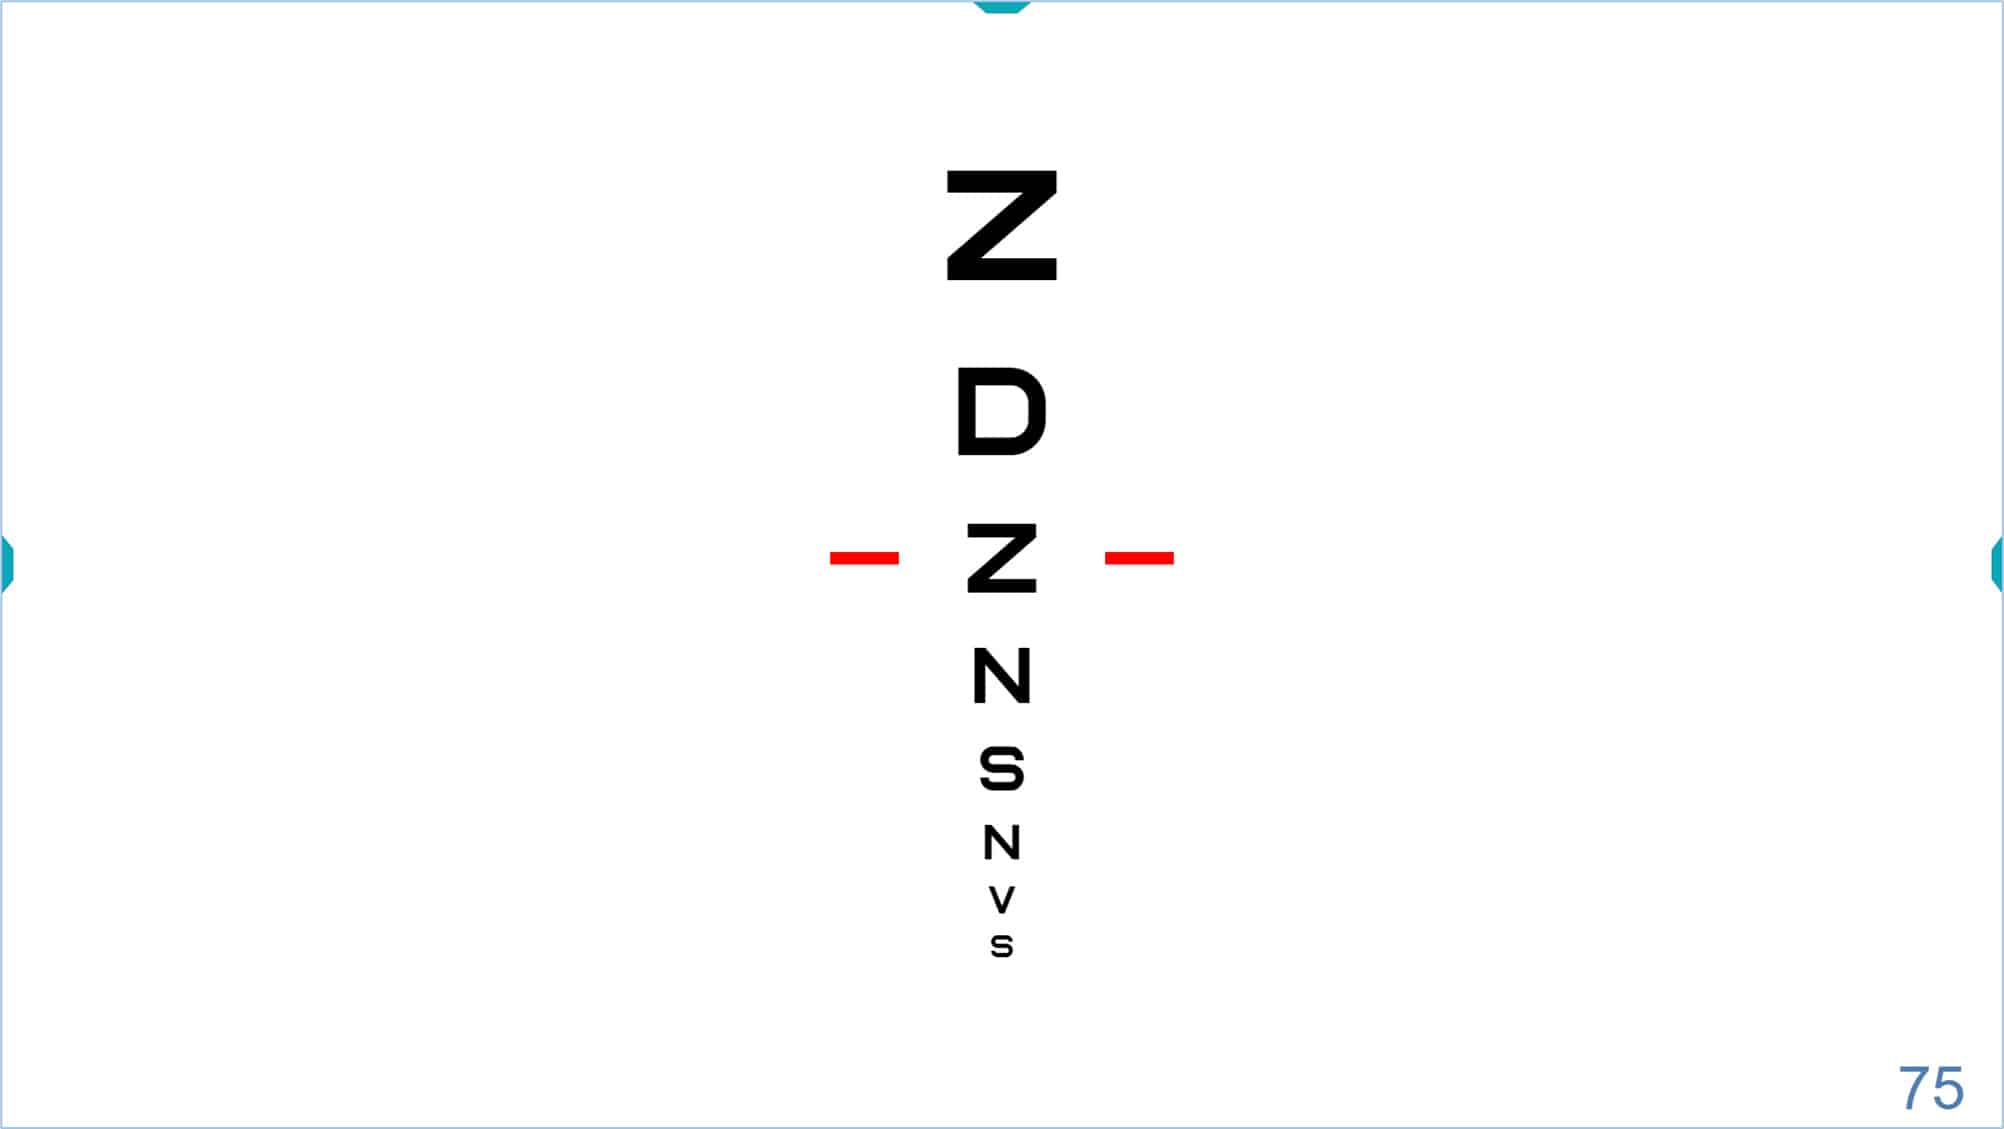
Once the patient makes the first mistake, the “T” key is pressed again (or ← arrow) to display the entire VA chart. The red lines will be shown either side of the row (in our example with a VA of 100 VAR):

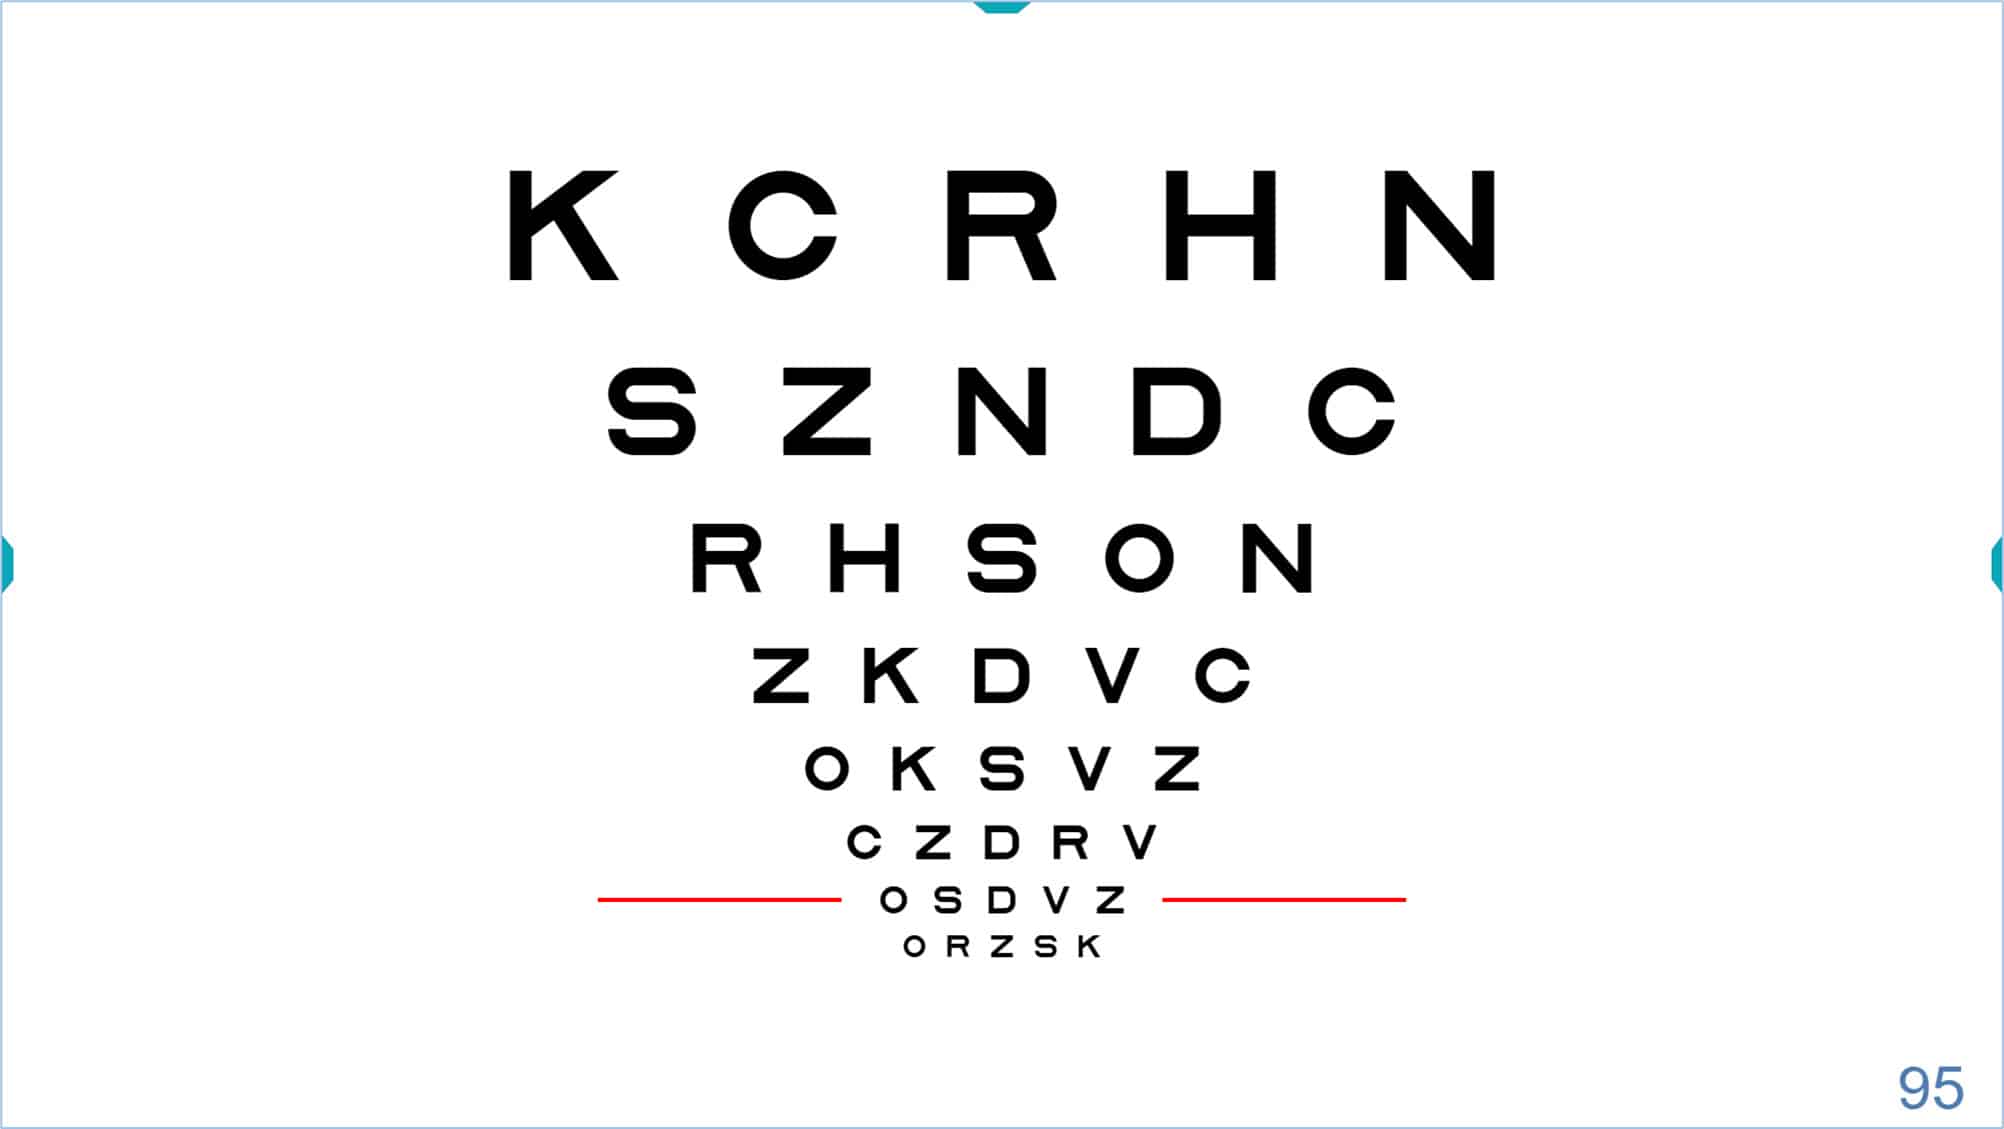
The red lines should now be moved a step upwards to the above row and the patient will be asked to read the whole row selected (VA 95 VAR).
If any mistake occurs in this row, the patient will be asked to read the preceding row (i.e., no mistakes are allowed in this first row). The examiner will count the number of letters correctly identified by the patient and will press this number on the computer keyboard (expected to be the number 5).
Let us suppose that the patient reads the entire line correctly and therefore by pressing the number 5 on the keyboard the automated VA measurement will be started. The red lines will drop automatically to point to the row below, and the patient will be asked to read this new smaller row of VA 100 VAR.

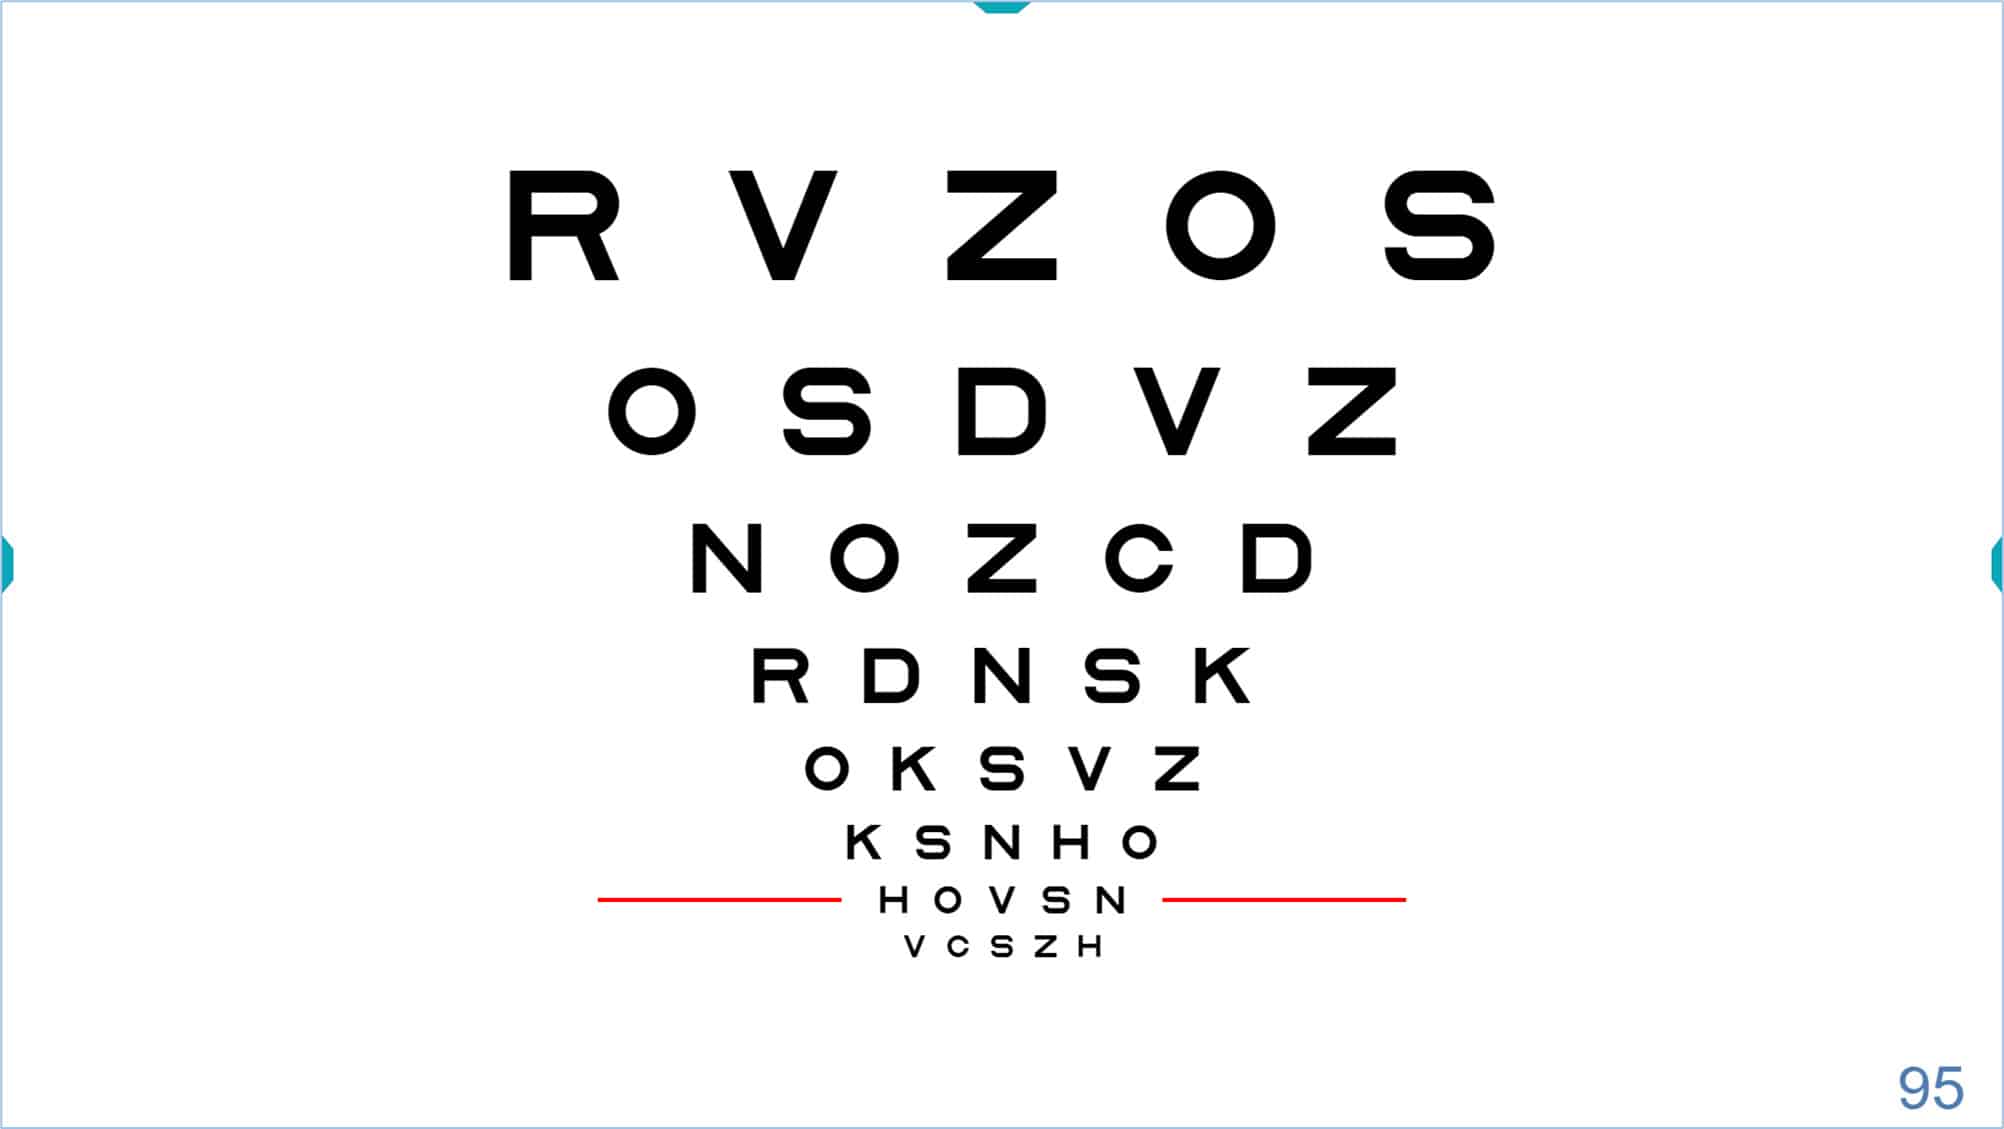
The above figure also shows the provisional automated VA score in the upper left corner of the screen (95 VAR), since the patient is able to read all the letters from the preceding row of VA 95 VAR.
Now suppose that the patient correctly reads three letters of the row VA 100 VAR. The key number “3” will be pressed, and the following screen will be displayed with an additional row of letters, also pointed to by the red lines:
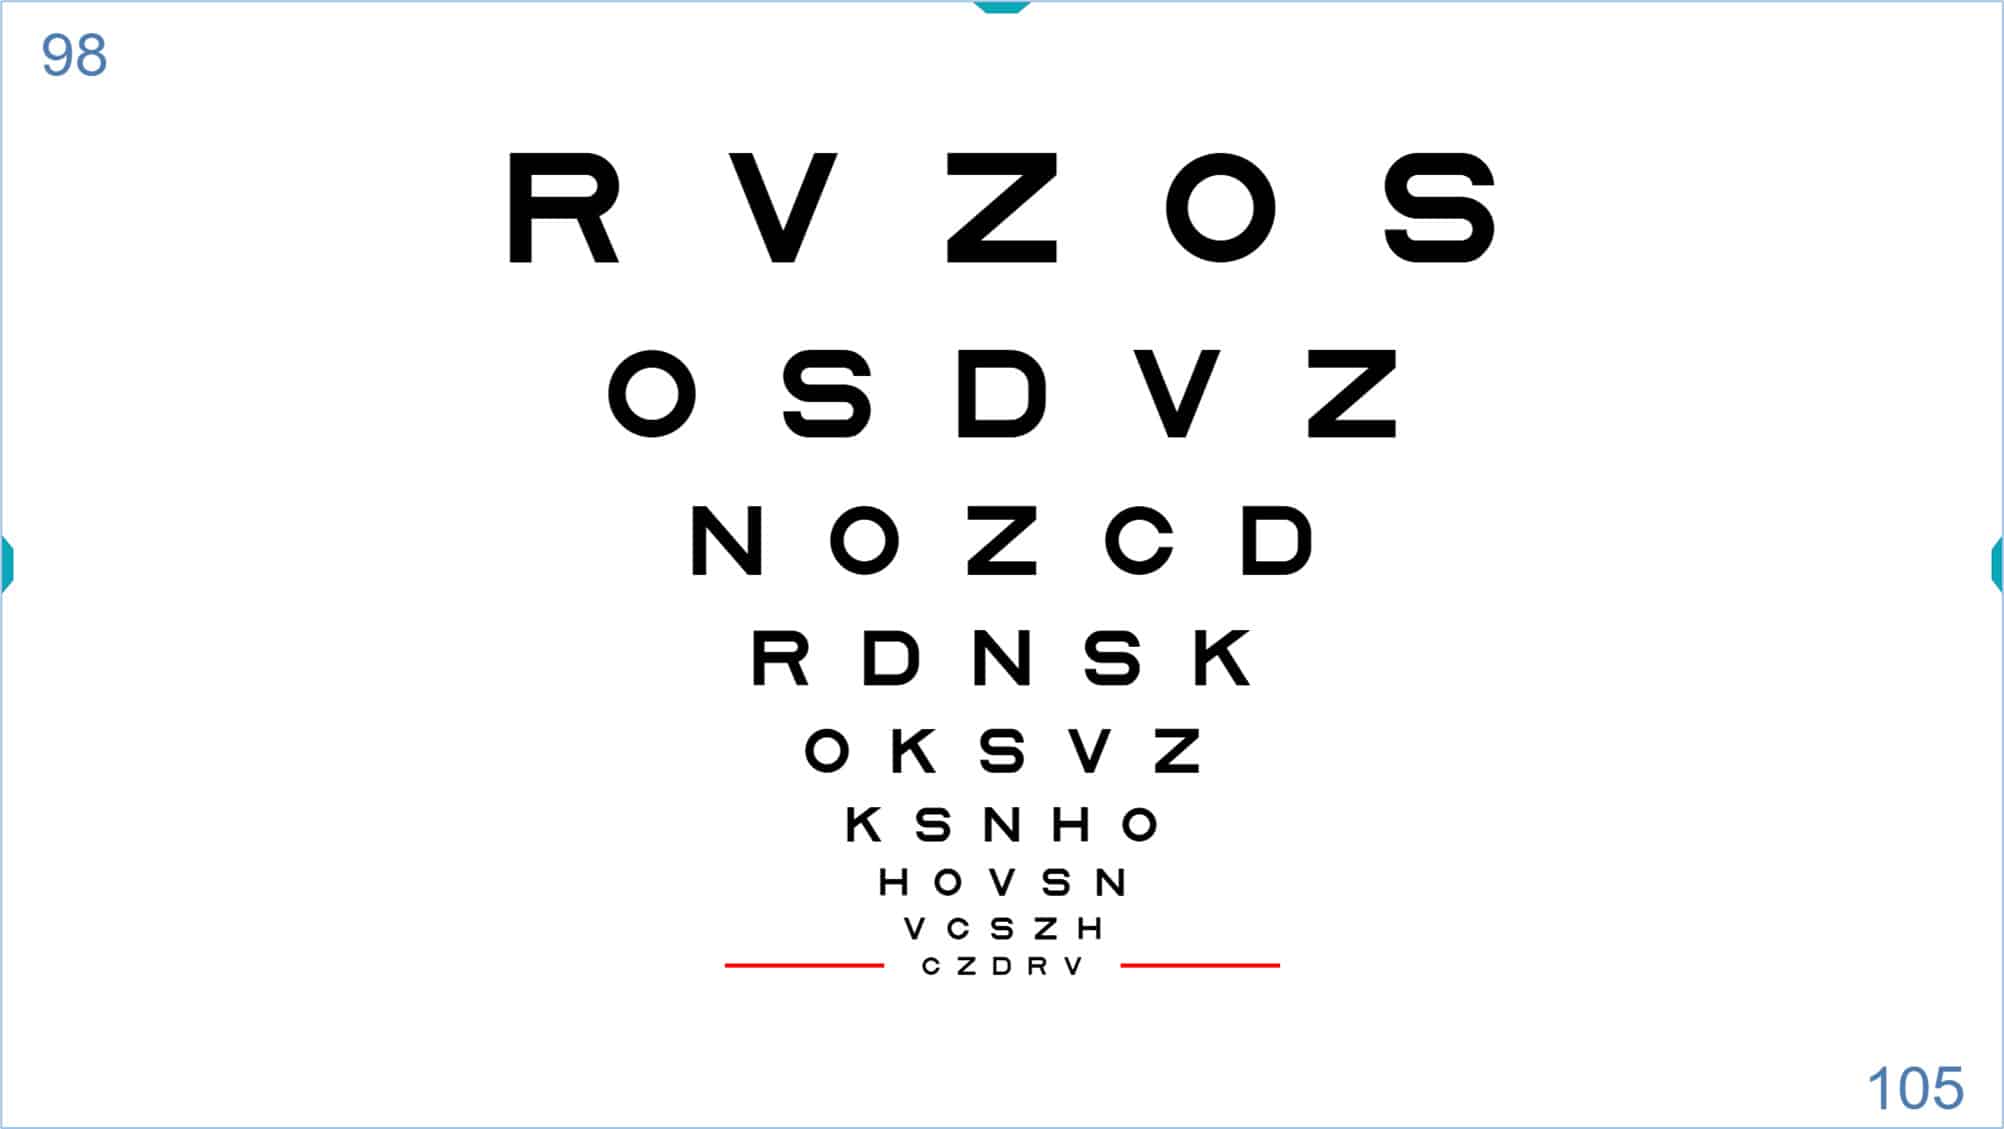
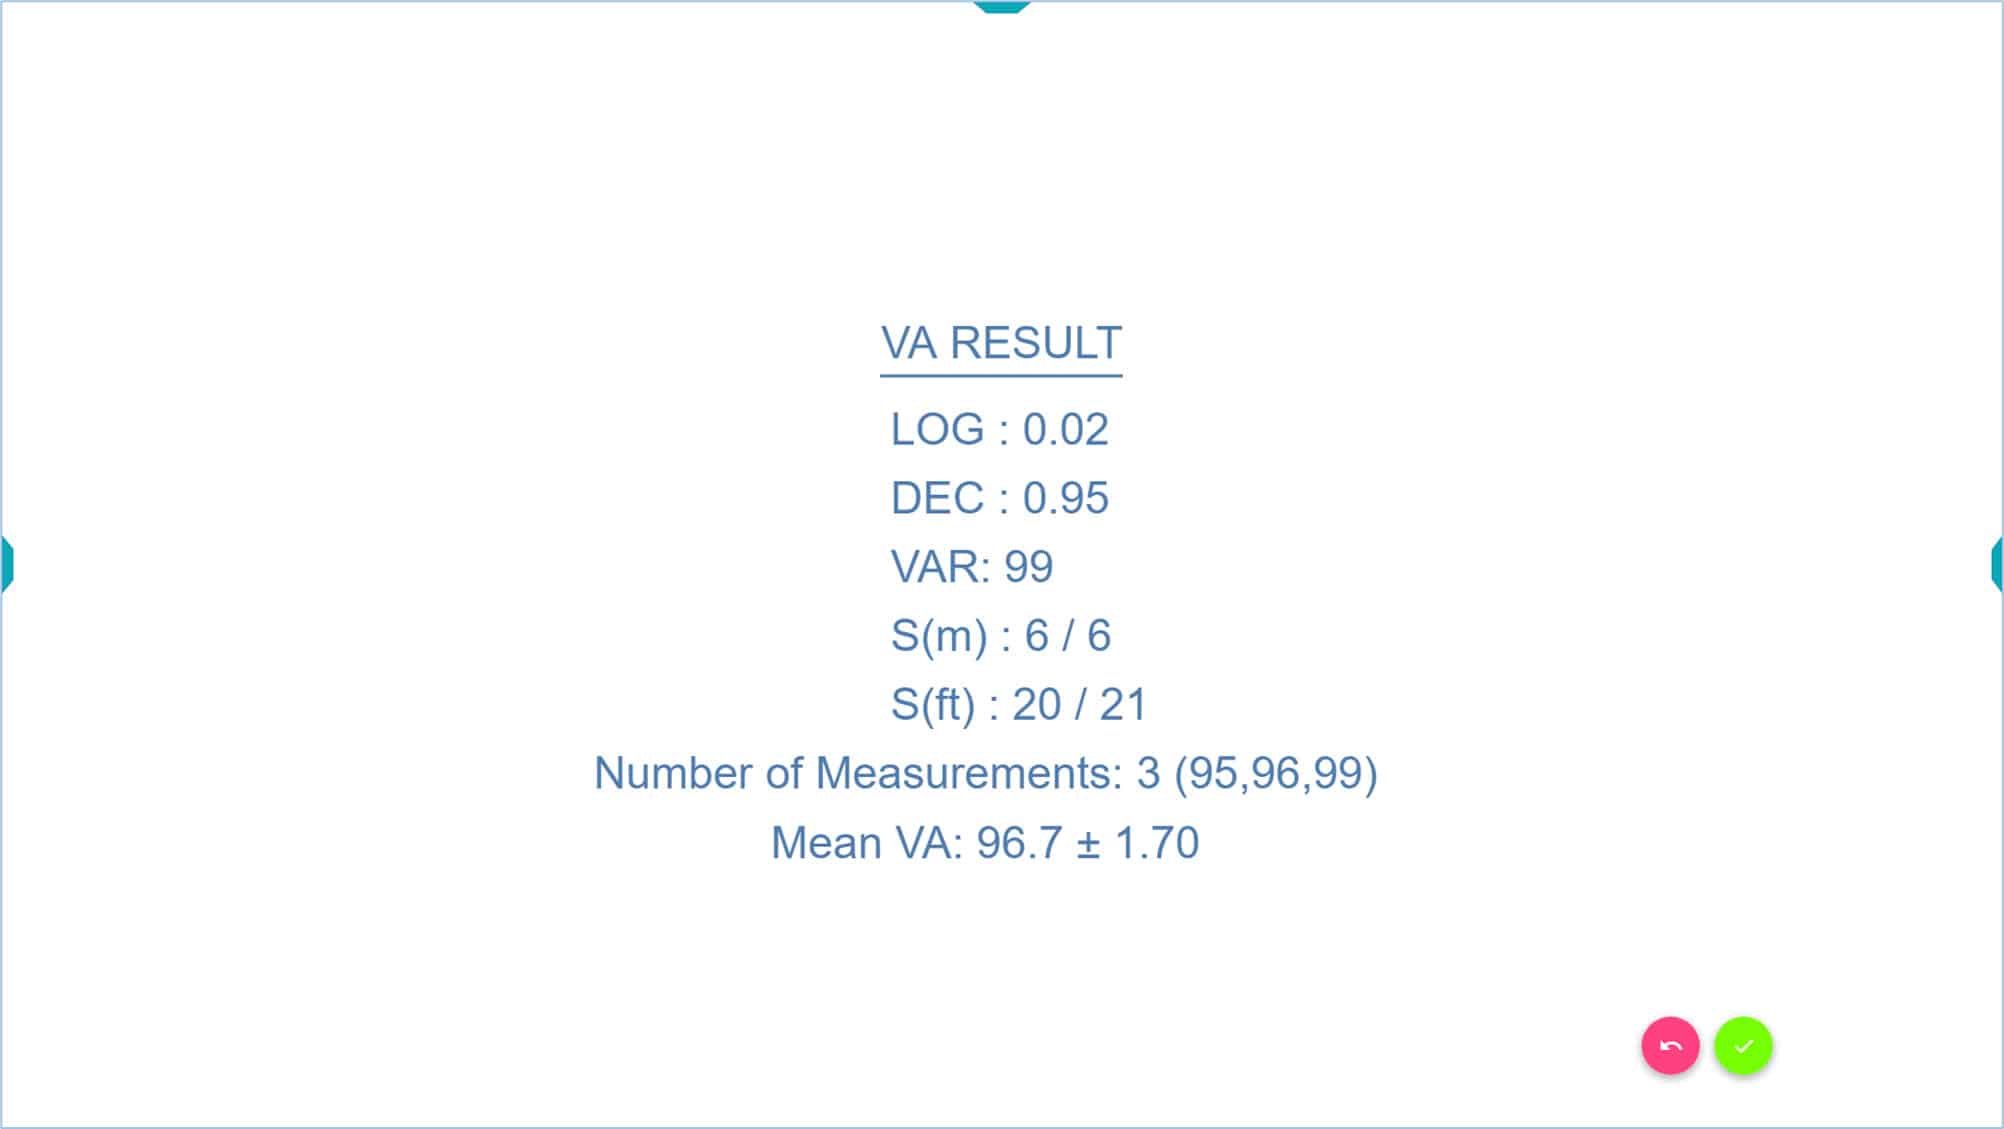
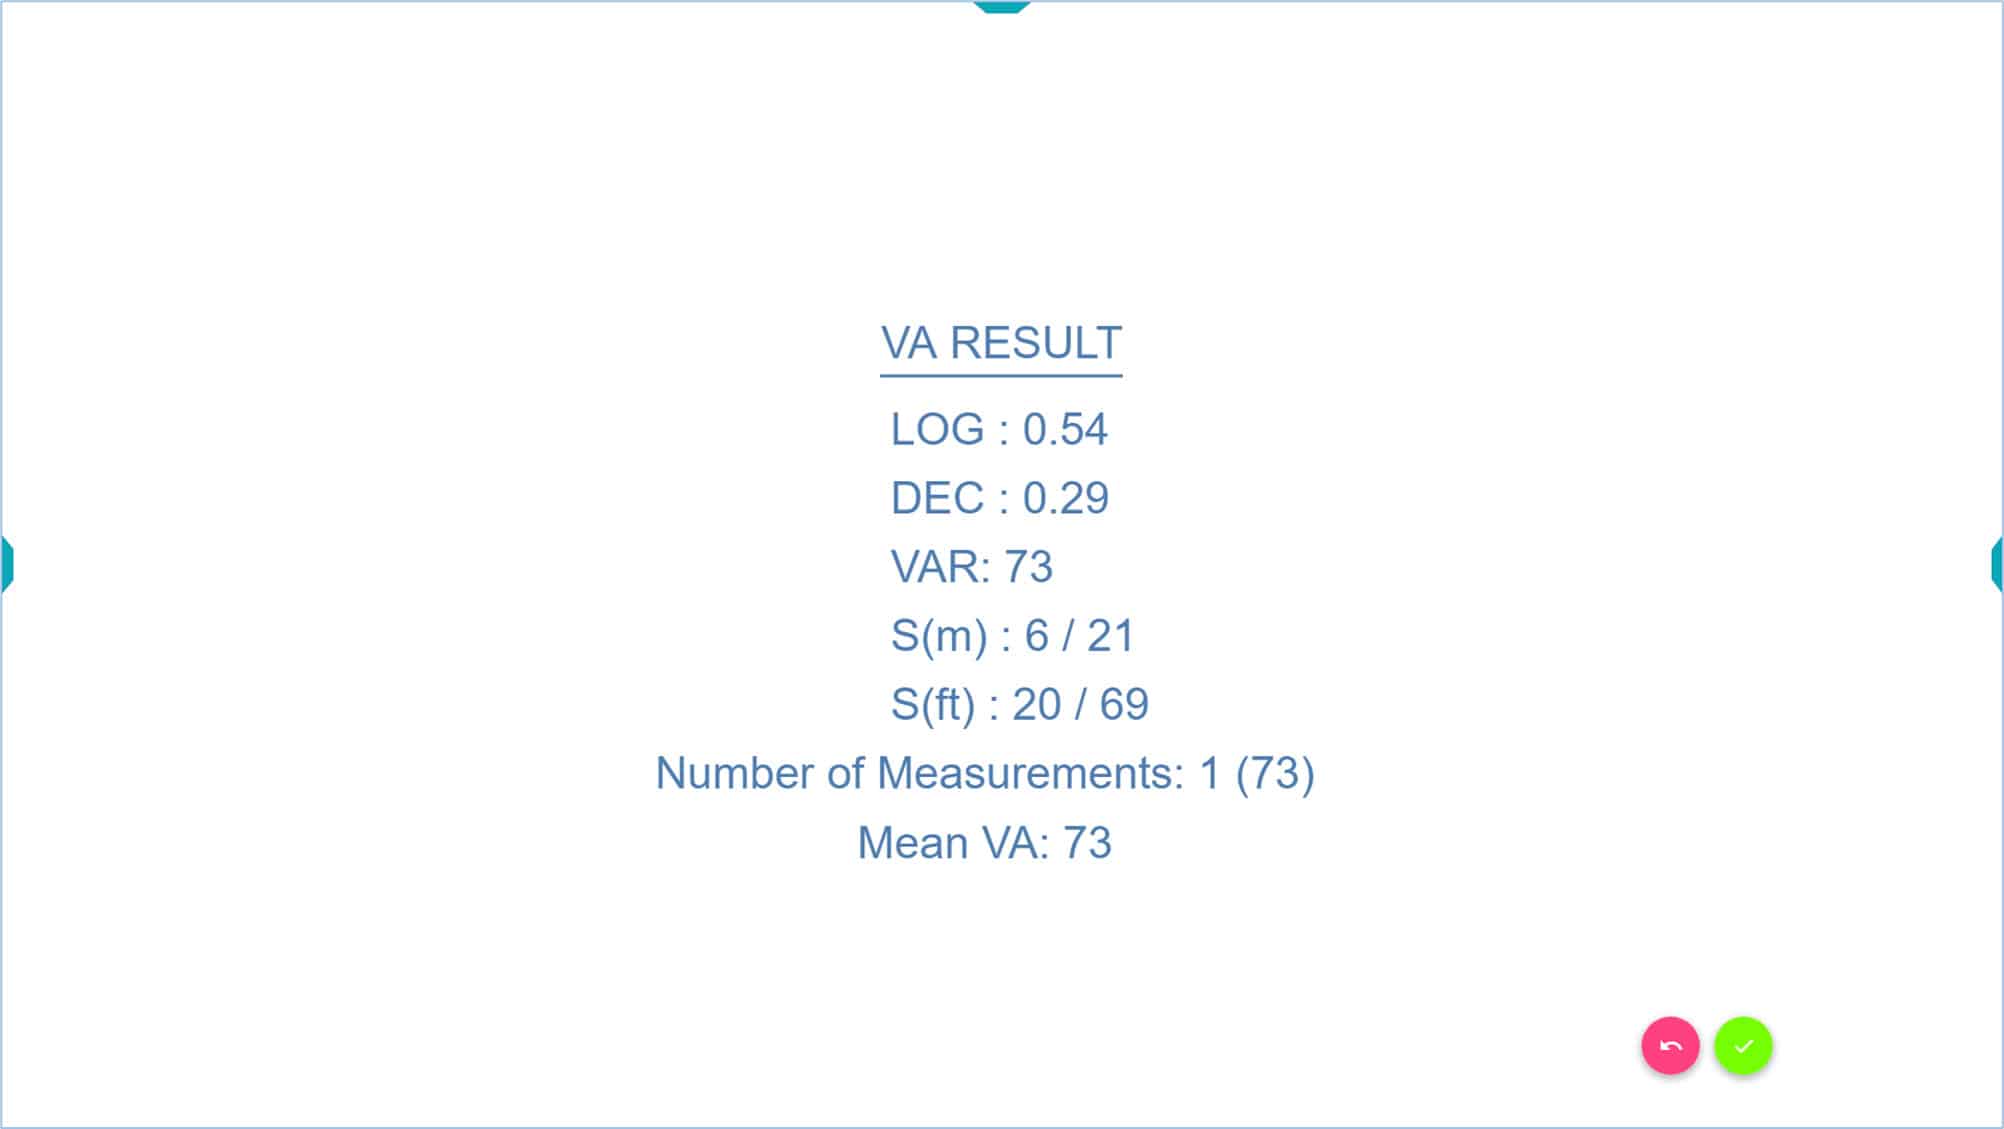
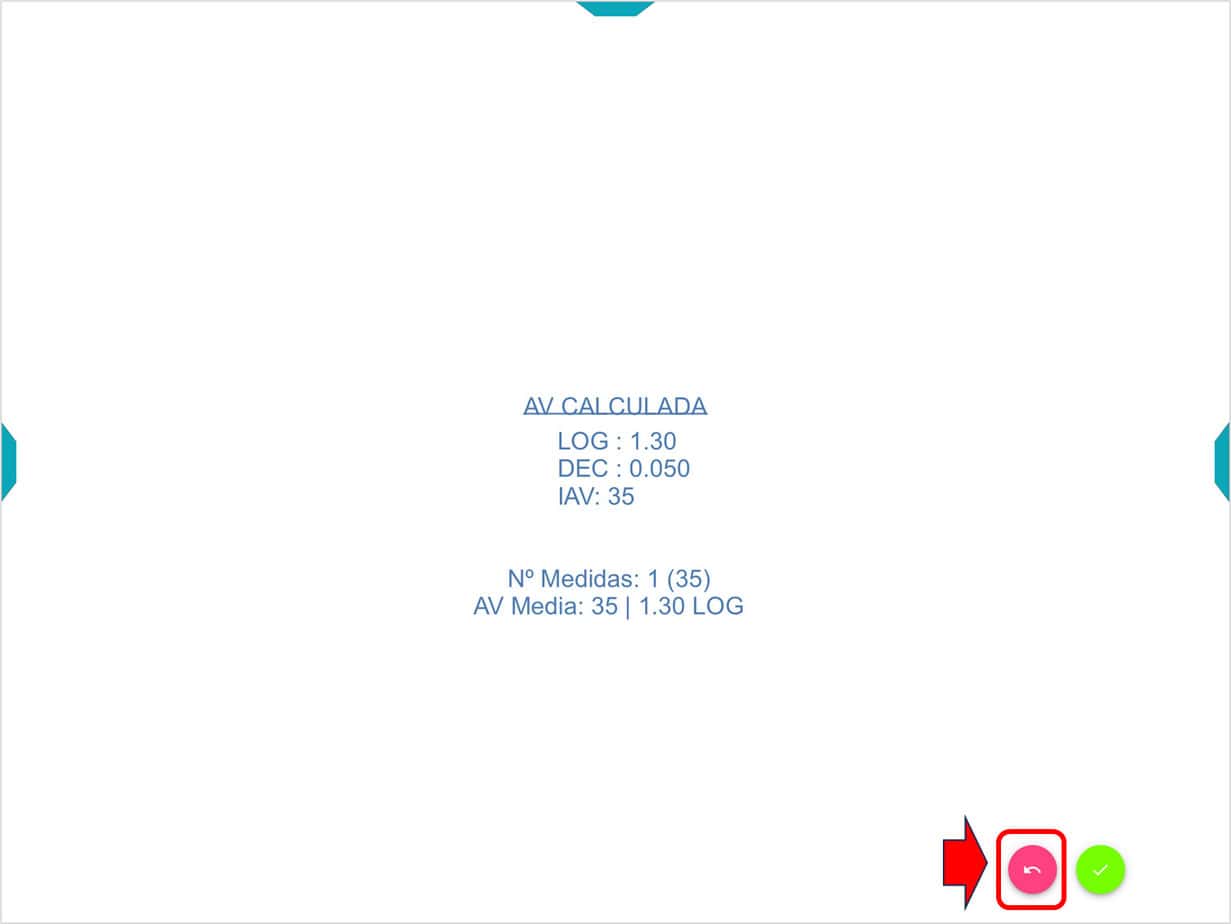
Assuming the patient misses all the letters of the bottom row (105 VAR), the number “0” will be pressed. At this point the VA score results will be displayed in the five different notations: LogMAR, Decimal, VAR, Snellen (metric) and Snellen (imperial).

Once the automated VA measurement has begun, the examiner must press the number of letters per line correctly identified on the keyboard (from 0 to 5). If another key is pressed, the automated calculation is cancelled and should be repeated. A message in red will be shown on the screen indicating the automated measure is cancelled.
Repeated Measurements #
To improve accuracy, it is recommended that at least two consecutive measurements of VA are taken per eye and averaged. Accordingly, once the first measure is completed, the examiner will just press the “Enter”/“OK” key (or the pink button) to return to the VA chart. The row of letters from which the automated routine was previously started will automatically be pointed to by red lines (in our example 95 VAR), but with a different combination of letters to avoid memorizing (see next image).
This allows performing automated consecutive measurements of VA quicker, as the process is repeated from the same row of letters.
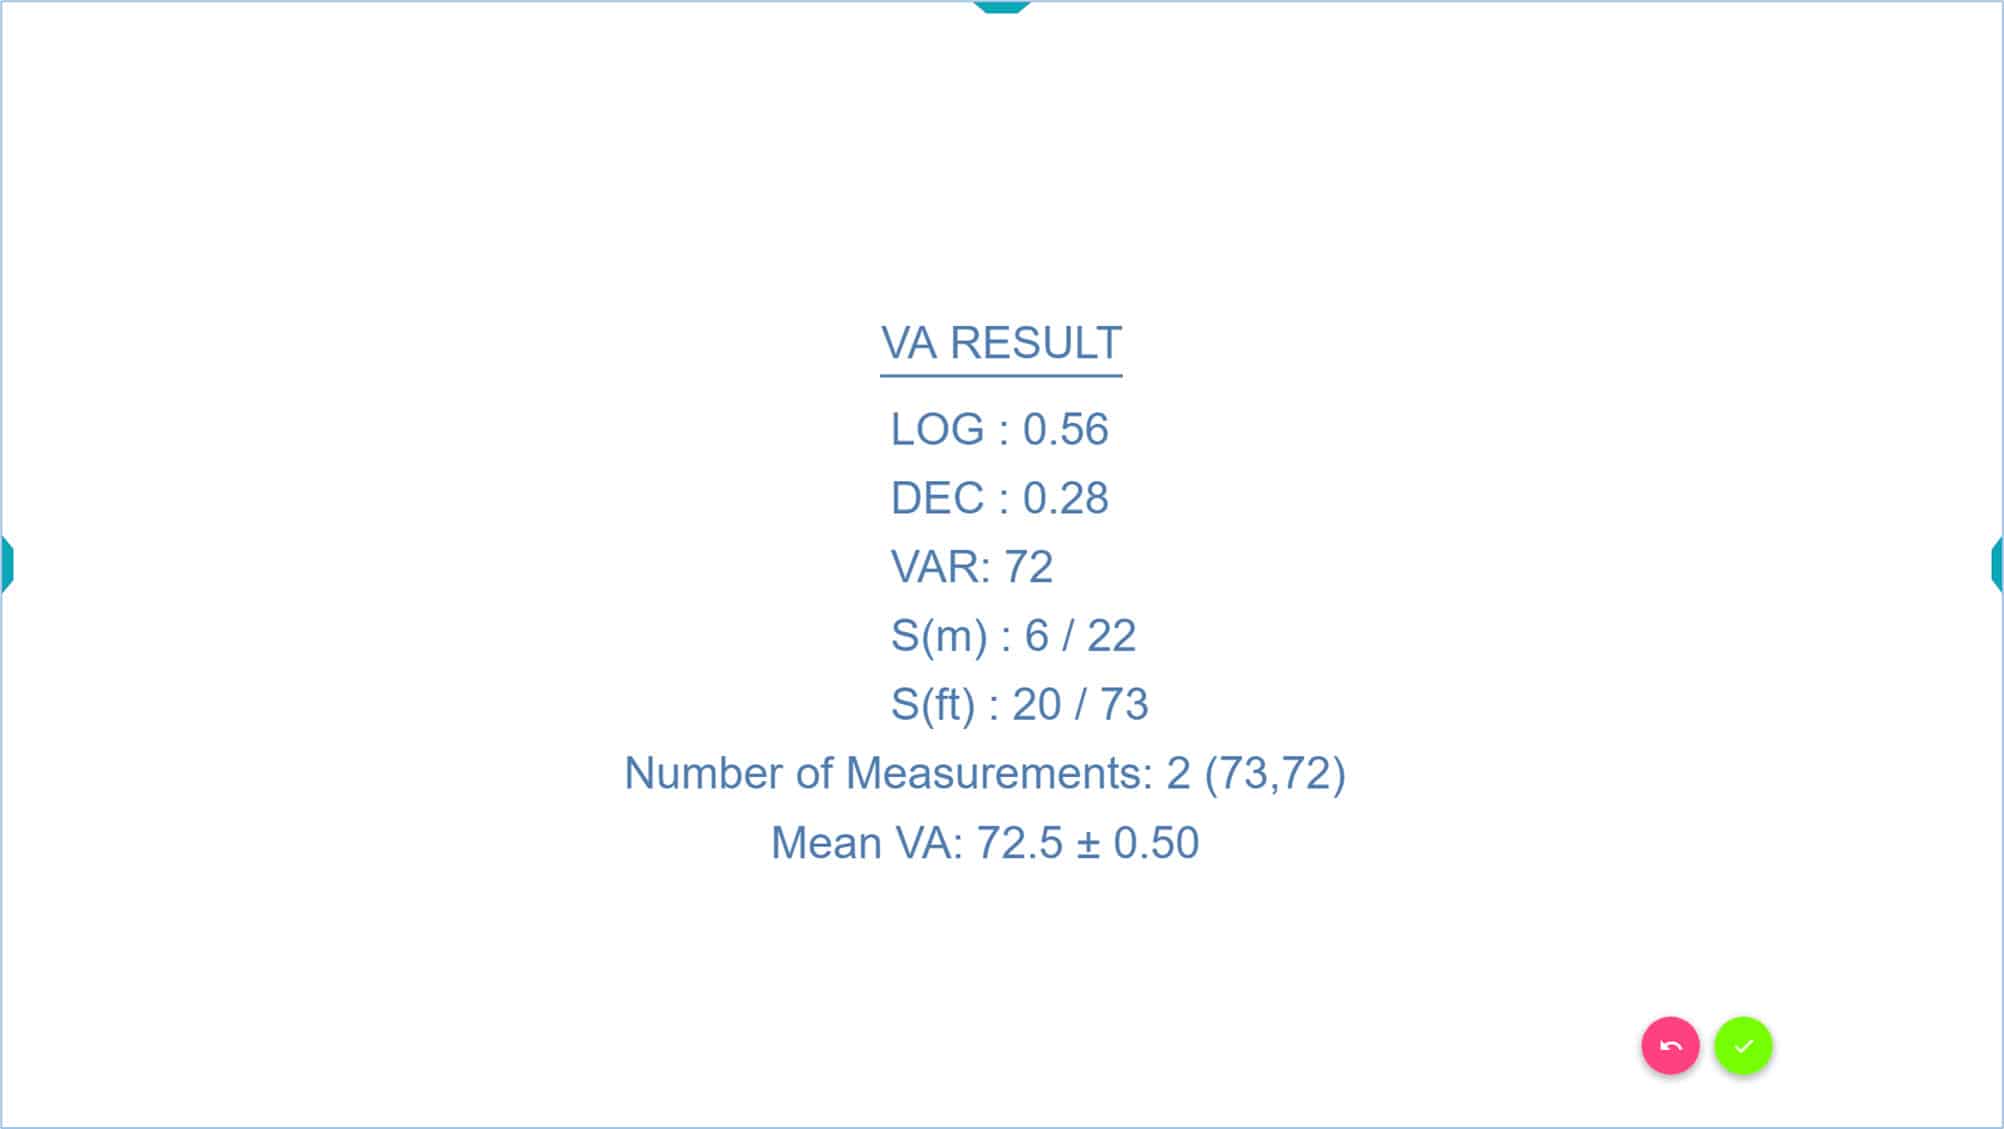
The automated measurement can then be repeated several times, and the unit will calculate the average VA and Standard Deviation values after each measurement.
Taking 3 to 5 repeated measures is also useful for precise monitoring of VA changes over time, as it allows determining the patient’s own criterion for significant loss of vision at subsequent consultations, which is indicated by the standard deviation. A change in the patient’s visual acuity greater than two standard deviations can be considered a significant change.
In the previous example, the standard deviation is 1.70 (double is 3.4 letters). Therefore, we know that if this patient’s VA changes by 4 letters or more in the future, it indicates an actual change in their VA. However, if it varies by only 3 letters, it might just be due to the patient’s slightly variable responses.
It should be noted that the automated VA measurement method can only be triggered from rows showing five letters (or symbols).
The automated VA measurement can be stopped any time by simply pressing on the “Escape” (Esc) key to return to the default VA chart starting screen.
The combination of the letters can be changed randomly anytime by pressing the “Z” key, for example, when changing the eye under evaluation.
Symmetrical Letter Chart #
The Symmetrical letters VA chart is specifically designed for paediatric visual assessment; letters are presented in single lines of 5 letters with constant contour interaction (it is recommended as a standard VA system for preschool and young age children).
Linear visual acuity with symmetrical letters (instead of symbols) provides a reliable and testable method of measuring VA in children from the age of about 2.5 years to 7 years. (4),(5),(6),(7) Furthermore, the task employed is similar to international standards for VA testing employed with adults. Therefore, using symmetrical letters VA charts will ease the transition and comparison between tests designed for children and those designed for adults.
The letters O, X, H, T, U and V (8),(4),(6) are easy to match, and are employed in the Optonet Vision Unit. The vision unit allows displaying a single line of five symmetrical letters with crowding bars:

Test Distance #
A test distance of 3 meters is recommended for VA testing to guarantee a greater collaboration, especially in younger or less motivated or intimidated patients.(9)
Matching or Naming Letters #
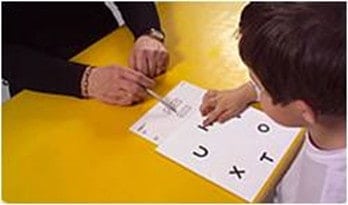
Prior to VA testing, training in letter matching is also recommended for younger children and for those unable or unwilling to name letters. The child is asked to identify and point to the same letters on a “matching keycard” that are shown on the computer screen, without having to name them. The matching key card consists of a sheet with printed symmetrical letters.
Training in Letter Matching #
Training in letter matching is required before VA testing; this can be carried out by the practitioner or by the parents. It can be very useful for the child to practice at home with their parents before the visual examination. For that, a printed “Matching Kit” is given to the parents.
The Matching Kit consists of several cards with single line symmetrical letters (surrounded by crowding) printed and a key card to match those letters. A single line of symmetrical letters card is shown by the parents, and the child will practice pointing to the matching letter on a key card.
This training could also be carried out with a digital animation that it is included in Optonet Webpage: Animation
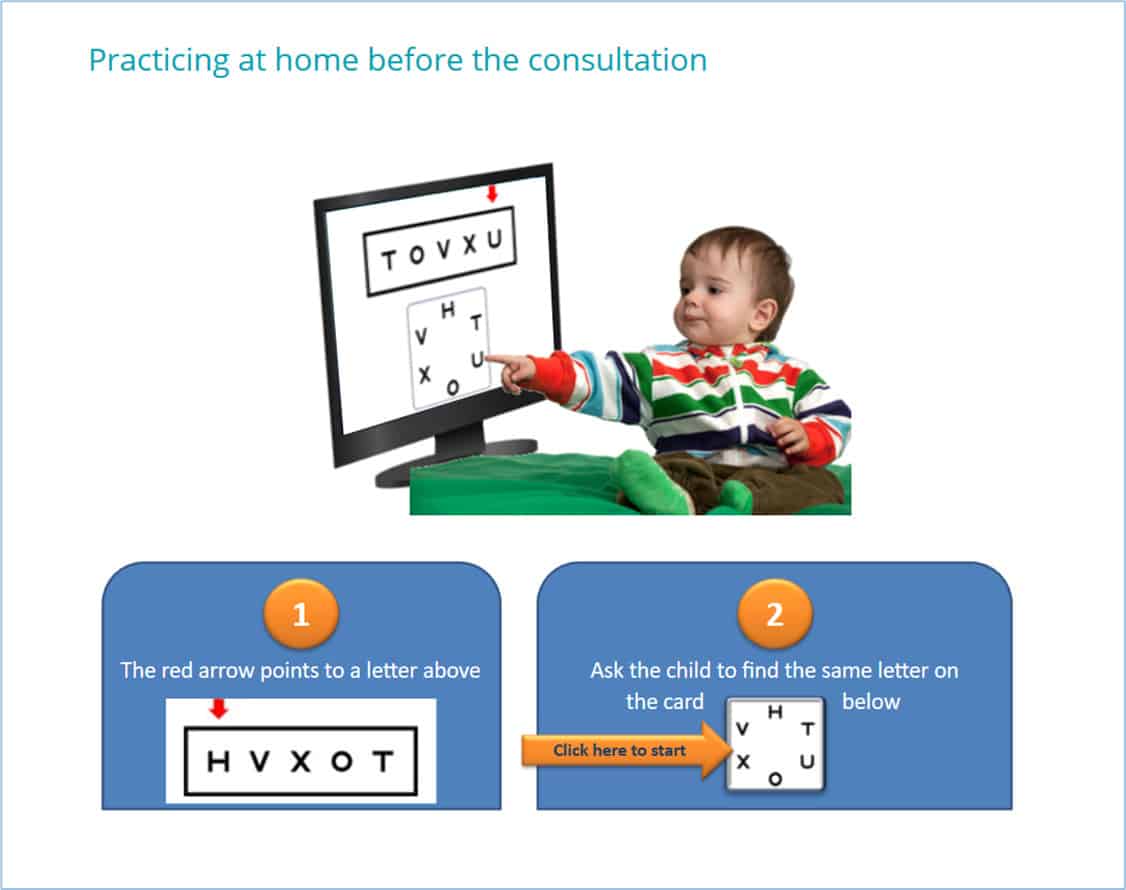
Whatever the method employed, the child will easily learn the dynamics of visual acuity testing, and his/her response to VA testing will improve significantly.
Modified Fast Procedure #
Similar to VA testing in patients > 6 years old, a modified fast procedure is employed to measure VA in children. This fast procedure consists of asking the child to read one isolated letter (surrounded by crowding bars) per VA level until a mistake is made.(3)
The up ↑ and down ↓ arrow keys/buttons can be employed to increase or decrease the size of the letters. Alternatively, the keys “+” y “-” can be used to modify the size of the letters.
Once the child has made a mistake, he/she is presented a single line of five letters (with constant contour interaction) of the preceding VA level and required to read the whole line, with no mistakes. We expect the patient to read correctly five letters of this row. If the child makes one or more mistakes at this starting level, he/she will be shown the preceding larger row. This step must be repeated upward every time the subject makes any error.
When a row is read correctly with no errors, the fast procedure becomes identical with the standard, i.e., asking the child to read all the rows downward until four or more mistakes are made on a line of five letters or symbols. (1)
This procedure significantly reduces test time, avoid tiredness and yields results that are as accurate as those obtained with the standard method. (3) This is particularly important since attention and cooperation time is limited in this age group.
It is recommended to start the VA testing binocularly (both eyes open) to build confidence in the procedure.
The Optonet Vision Unit allows isolation of letters, by simply clicking on the letter “L” of the keyboard ((L)etter) (or → arrow) and then “C” for (C)rowding. A single letter surrounded by bars is shown:
Example
Let us see this procedure through an example:
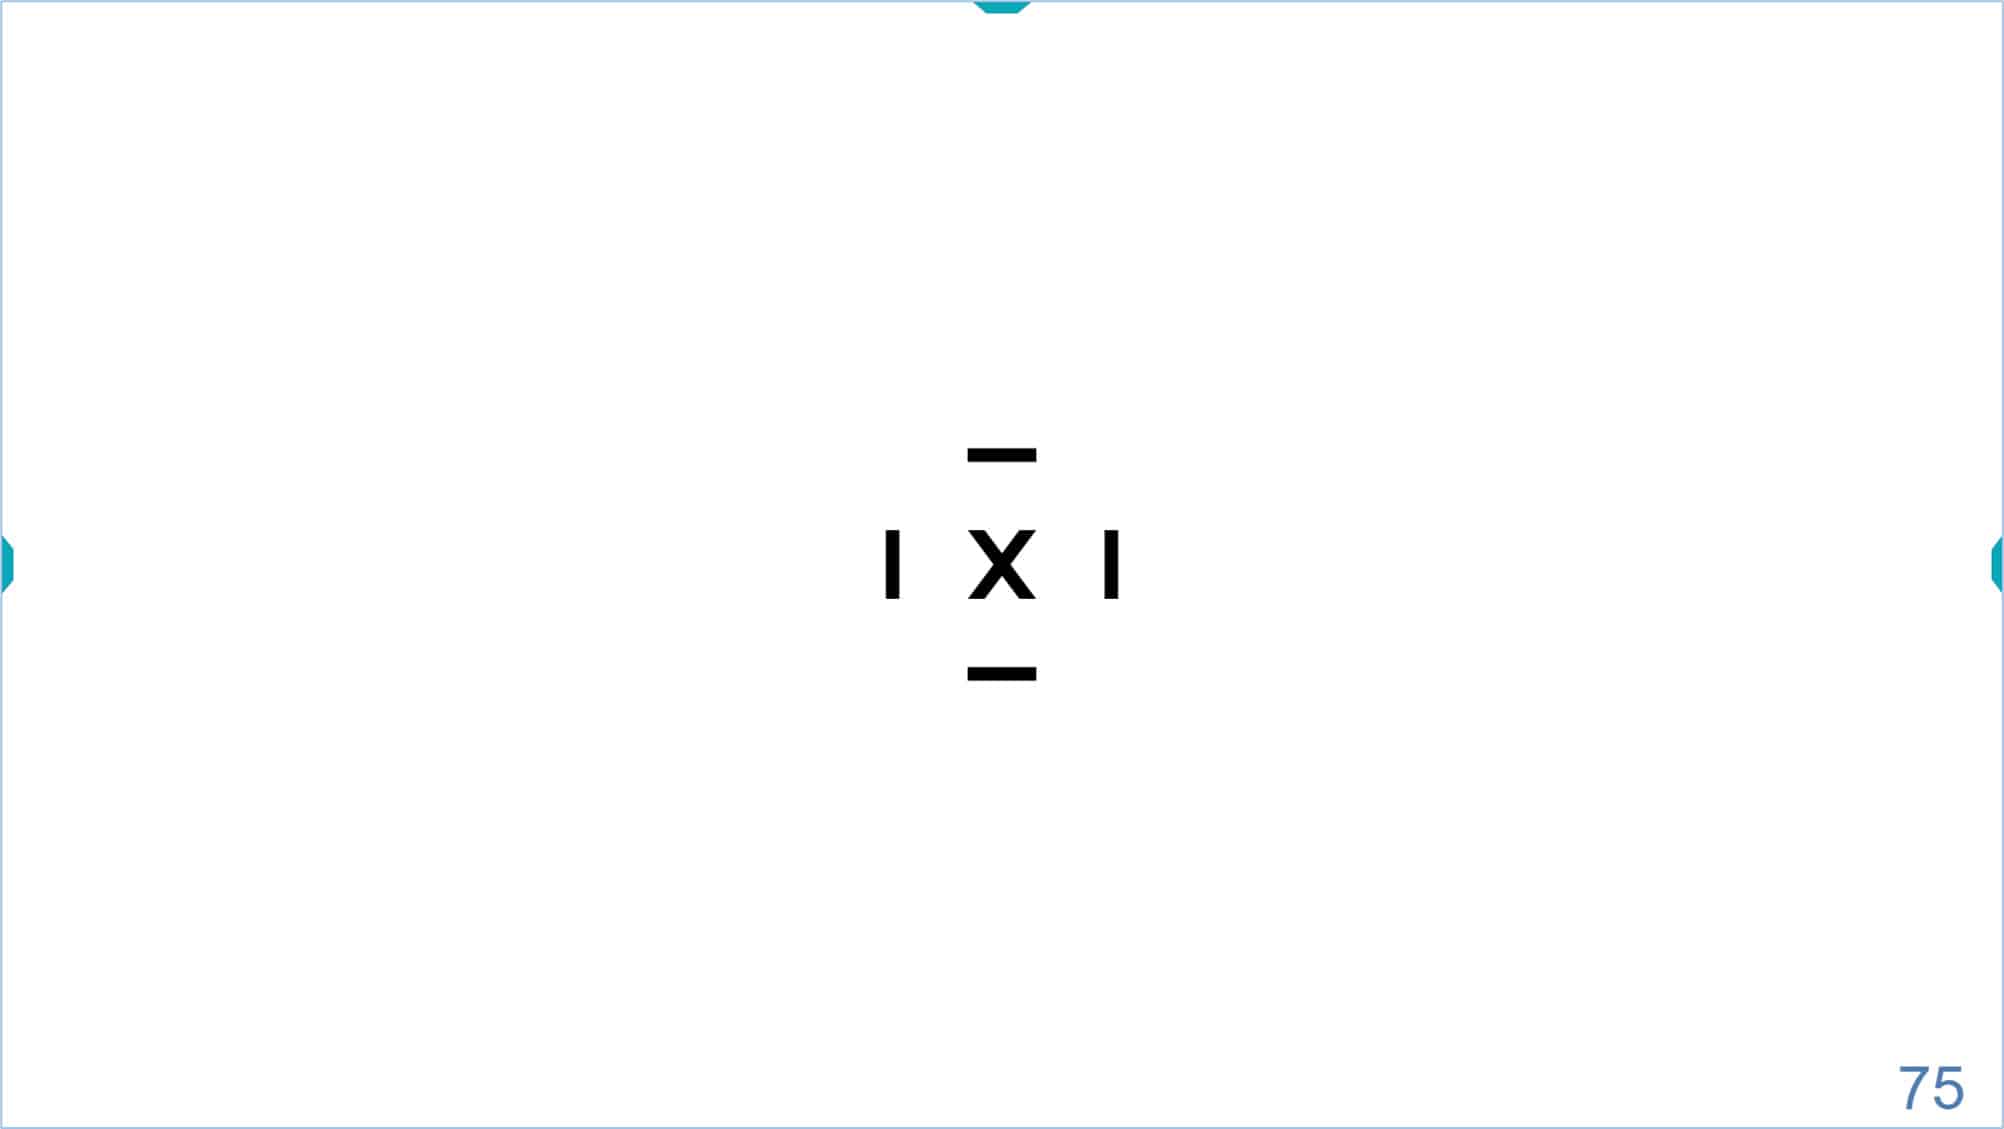
First, the patient is asked to read down isolated (single) letters binocularly (both eyes open) until a mistake is made. Let us assume that the first letter that the patient is unable to read correctly is the “X” which represents a VA of 75 VAR (Snellen 6/19, 20/63), as shown in the following figure (the VA value is shown in the lower right corner of the screen) (70 VAR can be recorded as binocular VA for single letters in this example).
The child is then asked to read monocularly a single line of five letters (with constant contour interaction) of the preceding VA level, i.e., 70 VAR, by simply pressing on the “R” key (from (R)ow) (or the “Enter” key) and then on the up ↑ arrow key/button (or “+” key) to adjust the size of the letters to the preceding level of VA (70 VAR as shown in the next image).

If one or more mistakes occur in this row, the patient will be asked to read the preceding row, (i.e., no mistake is allowed in this first row). The examiner will count the number of letters correctly identified by the patient and will press this number on the computer keyboard (as we have said, we expect to be the number 5).
Suppose the child read the whole line correctly and by pressing the number 5 on the keyboard the automated VA measurement will be started. The single line will decrease automatically in size and the patient will be asked to read this new smaller row of VA 75 VAR.

The above picture also shows the provisional automated VA score in the upper left corner of the screen (70 VAR), since the child could read all letters from the preceding row of VA 70 VAR.
Suppose the child can read correctly just three letters of the row of VA 75 VAR. Therefore, the number “3” will be pressed, and the following screen will be displayed with an additional row of letters (VA: 80 VAR). The upper left corner also shows the provisional VA score (70+3) = 73 VAR.

Suppose the patient misses all letters of the new row of 80 VAR, then the number “0” will be pressed. At this point the VA score results will be displayed in the five different notations: LogMAR, Decimal, VAR, Snellen (metric) and Snellen (imperial).
Once the automated VA measurement begins, the examiner presses the number of letters per line correctly identified on the keyboard (from 0 to 5). If, for any reason, another key is pressed the automated calculation is cancelled, and should be restarted.
Repeated Measurements #
It is recommended that at least two consecutive measurements of VA are taken per eye, and then averaged. Accordingly, once the first measure is completed, the examiner presses the “Enter”/OK key (or the pink button) to return to the VA chart. Conveniently, after pressing the Enter/OK key the row of letters from which the automated system was previously started will be shown on the screen (in our example 70 VAR), but with a different combination of letters to avoid memorizing (see next image).

Then the automated measurement can be repeated, and the unit will calculate the average VA and Standard Deviation values after each measurement.
This allows for quick, consecutive, automated measures of VA as the process is repeated from the same row of letters.
Some children easily memorize the letters. When changing the eye under evaluation, the distribution or combination of the letters should be changed randomly by pressing the “Z” key.
It should be noted that the automated VA measurement method can only be started from rows showing five letters (or symbols).
The program also allows the automatic calculation of VA from an isolated letter; we will describe this alternative method later.
The automated VA measurement can be stopped any time by pressing the “Escape” (Esc) key to return to the VA chart starting screen.
Broken Glasses Chart #
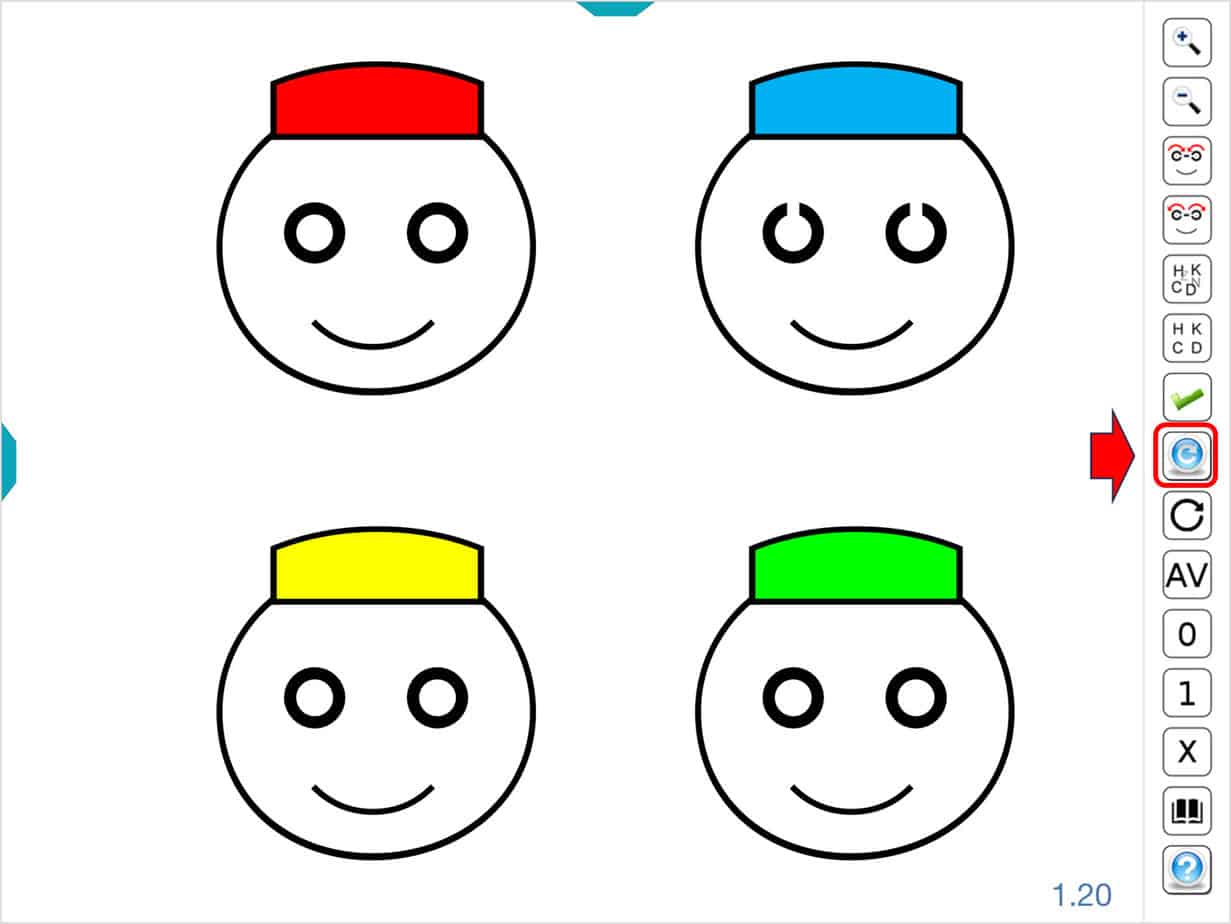
The Broken Glasses chart represents a test based on the Landolt C optotype with a four-alternative, forced-choice (four-AFC) task (smiling face with red, blue, yellow, or green cap).
Matching or Naming
Prior to VA testing, training in matching is also recommended for younger children and for those unable or unwilling to name the responses. The matching key card consists of a sheet with printed smiling faces with red, blue, yellow, or green caps.
To start, the largest 4 smiling faces that allow the computer screen are shown. In case of smaller children, only two large smiling faces can be displayed.
The child is asked to identify on a “matching keycard” by pointing to the smiling face with the same colour cap and position that shows the Landolt Cs (broken glasses) on the computer screen, without having to name them.
The practitioner will reduce the size of the smiling faces until the child makes a mistake. Then, the size is increased by one level to begin the automated measurement.
The Broken Glasses test differs from the previous visual acuity charts in that the child gives just one response for each screen. Instead of the usual five responses for each level of VA, as is the case with the symmetrical letter optotypes.
The automated measurement of VA for this chart works as follows:
Each time the child correctly identifies the face with the broken glasses, the practitioner will press the number “1” on the keyboard and each time the child makes a mistake, the practitioner will press the number “0”. Once the practitioner begins to enter these values, the program will consecutively and automatically show five different presentations for each level of visual acuity.
The “Broken Glasses Chart” is also different in that there are only four possible answers in each presentation (smiling face with red, blue, yellow, or green cap). Therefore, it is much easier for the patient to give a correct answer, even if they are not able to see the test. To solve this problem, the VA measurement will end when the child makes three or more mistakes (two correct responses or less) (1) at a certain level of VA.
Example
Let’s look at an example:
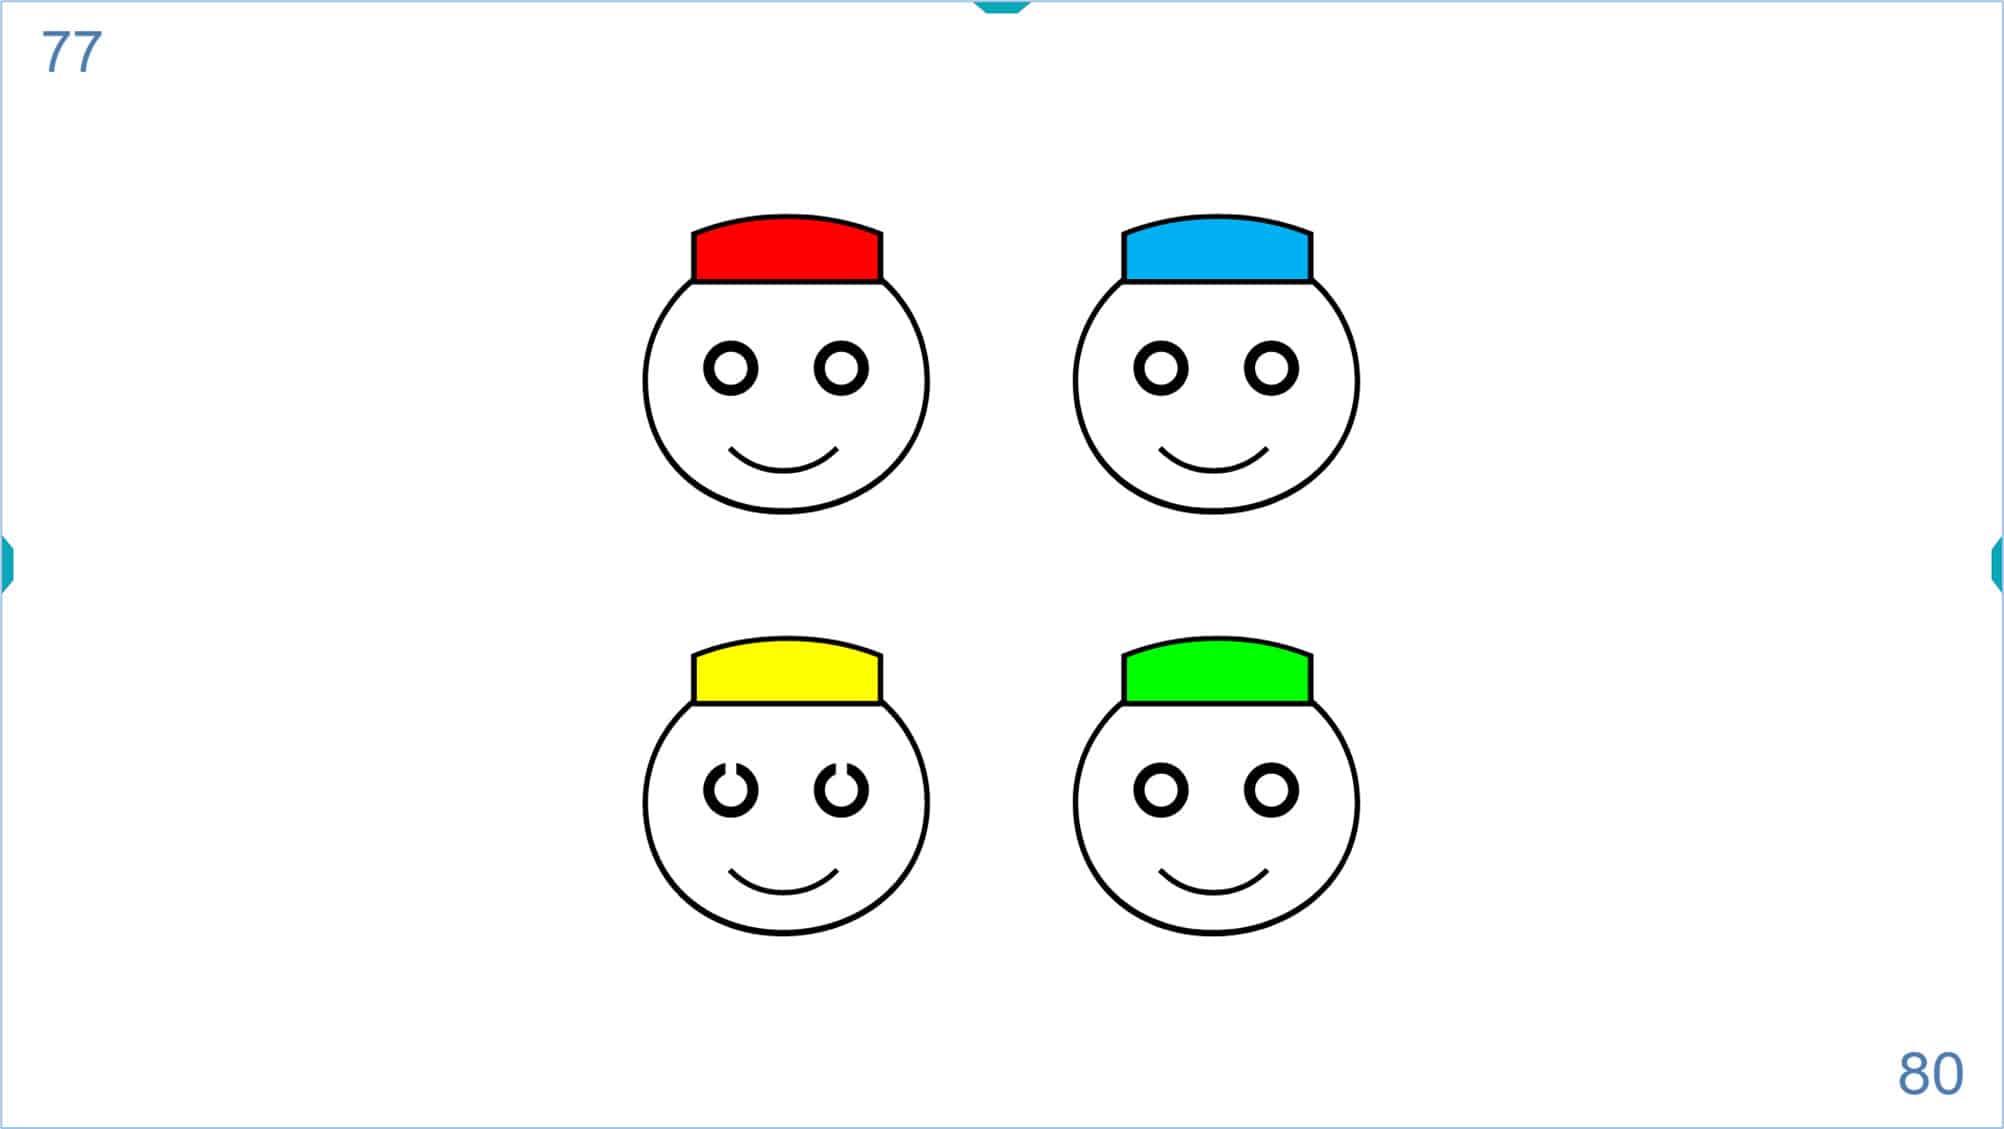
Suppose the first screen that the child is unable to identify corresponds to a VA of 80 VAR. The previous level of 75 VAR will be shown to start the automatic measurement.

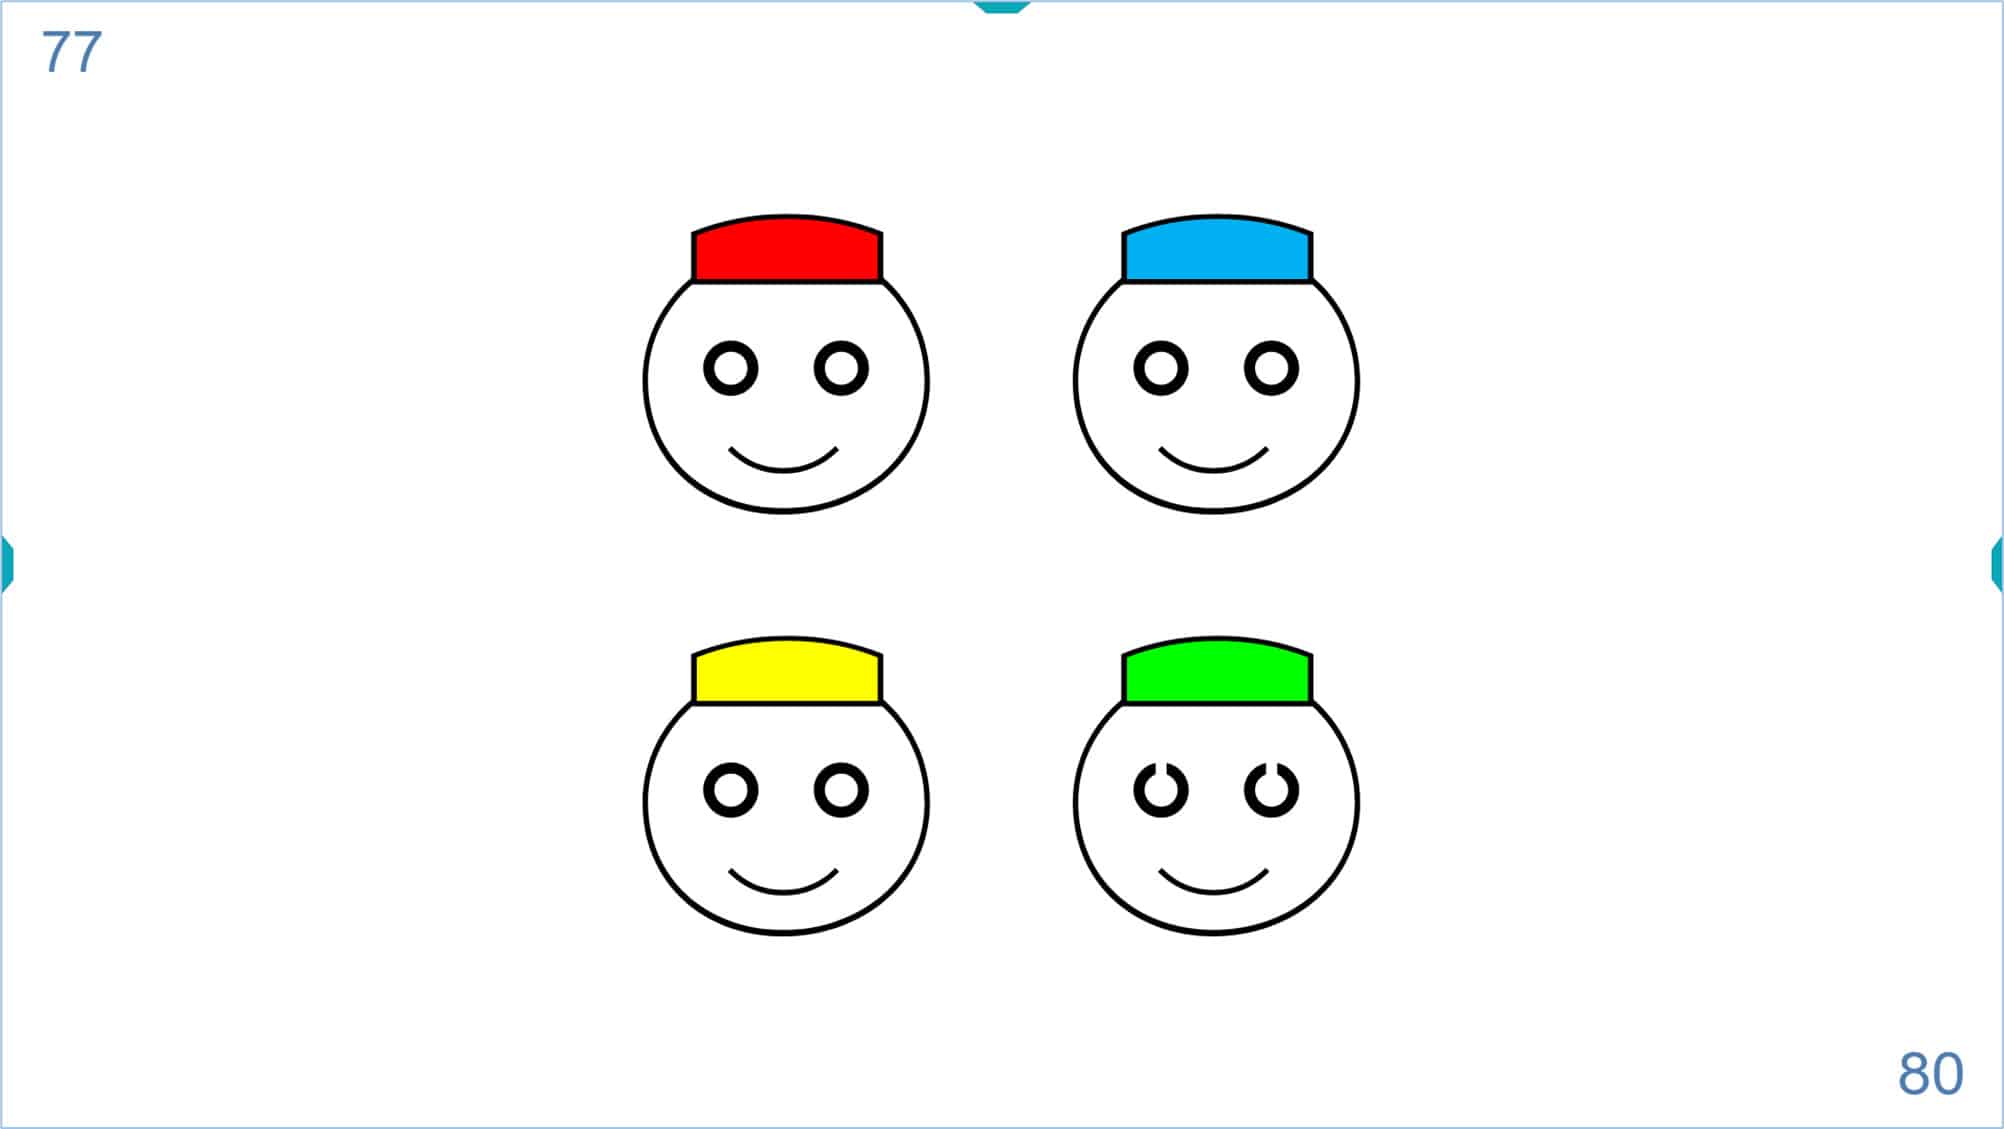
The child correctly identifies the smiling face, and the practitioner presses the number “1” on the keyboard. Another screen of the same level of VA appears, and the child again makes a correct response. The practitioner again presses the number “1”. The child gives a correct answer 5 consecutive times, and the application shows the next level of VA: 80 VAR (no mistakes are expected in the first level).

The child again makes a correct response and after pressing the “1” key, the program will display a different and random option of the same VA 80 VAR:

The child again answers correctly and the key (“1”) is pressed. The program shows another different and random option of VA 80 VAR.
The child fails the response and the wrong key (the “0”) is pressed. Another different and random option of VA 80 VAR is displayed.
The child again makes a mistake, so the wrong key (“0”) is pressed and another different and random option of VA 80 VAR is displayed. Note that the value of the provisional VA in the upper left corner of the screen has not varied during the two mistakes.

The program will show another different and random option of VA 80 VAR. The child answers correctly and the key (“1”) is pressed.
Since the child has responded correctly on 3 out of 5 occasions at a VA level of 80 VAR, the program automatically switches to the next VA: 85 VAR.
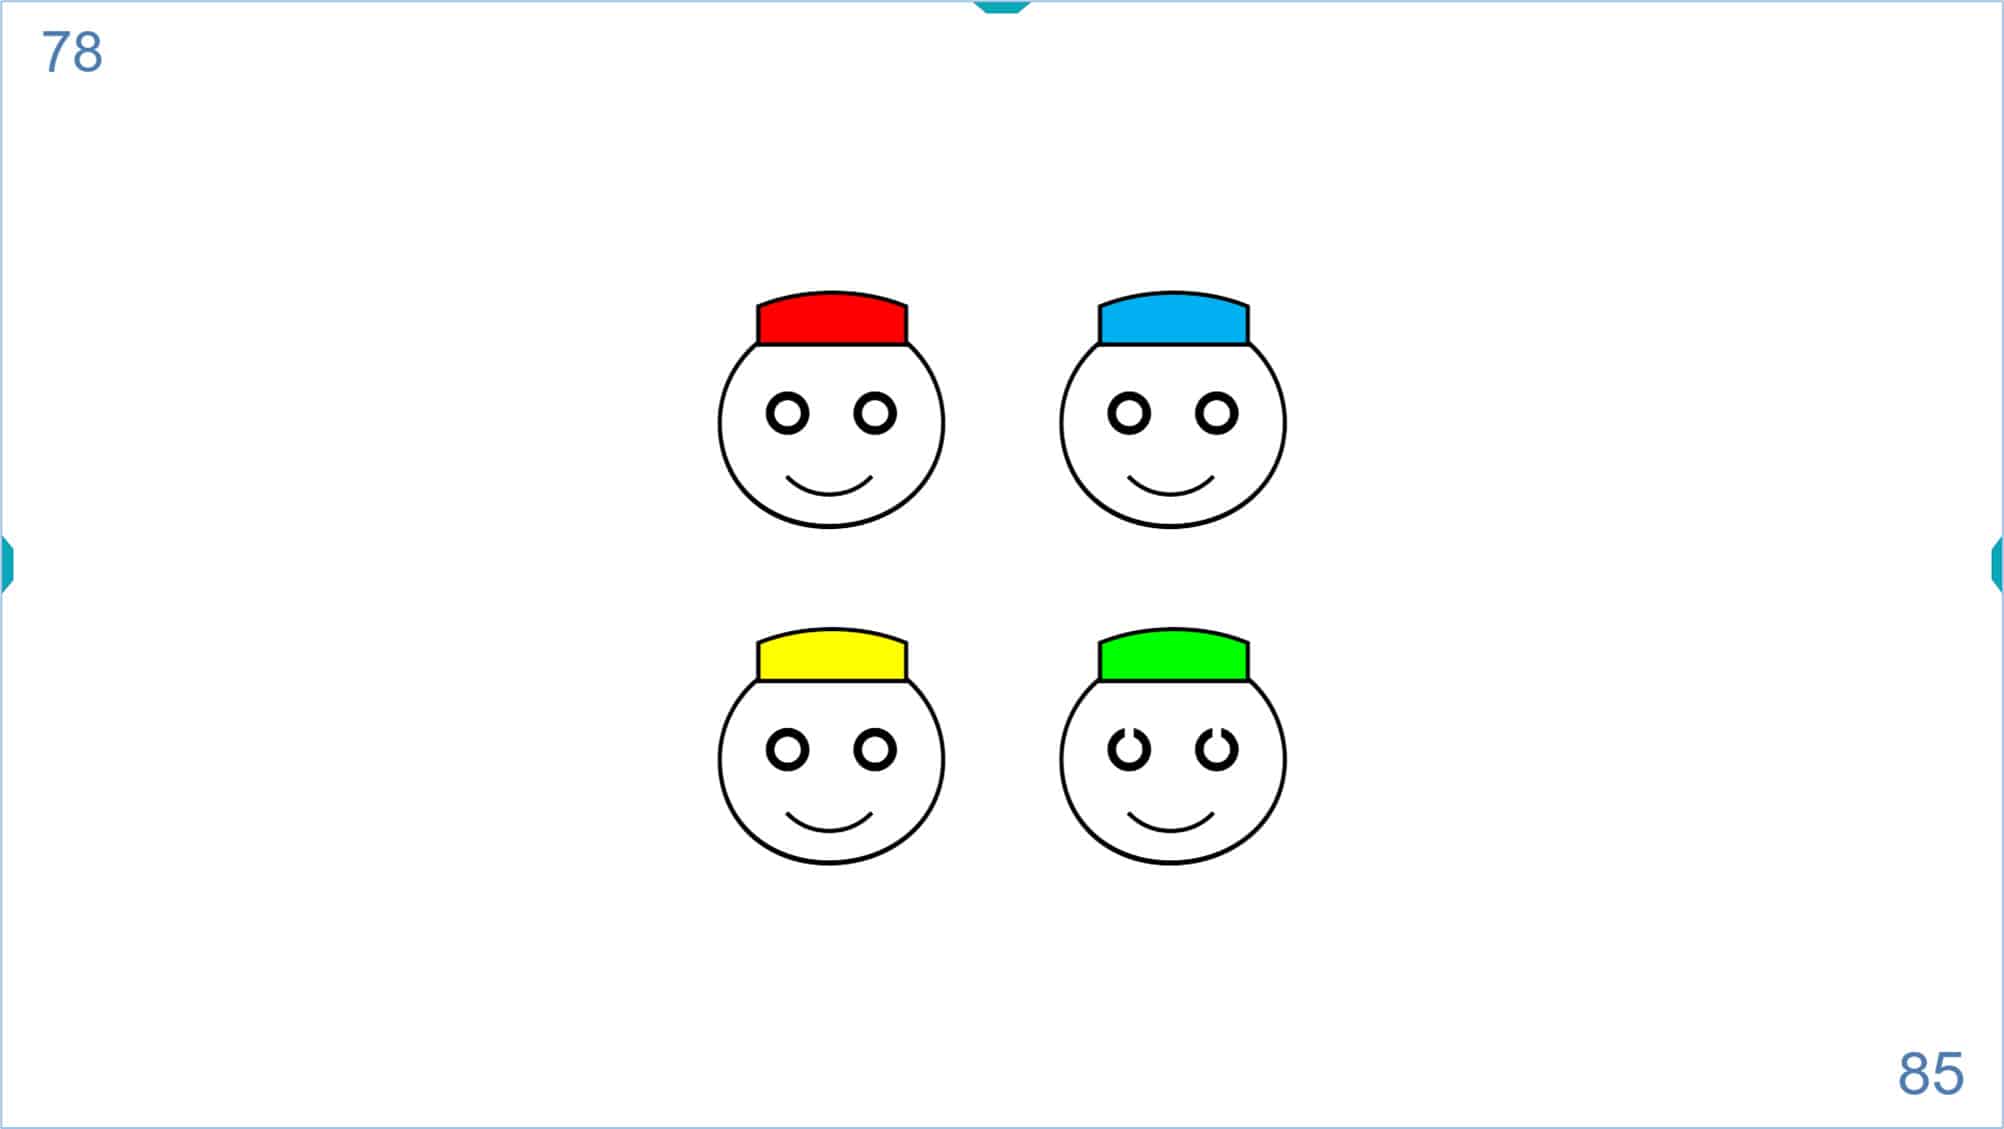
Looking at the number in the upper left corner of the screen, notice the child’s VA is 78 at this point. This is because the child saw five presentations of the VA 75, but gave just three correct answers at VA level 80 (75 + 3 = 78).
The program will continue to show five different and random options consecutively for each VA level. Continue to press “1” for each correct answer and a “0” for each incorrect answer, until the child makes three or more mistakes for a certain visual acuity. The process is then automatically terminated and the child’s VA value is displayed on the three LOG, VAR, Senellen, and Decimal units.
Similar to the rest of VA charts, the automated measurement can be repeated, and the unit will calculate the average VA and Standard Deviation values after each measurement.
Tablets and Remote Control #
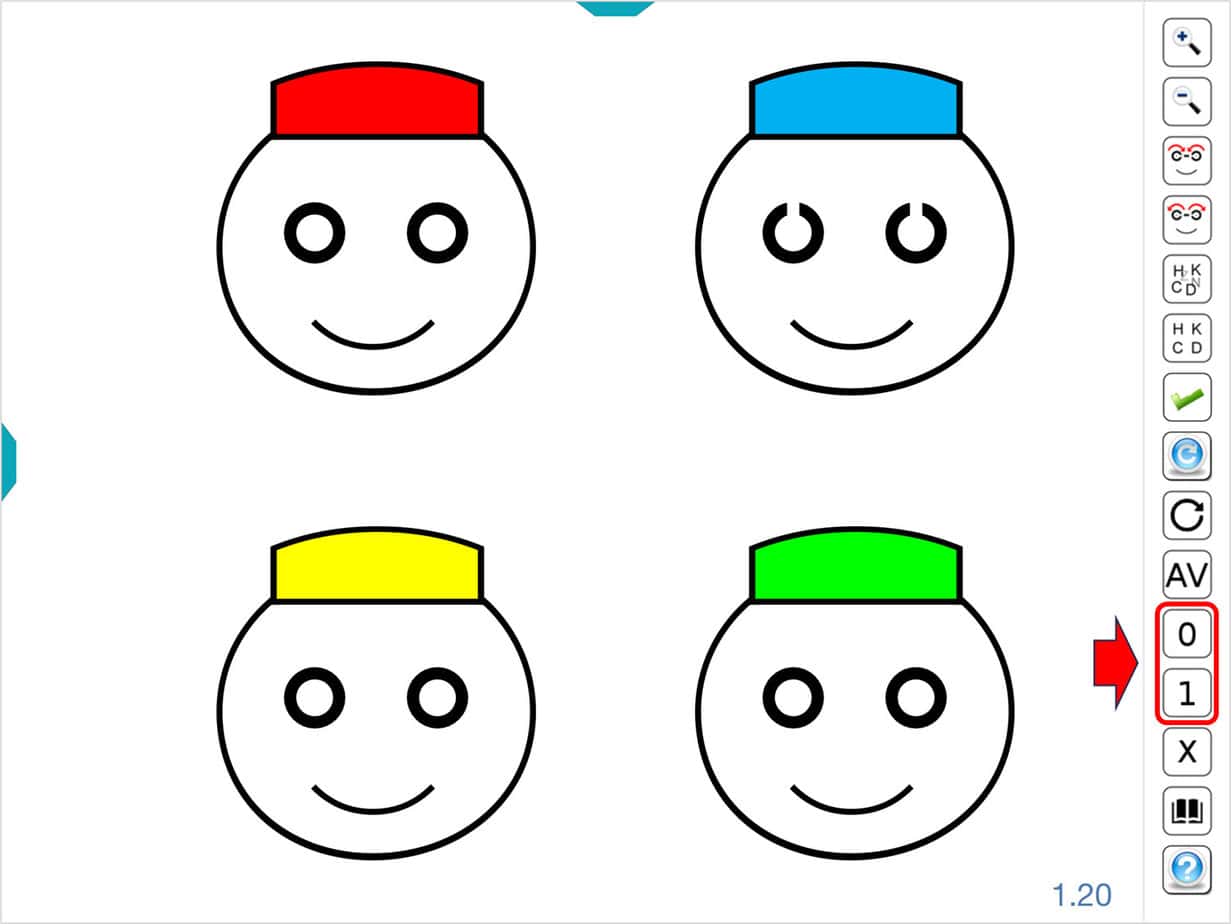
If we use a tablet to display the VA charts, the tool menu includes buttons with numbers from 0 to 5, allowing us to perform automatic calculation. In the case of the “broken glasses” test, only the buttons with numbers “0” and “1” are displayed.
The tool menu also includes a new blue button for repeated VA measurements.
On the results screen, a pink button is also displayed to repeat the measurement.
Additionally, if we use a tablet as a remote controller, the numbers and the blue button will also be displayed in the tool menu.
References #
1. Carkeet, A. (2001). Modeling logMAR visual acuity scores: effects of termination rules and alternative forced-choice options. Optometry and Vision Science: Official Publication of the American Academy of Optometry, 78(7), 529–538.
2. Bailey, I. L. & Lovie-Kitchin, J. E. (2013). Visual acuity testing. From the laboratory to the clinic. Vision Res. doi:10.1016/j.visres.2013.05.004
3. Camparini, M., Cassinari, P., Ferrigno, L. & Macaluso, C. (2001). ETDRS-fast: implementing psychophysical adaptive methods to standardized visual acuity measurement with ETDRS charts. Invest. Ophthalmol. Vis. Sci. 42, 1226–1231.
4. McGraw, P. V. & Winn, B. (1993). Glasgow Acuity Cards: a new test for the measurement of letter acuity in children. Ophthalmic Physiol. Opt. J. Br. Coll. Ophthalmic Opt. Optom. 13, 400–404.
5. McGraw, P. V., Winn, B., Gray, L. S. & Elliott, D. B. (2000). Improving the reliability of visual acuity measures in young children. Ophthalmic Physiol. Opt. J. Br. Coll. Ophthalmic Opt. Optom. 20, 173–84.
6. Salt, A. T., Wade, A. M., Proffitt, R., Heavens, S. & Sonksen, P. M. (2007). The Sonksen logMAR test of visual acuity: I. Testability and reliability. J. AAPOS Off. Publ. Am. Assoc. Pediatr. Ophthalmol. Strabismus Am. Assoc. Pediatr. Ophthalmol. Strabismus 11, 589–96.
7. Sonksen, P. M., Wade, A. M., Proffitt, R., Heavens, S. & Salt, A. T. (2008). The Sonksen logMAR test of visual acuity: II. Age norms from 2 years 9 months to 8 years. J. AAPOS Off. Publ. Am. Assoc. Pediatr. Ophthalmol. Strabismus Am. Assoc. Pediatr. Ophthalmol. Strabismus 12, 18–22.
8. Sheridan, M. D. (1974). What is normal distance vision at five to seven years? Dev. Med. Child Neurol. 16, 189–195.
9. Atkinson, J., Anker, S., Evans, C., Hall, R. & Pimm-Smith, E. (1988). Visual acuity testing of young children with the Cambridge Crowding Cards at 3 and 6 m. Acta Ophthalmol. (Copenh.) 66, 505–8.